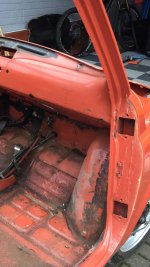
General Introduction and my new 1969 500L

Currently reading:
General Introduction and my new 1969 500L

The rear spring top mounts are basically a metal cup that sits in the top of the spring and then a rubber cup that sits between that and the bodywork. You should be able to prise them off with a screwdriver or something suitable as its only the friction of the rubber holding them in place.
With regard to the front spring, if you had the original Fiat tool then it would be a piece of cake to remove and re-fit the spring but seeing as these aren't readily available then you have to improvise. I'll assume the spring is still attached to the front hubs. Take the weight of one side front hub with a hydraulic jack. Remove the bolt attaching the spring to the front hub. With the weight still on the jack remove the same side spring mount bolts holding that side of the spring to the car. As you release the weight off the jack that side of the spring will basically want to touch the floor as it tries to bend back on itself. Repeat for the other side. Be careful if you have the car on axle stands that you dont lift the car off the stands. It sounds a bit scary but when you get stuck into it it starts to make sense. Refitting the spring is a lot harder than removing it but you're a way off that stage yet!
Good luck
 
Removing the spring with no suspension attached is not difficult at all and requires no special tools--just care! Refitting it AND the front suspension is quite different. Basically the Fiat tool was just a 'spring flattening' device One can be made up by welding a couple of plates across a section of 'T' bar (long enough to fit just inside the spring end bushes)--2 long 'square' U bolts, with long threaded sections, go over the spring and through holes in the cross plate (1 hole per side per plate)--do up the nuts and you will effectively flatten the spring, to the point that you can easily bolt up the uprights to it. If the 'T' of the 'T' bar is wide enough you may get away not needing the cross plates.
thumb.gif
smile.gif
 
Thanks Paolo! Rear spring top mounts now removed. A tiny bit of rust was lurking under one of them which will be removed at the weekend.

We'll prob have a crack at removing the leaf spring at the weekend now I know it's doable without the tool. It's the only part remaining that won't have been refurbished or replaced so it would be a shame not to really.

Thanks all!
 
Hi Al,

Thanks for the tips.

Regarding the leaf spring: I would have removed it but I don't have the correct tool and from what I read, it's not something to be tackled without it? Also, it was covered in underseal and appears to be in good nick. If I can get hold of the tool I'd take it off and replace any parts that required it.

The rear spring top seatings - how are these removed? I wasn't aware that they came off.

We don't have any specialist tools, just standard home garage stuff. Neither of us have tackled anything like this before. My husband is familiar with the mechanical side of things as he services and maintains our other cars but in terms of restoration and bodywork this is all new to both of us.

Cheers,

Katie

Hi Katie,

I think Paolo66 and the hobbler have answered your questions above very comprehensively (y)
Iirc, Fiat called the rear spring seat rubber a 'cushion' or 'cushion pad', I think the idea being to try to reduce the amount of vibration from road surfaces, tyre noise etc. being transmitted into the bodyshell.

With the front spring removed, you'll be able to finish cleaning, checking and painting the area above much easier and to your usual very high standards. :worship:
Don't worry about refitting the front spring, I'm sure by then you'll have figured out a suitable method, Tom's method sounds very good..:idea:

Love your new air compressor, should be great for spraying. Mine's tiny in comparison. :eek:

Keep up the great work and post pics as and when you can.
Any difficulties, just holler and we'll all try to help. (y)

Regards,

Al.
 
Last edited:
Thanks Paolo! Rear spring top mounts now removed. A tiny bit of rust was lurking under one of them which will be removed at the weekend.


We'll prob have a crack at removing the leaf spring at the weekend now I know it's doable without the tool. It's the only part remaining that won't have been refurbished or replaced so it would be a shame not to really.


Thanks all!


You'll probably want to have a crack at refurbishing the leaf spring whilst it's off. If you look at my restoration thread Project Paolo you will find how I did mine. You basically replace the rubber bushes including the centre one. Strip the spring down and rub each leaf down. Etch prime and paint. You can buy new plastic inserts. I put anti scuff grease between each leaf and plastic to keep friction down

Damian

Hi Damian,

Did you paint the surfaces of the leaves once cleaned up? We have stripped the dirt and rust off, and will treat the pitted areas and then plan to etch prime and paint them. Is this advisable or do the areas that contact the plastic insterts need to be left shiny steel to aid with suspension movement?

Thanks,

Katie
 
Last edited:
Hi Damian,

Did you paint the surfaces of the leaves once cleaned up? We have stripped the dirt and rust off, and will treat the pitted areas and then plan to etch prime and paint them. Is this advisable or do the areas that contact the plastic insterts need to be left shiny steel to aid with suspension movement?

Thanks,

Katie


I just cleaned them up with a flap disc on my grinder down to bare metal. I then etch primed them and painted them black to match the rest of the suspension. I replaced the two end bushes and the rubber stop in the centre. I also replaced the two outer clamps as well. I put anti scuff grease between each leaf and plastic strip to aid friction. Not used originally but a useful modification I thought. Good to see you got yours off okay. I also replaced the rubbers in the two mounts. The mounts themselves I cleaned up and refurbished
 
I just cleaned them up with a flap disc on my grinder down to bare metal. I then etch primed them and painted them black to match the rest of the suspension. I replaced the two end bushes and the rubber stop in the centre. I also replaced the two outer clamps as well. I put anti scuff grease between each leaf and plastic strip to aid friction. Not used originally but a useful modification I thought. Good to see you got yours off okay. I also replaced the rubbers in the two mounts. The mounts themselves I cleaned up and refurbished

Great, thanks! I'll post some pics later of the process but it went very smoothly thanks to all the advice (y)
 
Hi all,

Getting around to ordering my parts list this week. I am planning to order a 126 650cc engine with 500R box. I have a few questions before I order...

Whats the difference between a box with 500R internals and 126 internals? Both have synchro on gears 2, 3 and 4 right?

Do I need a 126 fuel sender or a 500 one? I have read I require a 126 one and need to modify the float for the 500 tank - is that correct?

Also, today is exactly 1 year since I bought my car :woot:

Thanks in advance!

Katie
 
The only reason to buy a 126 sender is if you plan to run a return line to it from your 28 imb carb. There are 3 options available when you have a 28 imb carb.
1 - run a return line from the carb through the car and back to the tank. You will need a 126 sender unit for this.
2 - run a line from the carb return around the back of the engine and join it to the the fuel supply line via a t piece just before the pump.
3 - block off the carb return completely.
Each has its own merits and downfalls and each forum member with a 28 imb carb will champion a different method. I have done number 3, never had a problem BUT I have blanked it off properly. Removed brass pipe, tapped the hole and fitted a button head screw with a viton dowty seal and loctited it in. Number 2 would be my next option. Easy and cheap. Wouldnt entertain number 3. Too much faff and expense.
Dont know about the gearbox. I would guess the final ratios might be different
 
Another parts related question (I did a search but I don't think anyone else has asked, maybe a sign that it's straightforward!) are the L model windscreen rubbers interchangeable with the F and R model? I'm fairly certain they are but before I order I wanted to check. I'm not overly keen on the plastic shiny strip that comes on the L model so I wanted to fit ones without the channel instead. Thanks.
 
It's the same windscreen , so a windscreen rubber for an F or or R should fit. You're doing a great job on the restoration and you've got the best equipped and organised garage I've ever seen. I've got to get my garage properly organised as I spend half my time searching out tools. The protective sheet for the floor is a good idea and one that I'll be copying!
 
It's the same windscreen , so a windscreen rubber for an F or or R should fit. You're doing a great job on the restoration and you've got the best equipped and organised garage I've ever seen. I've got to get my garage properly organised as I spend half my time searching out tools. The protective sheet for the floor is a good idea and one that I'll be copying!

Great, thank you!

Cheers :) The floor protection is a must. We have a Mototile tiled floor underneath and it would be destroyed by now if it wasn't for the sheeting.
 
Katie, does your car have little slots at each bottom corner of the windscreen frame? The later cars have a corresponding notch in the rubber.... I don't know about the ones before"F". My old "L" had narrow tubing that fitted those slots to take away the water that gathers there through gravity. I thought I'd be clever and as my car had no traces of the small pipes, I didn't make the holes as the drained water simply goes down the insides of the wings and starts to rust the join. But I've been plagued by water leaking to the inside as a result. The problem may be made worse by the fact that the seals seem to have those slots anyway from new. I'm interested to know if the replacement seal will have the slots and how you will deal with the conundrum. I have a theory that you might be avoiding the rain in your car anyway.?
 
Katie, does your car have little slots at each bottom corner of the windscreen frame? The later cars have a corresponding notch in the rubber.... I don't know about the ones before"F". My old "L" had narrow tubing that fitted those slots to take away the water that gathers there through gravity. I thought I'd be clever and as my car had no traces of the small pipes, I didn't make the holes as the drained water simply goes down the insides of the wings and starts to rust the join. But I've been plagued by water leaking to the inside as a result. The problem may be made worse by the fact that the seals seem to have those slots anyway from new. I'm interested to know if the replacement seal will have the slots and how you will deal with the conundrum. I have a theory that you might be avoiding the rain in your car anyway.��

Hi Peter,

I can't see any slots but I do have drainage channels on both the front and rear. On the front they are on the inside at the very top of the dash, on the rear they are within the rubber recess. Is that what you are referring to?

I don't plan to be taking it out in the rain often but I do live next to the Peak District so its inevitable I'll be out in the rain at some point.

Thanks,

Katie
 
Last edited:
These ones? Top right in photo?
 

Attachments

  • IMG_4480.jpg
    IMG_4480.jpg
    115.7 KB · Views: 41
Thats the ones. The wires come into these, 1 per side, get tucked behind the window rubber and come out the top and into the rear view mirror
 
Ah ok. I don't see anything other than those on the front end so I assume I don't have the slots Peter is referring to. I do however remember drainage tubes that went into the front wings from the windscreen area. I'll go back through my photos to investigate.
 
Last edited:
Back
Top