General Franko the 1971 500L

Currently reading:
General Franko the 1971 500L

Don't know how far away you are from painting Sean but I am definately doing ours 433 Azzuro acquamarina. It's either that or the modern equivalent which is Cha Cha Blue. I was thinking the modern paint would be better and also be easier to get hold of in the future for any scratches etc. If I beat you to the finish line of getting it painted you can use my photos to try and help you make up your mind. Mine will have black interior

Damian
 
Steering wheel & column refurbished.
Amazingly despite looking grotty, rusty & tired, the column was in very good shape & no signs of wear.
thumb.gif

Stripped it right back, repainted everything & cleaned it all.
Just have the steering wheel boss to polish when the paint has cured properly on the steering wheel.
There is a crack in the black rim as on Tony's, I just need to find some decent black repair kit for this as I may leave the rim natural worn finish.
 

Attachments

  • IMG_7721.JPG
    IMG_7721.JPG
    387.8 KB · Views: 42
  • 114 1.JPG
    114 1.JPG
    3.2 MB · Views: 38
  • IMG_4040.JPG
    IMG_4040.JPG
    460.7 KB · Views: 46
  • IMG_7715.JPG
    IMG_7715.JPG
    447.9 KB · Views: 36
  • IMG_7720.JPG
    IMG_7720.JPG
    439 KB · Views: 33
  • IMG_7931.JPG
    IMG_7931.JPG
    436.5 KB · Views: 35
  • IMG_7930.JPG
    IMG_7930.JPG
    340 KB · Views: 36
  • IMG_7929.JPG
    IMG_7929.JPG
    380.8 KB · Views: 36
  • IMG_7928.JPG
    IMG_7928.JPG
    440.2 KB · Views: 31
Judging by that last photo you're getting very brave! Makes it slightly more complicated that you have asteering lock. Some of the "L" photos that I have seen from abroad seem to have the ignition key in the centre of the dash like the "F".
 
Sean there is some epoxy putty called Milliput black that may do that job on the steering wheel?

All looking good though, I like the period Fiat horn button design.

Tony
 
A few little jobs underway.
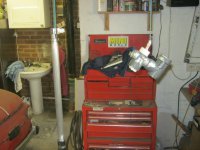
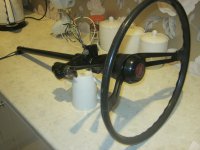
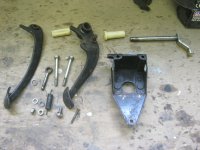
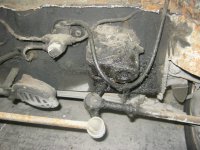
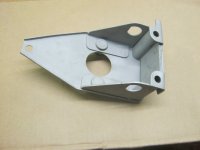
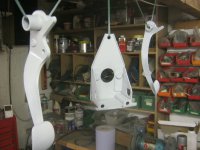
Stripped the pedal box assembly and gave it all a good clean of grease & dirt.
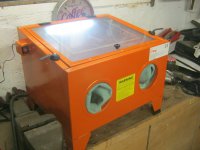
As soon as I get my sandblasting cabinet all the parts will get blasted, painted and re assembled. I am amazed at the very little signs of wear on most of the mechanical parts I have touched so far. This was clearly a low mileage vehicle that had just been left to rust.


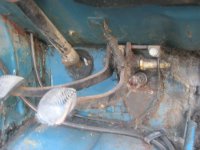
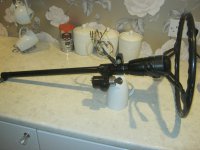
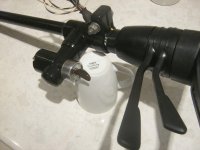
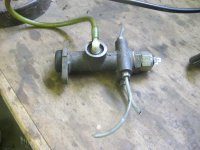
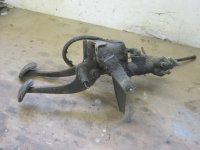
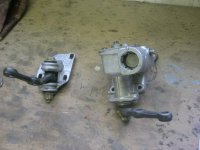
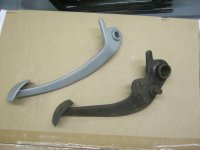
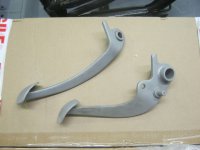
Cleaned the steering box & idler lever, they were both covered in oil, dirt and a layer of some black gunge. Good thing is they cleaned up really well.
I need a couple of new bushes for the idler lever, and will probably change the seals & gaskets in the steering box for good measure.
Only one snag so far, I cannot remove the filling plug. It is seized solid. I have left some wd40 on it but I thing I might have to resort to drastic measures to remove it. There doesn't appear to be any wear on the steering box though.
smile.gif


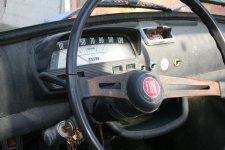
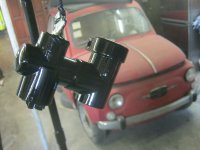
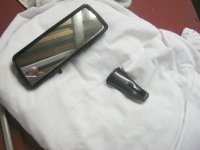
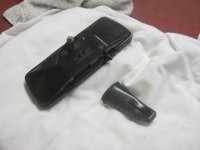
I also decided to have ago at the rear view mirror. I took it apart, cleaned it with some light compound polish to remove the dirt and polish some of the dull patches that were caused to being exposed to the elements. Then gave it a coat of polymer polish and it now looks shiny again.
The mirrored glass could do with replacing as it has some patina (for the benefit of Peter) that I would prefer not to live with. I will have to get a piece cut when I am out on my travels.
I was also shocked to find the bulb still working. Although Tony I think you mentioned replacing yours with an LED one. Where did you get that from?


Well that's it for now, I have decided to have a rest from the bodywork for a little while. I am going to focus my attention on getting all the other components refurbished. That way, when the shell is painted I can get them fitted and not worry about the car getting damaged.
 

Attachments

  • IMG_8144.JPG
    IMG_8144.JPG
    331.8 KB · Views: 27
  • IMG_8141.JPG
    IMG_8141.JPG
    439.9 KB · Views: 27
  • IMG_8137.JPG
    IMG_8137.JPG
    505.6 KB · Views: 30
  • IMG_8129.JPG
    IMG_8129.JPG
    376.9 KB · Views: 31
  • IMG_8147.JPG
    IMG_8147.JPG
    404.6 KB · Views: 29
  • IMG_8145.JPG
    IMG_8145.JPG
    325.7 KB · Views: 27
  • IMG_8146.JPG
    IMG_8146.JPG
    313.6 KB · Views: 25
  • IMG_8152.JPG
    IMG_8152.JPG
    412.5 KB · Views: 25
  • IMG_8140.JPG
    IMG_8140.JPG
    444.5 KB · Views: 26
  • IMG_4429.JPG
    IMG_4429.JPG
    621.8 KB · Views: 26
You're making me feel like I half did my restoration as I didn't dismantle the pedals and steering box nor did much paint fall in that direction. Lovely patina I have though.;)
New mirror glass is available but at about €10....one of the better fitting pattern parts which I used last week.
It's worth having those bits done because I found that helped me motor towards the end of the rebuild.
 
To be known from this day forth as Peter Patina. :D

The LED bulbs were these ones from EBAY. I think they are cheaper that the originals almost.

http://www.ebay.co.uk/itm/280999319521

Good idea to refurb the mirror as the replacements aren't cheap, nearly £50!!!!!

Is the filler on the steering box square like the gearbox one?

How easy was it to get the pedal assembly apart? I wanted to change the plastic bushes but I could not get it apart. I almost ruined the whole thing as I manage to move it a bit then the brake pedal wasn't moving on the shaft and wouldn't rotate freely. I soaked it in penetrating oil over night and it managed to move it back to its original position and it freed it up thankfully. Otherwise I was looking at quite a hefty bill to replace the lot.

Tony
 
This post contains affiliate links which may earn a commission at no additional cost to you.
Maybe Peter should change his username!
Filler plug is 8mm square, and will not move.
Pedals weren't too bad to take apart. It took a while to realise the bolt that goes through the pedal & shaft didn't actually have a thread. You have to knock it out with a hammer & drift.
I then had trouble getting the pedal off the shaft, tried a bearing puller but couldn't get it to fit. Then tried using a drift on the shaft but that didn't budge either. I ended up holding the clutch cable arm in the vice and managed to turn the pedal on its shaft and it slowly worked off the shaft, after that it all came apart easy.
Guess I was lucky. Yours has probably rusted together Tony. Hey that's one part that was better than yours lol.
I haven't seen the mirror glass advertised anywhere, where can I get one?
 
Being 8mm square there isn't really a lot to get hold of which doesn't help. I had problems with the square filler plug on the gearbox, as you might recall, but fortunately that is 1/2 inch so you can get the wrong end of a socket extension bar on it.

I didn't realise there was a pin holding the pedal to the shaft, which would explain why I couldn't get it apart. There was a lot of rusty looking oil seeping from it after the penetrating oil had done its job.

You can get a replacement gasket for the pedal assembly in case you are not aware.

Tony
 
I'm a bodger so would always attack that sort of job by hammering a random hexagonal socket onto it. The plug probably tapers so a tight fit is possible. It needs heat and I guess you've already had a blowtorch on it.
But a bar or rod of steel welded to it, possibly plug-welded through a hole drilled in the bar, then tapped "carefully" round; the heat will have been intense and should do the trick. Tidy the plug up afterwards and it could be better than new.
At worst though, I suppose you might crack the box but that plug has to come out somehow.
 
I'm a bodger so would always attack that sort of job by hammering a random hexagonal socket onto it. The plug probably tapers so a tight fit is possible. It needs heat and I guess you've already had a blowtorch on it.

But a bar or rod of steel welded to it, possibly plug-welded through a hole drilled in the bar, then tapped "carefully" round; the heat will have been intense and should do the trick. Tidy the plug up afterwards and it could be better than new.

At worst though, I suppose you might crack the box but that plug has to come out somehow.


I too tried the hammer a socket on technique but it just took the corners off. Might get a bar of flat steel & drill a hole in it, place the hole over the square and weld it. This might then undo it
 
I too tried the hammer a socket on technique but it just took the corners off. Might get a bar of flat steel & drill a hole in it, place the hole over the square and weld it. This might then undo it

Sounds like the best solution, if you leave the steel long enough it will give you the extra leverage you need. On the gearbox I had the extension arm on the filler plug then a socket on the square end with a ratchet, it came off really easily thanks to the added leverage.

The problem with heat, I think, is that because the steering box is alloy it doesn't really do much apart from expand the plug itself. I don't think heat will help a lot?
 
New toy delivered today.
smile.gif

So as with all new toys, get them out of the box and lets play...


I had a small container of blast media but it wasn't quite enough to fill the hopper enough to use it, so I had some really fine kiln dried sand that I thought I could use until I get some glass bead media from the blasters near me.


Pedals and pedal box first.
It takes the paint & rust off so quick and leaves a perfect finish to paint straight away, and the beauty of it is that it removes all grease etc.
I had already degreased them the other day and this does help the process.
The only trouble is with the fine sand is that it turns into such a fine dust is still finds its way out of the blasting cabinet and forms a fine dust in the air.
Hopefully the glass bead will be better, or alternatively I will put some gaffer tape over the door recess.


Within no time of blasting them, a quick coat of etch primer & a thin coat of primer and they are ready for a few coats of black gloss.

Oh this is going to be fun.

Lovely Jubbly.
cool.gif
 

Attachments

  • IMG_8339.JPG
    IMG_8339.JPG
    402.3 KB · Views: 30
  • IMG_8338.JPG
    IMG_8338.JPG
    403.9 KB · Views: 24
  • IMG_8340.JPG
    IMG_8340.JPG
    360.8 KB · Views: 22
  • IMG_8341.JPG
    IMG_8341.JPG
    333.6 KB · Views: 22
  • IMG_8345.JPG
    IMG_8345.JPG
    1.3 MB · Views: 25
  • IMG_8347.JPG
    IMG_8347.JPG
    1.2 MB · Views: 24
Back
Top