General Bambina 1966

Currently reading:
General Bambina 1966

Great, very helpful, thanks Berkeleyman and Vitesse.
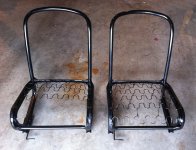
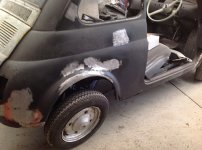
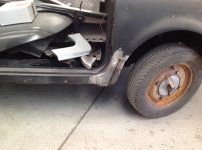
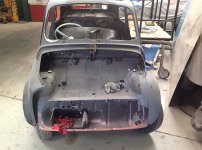
Good point, spraying interior panels. I had been wondering about getting the interior to match across all parts, carpet, seats etc.
Thanks folks. I'll look for Plastikote.
 
Here's some pics of my 500-F part way through panelbeating.

Just wondering if anyone has any advice on what order to do the rebuild in. taking the car apart, I started at the front and worked backwards.

After re-spray, I was thinking of putting electrics back in first. Then working from back to front. And doing interior last.

Any pitfalls to avoid?
 

Attachments

  • May2014-1.jpg
    May2014-1.jpg
    153.8 KB · Views: 33
  • May2014-2.jpg
    May2014-2.jpg
    152 KB · Views: 30
  • May2014-3.jpg
    May2014-3.jpg
    157.5 KB · Views: 32
  • May2014-4.jpg
    May2014-4.jpg
    162.5 KB · Views: 29
  • May2014-5.jpg
    May2014-5.jpg
    161.9 KB · Views: 34
Crumbs your guys are making my guys look quick.

You need to sort out any mechanicals underneath first so, suspension, brakes, steering rack etc and look to replace the fuel lines front to back. There is no point trying to scrimp on a few bob if you have gone back to a full body rebuild like you have.

After I was happy with all that I went for front door rubbers and trims first, lock etc. window rubbers which surprisingly were quite easy, but need to be sealed properly to prevent water ingress. Then electrics, putting the loom back in place, sorting out any dodgy connections.

Engine back in followed up by the interior because I didn't want any greasy hand prints all over it.

In fact you can see the order I went for on this forum. To give you a good idea.

http://www.oldclassiccar.co.uk/forum/phpbb/phpBB2/viewtopic.php?t=14089&start=360

Hopefully Luigi should be back on the road next week for the first time in 17 years.
 
Thanks Vitesse (Tony). You seem to be speeding along!

I've done new shocks, brakes and wheel cylinders, brake pipes and hoses. New master brake cylinder to go in. Steering rack gaskets (still leaks though – trying thicker oil). And all undersealed. Haven't touched the fuel line though (what do you reckon?)

When it finally comes back from the panelbeaters it will probably go to be sprayed. Might add a stripe and number at the sign writers before it finally comes home. At this rate, I'd be happy with the end of the year.

Good thinking re rubbers. I have all new to go in, so that will come next. Then wiring / electrics as you say. Under bonnet and boot mechanics and interior last.

I'm keen to replace the wire mesh under the air vent that's above the boot lid. Mine was ok, but I want to spray it a different colour. I've ordered a square metre but it's slightly thicker wire.

Also I want to replace the vinyl patch on the inside ceiling. I noticed you masked yours out. Is this a sound deadening panel? And where would I found one?

Also thinking about white wall tyres. Final colour will be off white outside and red interior.

Just went through your whole thread. Very helpful.
 
I used a paint called Plastikote as the name suggests it is specifically for plastic. I think I should have shares in the company the amount I have used!!!

During my recent rebuild I put in a new interior, the seats and door cards matched really well but the rear panels over the wheel arches were a much darker shade of red, nothing a bit of Plastikote couldn't solve.


Not quite sure whether I like the wooden windows - they'll stop fade from the sun I guess :)

Also note that you are using some sort of sound deadening/insulation. There is a current thread on this at present.
 
Looking like good progress, nice to see they are finally getting on with it.
Body doesn't appear to have too much major work to be done.
Keep the pictures coming, always great reference points for others!

Sean
 
Haven't touched the fuel line though (what do you reckon?)

Also I want to replace the vinyl patch on the inside ceiling. I noticed you masked yours out. Is this a sound deadening panel?

On the fuel line I replaced the entire length of copper pipe because it had, had a repair at sometime in the tunnel. If your copper pipe is ok then it should be fine but having said I found issues with little bits and bobs afterwards that I didn't know existed, so it may pay to replace it. The plastic Cavvis pipe at each end that was originally used goes brittle with the passing of time, so I would replace that, like I did for much more sturdier rubber pipe, that has a cord in the rubber to give extra strength. I also replaced the Cavvis pipe from the brake reservoir down to the master cylinder with EPDM rubber pipe, it has to be EPDM because of the brake fluid.

The vinyl patch on the inside of the roof is for sound deadening, I think without it, sound would resonate off it and it would be very boomy inside, I think it also acts to prevent the roof from vibrating when driving. I don't know where you would get a replacement though?

Tony
 
Thanks Fiat500 and Tony (Vitesse). I found the deadening panel at the Ricambio site too. Only seems to come in original grey with original pattern (good for the purists). I was wondering if there was anything around in another colour.

My interior will be red themed. Just re-covering the seats. Went into town to buy hessian (burlap for the Americans) to put on top of the seat springs. And found red hessian! You'll only see it when the seats are tilted – but I know it's there.:)

Must take some photos of my cleaned and sprayed parts – it seems to be the done thing.
 
Hi Tim you could always respray it with the Plastikote paint I mentioned earlier. But you have to be careful of a red overload. I originally purchased red sun visors for my car with a red interior but they just didn't look right especially taking into account that the bottom of the sunroof is white. The backs of my seats have the white tops, so the contrast of going from red sunvisors to white sunroof bottom to the grey deading panel looked a bit wrong. I ended up respraying my sunvisors with vinyl paint back to an off white colour.

Tony
 
Hi Tony. You're talking my language! (y) I'm a graphic designer so hopefully, colour will be second nature to me, although this is my first car restoration.
I know what you mean about red overload. I'm going for an off white exterior, which will be inside the car too. But there is also plenty of black around. On the rubber bits, pedals etc. I wondered about going for a red carpet with black centre consul. Ricambio do a nice looking red and black racing style seat cover and a nice small red and black steering wheel. Add the red vinyl sunroof and red (or maybe black) sun visors for the finishing touch. Good to know about Plastikote as a fall back.
Is it noticeable that your visors have been sprayed?
 
Hi Tony;
The 'anti-boom' roof panel is obtainable from a number of suppliers--I got mine from Nathan at 'Fiat 500 Classic'
thumb.gif
 
Thought I would add some restored parts to this thread, including the toolbox from my other thread.

Will put some more up, but just wrapped a whole lot of things up in cling film, so it might have to wait until they get unwrapped.
 

Attachments

  • toolboxRestored.jpg
    toolboxRestored.jpg
    670.7 KB · Views: 36
  • seats.jpg
    seats.jpg
    484.5 KB · Views: 32
  • plates.jpg
    plates.jpg
    578.7 KB · Views: 31
Here's an up date of the panel beating work. Just in the process of replacing the sills.

Tim
 

Attachments

  • sills1.jpg
    sills1.jpg
    497.3 KB · Views: 37
  • sills2.jpg
    sills2.jpg
    454.9 KB · Views: 39
Time for a quick update.

Just fitted new camshaft (with a modest grind), timing chain (nice and tight) and 3.5L sump and rubber gasket. Checked the timing clearances. All back together now. Clutch next.
Tim
 

Attachments

  • engine-after-camshaft.jpg
    engine-after-camshaft.jpg
    375.6 KB · Views: 24
  • sump.jpg
    sump.jpg
    634.4 KB · Views: 17
And here is the state of play on the body. New sill being attacked (other side done) plus part of floor and inner wheel arch. Still promised for Christmas...

Tim
 

Attachments

  • brace1.jpg
    brace1.jpg
    480.2 KB · Views: 21
  • brace2.jpg
    brace2.jpg
    521.2 KB · Views: 20
I applaud you for your patience Tim. I was itching to go and put all the new bits on and my car was only away for about 4 months but it didn't need anywhere near the amount of surgery yours has had. It looks they are doing a really good job, so worth the wait?

Tony
 
The proof of the pudding... as they say.

They are doing a good job, no filler being used until the top coat. So I am pleased, just very frustrated at the wait.

I will need to revisit the engine bay. I've used some sound deadening products and having read some other threads, it seems they might melt with the engine heat. Can you spray over the top of the sound deadening spray on /paint on products?
 
Back
Top