Technical 3 years standing Panda 1.1 resurrection.

Currently reading:
Technical 3 years standing Panda 1.1 resurrection.

Richsvan

Member
Joined
Aug 6, 2023
Messages
23
Points
57
Location
Bristol
HI I’ve a 2009 1.1 that I’m trying to get going. It’s my mothers car and it’s been sat unused for about 3 years and rarely used prior to that (sub 8k miles). The battery charged up ok, but I wouldn’t start as the starter had seized. I freed that off but it still won’t start. I did get it going with easy start spray but it ran really rough. My fault code reader gives the following codes P0460 and U1602.
Any tips appreciated as I’m keen to get this running and MOT’d.
Thanks
Rich
 
It's just fine - that weep hole is there by design and it'll pass an MOT.

There's a bit of corrosion around the hole, but that hole is there by design in an OEM backbox. This is what it looks like on a new one. The condensed water dripping out on that video illustrates perfectly why it's needed.

Not all replacement backboxes have such a hole. The cheapie one (all I could get at short notice) I just fitted hasn't, which doesn't bode well for its likely lifespan.

View attachment 429380
Cool everyday a learning day

Mines a 2011 on its original exhaust
And does not have a weep hole

Neither did my 05, my 06 didn't but that was probably not the original exhaust

I always do the hand over the exhaust before a
MOT as you haven't got long to fix any problems for the free retest runs out

Strange doesn't sound like this in real life

 
Mines a 2011 on its original exhaust
And does not have a weep hole
It's on the front end plate of the backbox, towards the engine, so you need to crawl under the car to see it. At the bottom (obviously!)

I always do the hand over the exhaust before a
MOT as you haven't got long to fix any problems for the free retest runs out

Me too, and for the same reason.

Just as well, since the first one ECP supplied had a hole burnt through the shell where one of the hangers had been welded on.

The original was holed at the point where the backbox connects to the centre pipe. Both parts had perforated, so the whole exhaust had to be replaced.
 
Last edited:
It's on the front end plate of the backbox, towards the engine, so you need to crawl under the car to see it. At the bottom (obviously!)


Me too, and for the same reason.

Just as well, since the first one ECP supplied had a hole burnt through the shell where one of the hangers had been welded on.

The original was holed at the point where the backbox connects to the centre pipe. Both parts had perforated, so the whole exhaust had to be replaced.
That explains it as long as it builds pressure I never crawl under the car

Cool leant something new

I can not visualise this at all

Appears to be on the side to me, possibly the outer skin on a longitudinal back box, probably need a photo or two from further away to get the orintation

I could be wrong

My video above does not sound right, obviously phone recordings can be misleading

Screenshot_20230906_115137.jpg
 
Last edited:
I can not visualise this at all
You've circled the bottom front edge of the backbox, engine side. The background is the ground (tarmac?); you can also see the inner wall of the passenger side rear tyre in the picture (top middle-right). Watch the video again; right at the start, the camera pans down from the pipe entering the backbox, engine side.

I'd say it was taken from roughly where your hands would be if tightening the clamp where the centre pipe joins to the backbox.

What I can't visualise is getting into the right position to take such a video! The camera must be well under the car. A contortionist, or maybe a selfie stick - or is the car on a lift?

I've recently fitted one with the car at ground level; it's awkward. There's not a lot of space under there, and the angular positioning of the centre pipe has to be just right. On a lift, though, it'd be easy peasy.

A hint for anyone changing the exhaust complete; get the position right before tightening anything. And always tighten the backbox to centre pipe clamp first; leave the centre pipe to maniverter clamp loose until everything else is positioned and tightened.
 
Last edited:
You've circled the bottom front edge of the backbox, engine side. The background is the ground (tarmac?); you can also see the inner wall of the passenger side rear tyre in the picture (top middle-right). Watch the video again; right at the start, the camera pans down from the pipe entering the backbox, engine side.

I'd say it was taken from roughly where your hands would be if tightening the clamp where the centre pipe joins to the backbox.

What I can't visualise is getting into the right position to take such a video! The camera must be well under the car. A contortionist, or maybe a selfie stick - or is the car on a lift?

I've recently fitted one with the car at ground level; it's awkward. There's not a lot of space under there, and the angular positioning of the centre pipe has to be just right. On a lift, though, it'd be easy peasy.

A hint for anyone changing the exhaust complete; get the position right before tightening anything. And always tighten the backbox to centre pipe clamp first; leave the centre pipe to maniverter clamp loose until everything else is positioned and tightened.
Ahh that's better

Being 90 degrees out confused me

Screenshot_20230906_224327.jpg
 
Great! Turning the screen capture through 90 degrees makes it much easier to visualise.

Also shows the tyre much more clearly - it looks like one of the original Continental EcoContacts that would have been fitted to the car when new. They'll be at least 14 years old now, so it'd be worth the OP checking all four for any excessively large cracks or bulges before putting this car in for an MOT, especially if it's been standing in one spot for 3+ of those years.
 
Last edited:
I’ve taken a bit of a break from the car but got going again this weekend where I fitted a new battery, new front discs and pads and new lower control arms. I was taking torque values from the YouTube AUTODOC video which told me to tighten the ball joint pinch bolt to 60Nm. At this point the bolt snaps. Does anyone know of a source for these and confirm what the true torque should be? Many thanks
Rich
32nm
 
Thanks for that, a lot less than the AUTODOC quoted torque. An expensive mistake as the bolt + shipping was £13 odd pounds. I was tempted to get a bag of 200 from Cromwell which was only about a tenner cheaper ( and close enough to collect). Not sure I’d have had much use for them though.
 
Thanks for that, a lot less than the AUTODOC quoted torque. An expensive mistake as the bolt + shipping was £13 odd pounds. I was tempted to get a bag of 200 from Cromwell which was only about a tenner cheaper ( and close enough to collect). Not sure I’d have had much use for them though.
The 500 and panda are virtually the same, but some of the bolts are different sizes, copy and past instructions from the 500 to panda has lead to some errors creeping in online.

When I needed one because of corrosion I fitted mazda/ford pinch bolts (£2.40 Inc VAT each). There are coated, High tensile and the right lengths, diameters. Stocked by most motor factors. The only downside is the thread pitch is different.

It’s not just a standard bolt but made of high tensile steel
 
Whilst checking the handbrake adjustment at the weekend I found that passenger side hub was noisy.

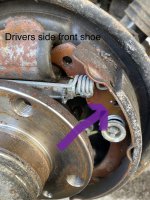
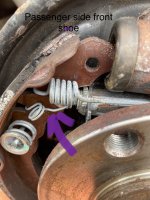
Is this little spring (adjuster fork to front shoe) in the right place?

Having checked, It seems to be behind the shoe on the drivers side and infront of the shoe on passenger side. This is the position the spring was in before I dismantled the passenger side drum brake in August to unseize the wheel cylinder and I rebuilt the brake to match. (I took photos before so I’m sure of this). The noise was from the brake adjuster bar as it wouldn’t stay in place on the shoe and had drop-down and was rubbing on the hub, even after repositioning it several times. Having noticed the position of the spring on the drivers side I’ve adjusted the passenger side to match and the adjustment bar now seems to stay in the right place.

My first trip out will be to the MoT so I’m keen to confirm that I’ve done the right thing.
 

Attachments

  • IMG_5108.jpeg
    IMG_5108.jpeg
    896.7 KB · Views: 26
  • IMG_4883.jpeg
    IMG_4883.jpeg
    761 KB · Views: 29
Others may correct me, but I have often seen that little spring looking slightly "kinked" but working quite happily.
Generally the large top spring keeps the handbrake bar in place, assuming it was located correctly originally and the adjuster was pre set to take up the slack prior to the self adjuster kicking into operation.
Whenever servicing customers cars or replacing shoes etc. I always manually adjusted the rear brakes to give optimum foot and handbrake concurrent with good free operation of the brakes prior to refitting the brake drum.
 
Probably will not make a difference

But all 4 springs should be on the front face

There's quite a few ways the Adjuster can go together I think 16 but can't be bothered working it out

It's been awhile since I did a Bosch setup

One spring across the top and on across the bottom

The wider ends of each fork to the front

The short threaded end to the handbrake side

At the top under the main spring on the Adjuster side there is a small spring that goes diagonal

The other side is a small spring that goes horizontal

When finished should look like this

Screenshot_20231019_160230.jpg


Sorry best photo I could find


Looks like your shoe is damaged here

IMG_20231019_161137.jpg


It's common for the Bosch to delaminate i probably change the shoes, but it's hard to tell from the angle of the photo
 
Last edited:
I’m surprised it was different from side to side. Especially as at sub 7.5k these are likely the factory fitted shoes. Anyway trust me to opt for the wrong way. But having said that. It did look like it was getting caught on the shoe to shoe spring and that perhaps that could have been the issue, further all seemed fine with the little spring on the back of the shoe. I think the likely problem was that perhaps I did not adjust the adjuster up enough so maybe the bar was loose. My assumption was that it would self adjust by cycling the brake.
 
. I think the likely problem was that perhaps I did not adjust the adjuster up enough so maybe the bar was loose. My assumption was that it would self adjust by cycling the brake.
As you say it should "cycle" up , but I never rely on them to be that good, so I always manually adjust when servicing even when no parts replaced.
However I am scrupulous about ensuring nothing binds after and even check again after a road test.
It was one of the many little things that my customers said they always knew their car felt better after I worked on them for.
 
I’m surprised it was different from side to side. Especially as at sub 7.5k these are likely the factory fitted shoes. Anyway trust me to opt for the wrong way. But having said that. It did look like it was getting caught on the shoe to shoe spring and that perhaps that could have been the issue, further all seemed fine with the little spring on the back of the shoe. I think the likely problem was that perhaps I did not adjust the adjuster up enough so maybe the bar was loose. My assumption was that it would self adjust by cycling the brake.
If the adjusts are working

You just wind the adjusters in

Put the drums on button it all up

With the handbrake cable loosened pump the brakes until the adjusters stop clicking

Pull the handbrake up 3 clicks, adjust cable until the wheels just lock

Check the handle does not go past 5 clicks, and fully off ish with the handbrake down. A very slight drag is okay with new shoes

Both sides should be equal

Here's the official procedure

 
Last edited:
If the adjusts are working

You just wind the adjusters in

Put the drums on button it all up

With the handbrake cable loosened pump the brakes until the adjusters stop clicking

Pull the handbrake up 3 clicks, adjust cable until the wheels just lock

Check the handle does not go past 5 clicks, and fully off ish with the handbrake down. A very slight drag is okay with new shoes

Both sides should be equal

Here's the official procedure

 
Well despite its best efforts ( more on that later) it now has a fresh MOT with no retest or advisory.
I was hampered by a couple of things, firstly getting a slot. My preferred local garage had a five week wait for MoTs! I had to go with another garage which was 15 days, I’d not heard good things about this garage (so was a bit nervous) but I had no choice. Anyway it passed!
On to the problem….,, I’d not started the car for a couple of weeks and when I went to start it about 10mins before I had to leave for the MoT, it wouldn’t start. The fuel pump wasn’t running again. So it was a quick rush to remove the seat, unplug/plug the connector and a few taps with a screwdriver handle and then it started. So I almost didn’t make it!

A few more things to look at and fix.
-try and figure out the fuel pump problem.
-look at the passenger side front window, as it makes a hell of a cracking noise at the end of its travel upon closing.
- the rear wiper snapped, I’d changed the blade out for the mot. But the plastic bit snapped (whilst driving home) just past the tabs which locate it into the arm.
-also I’m looking at a low budget tart up of the bad lacquer.

Anyway it’s mot’d and on my drive now, so all these things will be a lot easier than doing things remotely.

A big thanks for the help to date.
 
Well done for sticking with this and seeing it through. You've saved a car which might otherwise have been scrapped, and hopefully made yourself a little more wealthy as well.

also I’m looking at a low budget tart up of the bad lacquer.

I don't think there is one.

Someone will buy this for what it is; cheap, economical ULEZ compliant transportation. The Panda is a workhorse, not a fashion accessory.

Anything you do will likely cost more, perhaps much more, than any additional value you might add to the car.

Respraying the affected panels could actually reduce its value; potential buyers might be concerned that you've concealed something far worse.

You could even use it yourself for awhile - but be careful, it just might grow on you. There's something quite appealing about the 169 Panda which you don't fully appreciate until you've lived with one.
 
Last edited:
Door panel off, and it’s the white plastic clip that holds the glass that’s broken.
Options seem to be a replacement plastic clip (several on eBay) or a complete new window regulator (again there’s several on eBay). It seems a shame to go for the new regulator as only the clip is broken.
What’s the chance of getting the the cables into the clip and over the pulley’s? I had a quick go using the broken clip as a practice and it seemed quite difficult. Is there a technique order for doing this?
 
Back
Top