I just fitted my EVO lights in my Grande Punto, as there's no guide yet I made a couple of pictures to create one.
I hope'it's usefull for anybody who waht's to fit EVO rear lights.
I hope'it's usefull for anybody who waht's to fit EVO rear lights.
Needed tools
1. Screwdriver (+)
2. Soldering iron
3. Solder with a resin core (gives a bit more flex)
4. Cutter
5. Cable stripper
6. Piece of cloth
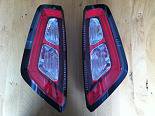
7. A set of EVO rear lights
8. EVO rear light plugs with about 7cm's of cable.
9. Heatshrink
10. Lighter
11. Resistors (2 x 25watt 8Ohm resistors with heatsinks in a series)
2. Soldering iron
3. Solder with a resin core (gives a bit more flex)
4. Cutter
5. Cable stripper
6. Piece of cloth
7. A set of EVO rear lights
8. EVO rear light plugs with about 7cm's of cable.
9. Heatshrink
10. Lighter
11. Resistors (2 x 25watt 8Ohm resistors with heatsinks in a series)
Removing the old rear lights
Open the trunk and get the screwdriver.
Remove the two bolts holding the rear lights in place.

Gently pull the light until the two pins on the outside pop out.
Remove the plug from the light are put the light away.
Wire colors and functions original plugs
My car has parking sensors so I have an extra plug.
It has these color with the coresponding functions.
Left Light:

Color: Function:
Black/White -> Mass
Red/Yellow-> Normal Light (LED)
Orange/Black-> Turn Signal
Gray/Black-> Brake
Right Light:

Color: Function:
Green/Black-> Mass
Gray/Red-> Brake
Orange/Black (1st pin)-> Normale Light (LED)
Orange/Black (2nd pin)-> Turn Signal
With the 1st pin I mean the orange/black cable that's on the side of the plug!
With the 2nd pin I mean the orange/black cable that's kinda in the middle of the plug!
Wire colors and functions new plugs
The plugs that came of the EVO had different colors so I had to find out what function each color had.
Left Plug:
Green/White-> Brake Light
Blue/White-> Turn Signal
Black-> Mass
Red/Yellow-> LED
Brown/Black-> Unkown
Right Plug:
Black-> Mass
Black/Yellow-> LED
Purple/Green-> Unkown
Blue/Black-> Turn Signal
Green/Yellow-> Brake Light
Soledering the new plugs to the existing cables
I started at the left side.
Cut of the first cable and strip the end.
Also strip the end of the cable that has to be soldered to it.
Put some heatshrink over the cable and twist the two ends together.
Solder them with a bit of solder so it has a smooth finish.
Pu the cloth undearneath it so no solder can damage your paint.
Left side:

Rights side:

These cables must be soldered together:
Left side:
Orginal cable -> EVO cable
Black/White -> Black
Red/Yellow -> Red/Yellow
Orange/Black -> Blue/White
Gray/Black -> Green/White
Right side:
Original cable -> EVO cable
Green/Black -> Black
Gray/Red -> Green/Yellow
Orange/Black 1st pin -> Black/Yellow
Orange/Black 2nd pin -> Blue/Black
Once soldered together plug in the new EVO light to check you work!
My cables were long enough to put the ligth inside the car so I could see if everyting worked.
Turn on the light, turn signals and the brake light.
If everything works put the heatshrink in place and shrink it with the lighter.
Ignore the faulty light error on the dash

Results:


Resistors
To remove the faulty light error resistors must be placed between the mass cable and the LED cable. This will draw enough electricity to fool the canbus system so the chrismast tree on the dash will disappear.
To make it easy for myself I did not solder the resistors to the new cables.
Instead I put plugs onto the cables so I could plug and unplug the resistor.
I used these on the new cables:
They wrap around the cable and pierce it. On the other and you can insert a flat plug.

I welded a bit of cable to the resistors with the plugs. I forgot to make pictures but this is the result.

And the resisor fitted:

The error on the dash disappeard
Update:
To make it easy for myself I did not solder the resistors to the new cables.
Instead I put plugs onto the cables so I could plug and unplug the resistor.
I used these on the new cables:
They wrap around the cable and pierce it. On the other and you can insert a flat plug.
I welded a bit of cable to the resistors with the plugs. I forgot to make pictures but this is the result.
And the resisor fitted:
The error on the dash disappeard
Update:
Cosmetic cable wrap
I wrapped the cables so I have 1 single string of cables instead of 5 small ones going everywhere.


EVO Lights fitted
Clean up and put the evo lights into the car.
Plug the lights and put in the screws.
Close the trunk and take you car for a long drive so everybody behind you can enjoy your new rear lights