In a recent thread about sump plug problems: https://www.fiatforum.com/threads/oil-drain-plug-too-deep.500797/ I briefly mentioned tight wheel nuts. This led me on to thinking about an incident I had recently which could have been very nasty and this led me on to thinking about some of the roadside disasters I've attended with our breakdown truck where the customer caused the problem by the way they used the jack. - So, here's some "musings" on the subject. Probably of more interest to those who aren't in their driveways every weekend "fettling" their motors who I would hope will know a lot of this stuff and more for those who only occasionally get their hands dirty.
So, for whatever reason, you find you want to take a wheel off. The first thing is, DON'T attempt to jack a vehicle up, with the included jack, on anything other than a really sound and reasonably level surface, even if this means driving on a flat tyre for a wee way. Better to risk ruining the tyre. - I'll talk more on this later. Once it's on a hard and level surface slacken the nuts/bolts. If you are at the roadside with a puncture your options are going to be limited to what's in the boot. If you're lucky enough to find a spare wheel, jack and wheel brace of some sort then you can proceed. If all you've got is a can of "gunge" then follow the instructions and hope the hole isn't too big!
For those with a wheel, jack and wheel brace, and have decided to have a go themselves rather than calling their breakdown service, it's likely the wheel brace will be something like this:
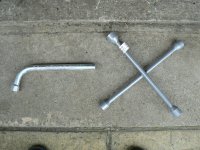
The one on the left is actually the one from our Panda and the one on the right is one that came with the space saver kit for the Mazda. You are likely to find the nuts/bolts are very tight. Even on quite a small car around 80 to 120 Newton metres is common (compare that to around 20 to 30 Nm for the likes of spark plugs and sump plugs, it's tight!) If your wheel nuts are very tight - not unusual - you're probably not going to shift them with one of these even if you jump up and down on the end of it! What may save the day is if you keep a length of pipe in the boot along with the wheel brace which you can slip over the end of the tool to increase it's leverage. This is well worth doing - so search out a suitable length of pipe right now! - if the nut/bolt is excessively tight these cheap wheel braces are not intended to be used with a length of pipe and will probably bend or fail in some other way and, frankly, you're going to need the breakdown man (or Dad if you're one of my kids or Mrs J, who famously said, when I suggested she learn how to change a wheel, "Why would I keep a dog and bark myself?" That really put me in my rightful place!))
If we escalate this to the next level you can buy a dedicated extending wheel brace, something like this: https://www.screwfix.com/p/rac-tele...bArm0i-yZlkgVNLy7zcaAj9JEALw_wcB&gclsrc=aw.ds My boys both bought one and they work quite well. Use in extended configuration to loosen and close up to short length for tightening. If you are inexperienced and tighten with it extended you can exert so much twisting force, without realizing it, that you might either strip the threads or snap the fixing. I've used my boy's tools and they certainly do the job but, I find them annoying when you have a nut or bolt which is just slightly to tight on it's threads to spin off by hand using the socket alone. The L shaped of the wrench is quite clumsy when you have to use it to do half a turn at a time. For this reason I prefer a power bar (some call them breaker bars) Here's my trusty old Britool on one of the Ibiza's wheels being used in conjunction with a deep single hex socket:
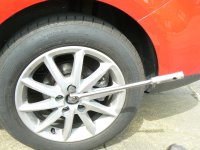
The great advantage of a breaker bar is that once you've loosened the nut/bolt you can then turn it straight out from the wheel and spin the nut/bolt out very quickly by rotating the shaft of the bar:
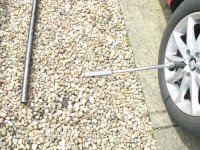
However, at this initial stage you're only going to loosen it by about half a turn and you do it with the wheel on the ground to stop it turning. You'll find it much more difficult to break it away after jacking the wheel off the ground. Whatever you do don't actually undo them all the way before you've got a jack under the car or it all gets a bit too exciting! You do know where your locking nut adaptor and any other necessary tools are don't you? My Ibiza has little black plastic caps over the wheel nuts which are so deeply recessed that it's very difficult to get them off without the special little plastic tool supplied.
I think a breaker bar and socket is probably about the best option for roadside work and I keep a 14" one, with a suitable deep socket, in the Ibiza's boot all the time. It is a bit of a more expensive option, and you have to have, or buy, a suitable deep single hex socket to use with it (the extending bar usually comes as a kit complete with a selection of suitable sized sockets) However a breaker bar is not all that much more, and you can use it for other jobs too.
It's not often you won't win with a modest size of breaker bar, but you can always escalate the attack with a longer bar and length of pipe if necessary:
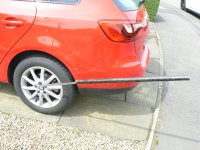
However you're not going to be carrying that around with you under everyday conditions and you do need to wake up the "little gray cells" before use as you're definitely into breaking and wrecking territory now!
Assuming you've managed to loosen the nuts - just half a turn - it's time to think about jacking it up now. If you're at home a trolley jack is definitely the way to go. The width and length of a trolley jack, even a little one, gives much much greater stability:
I've had this one for over 40 years - I rebuilt it recently with a new pumping unit:
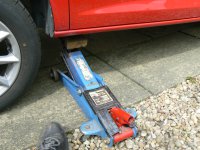
But. if you can afford one, a small professional one is really the best:
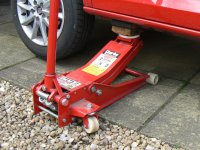
You can see how wide it is so even if you leave the handbrake off and out of gear, on a flat surface, the vehicle is going nowhere.
And on that subject, of course you need to firmly apply the handbrake and chock the wheel which is diagonally opposite the one you are jacking up. so here I'm working on the N/S/F (passenger front) so I will chock the O/S/R (driver side rear). That way, as the car is jacked up so the chocked wheel will be loaded more and this tends to lock the chocks under it's tyre. You can buy purpose made chocks quite cheaply. Here's some I use:
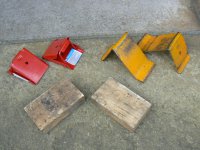
The red ones were bought for peanuts and live in the Panda's boot. The yellow ones came with my old Datsun 120Y estate and the 2x4 wooden blocks are there just to show you don't need to buy dedicated items - although they don't provide quite such good resistance. I wouldn't jack up a vehicle using it's own cheap jack without chocking and you're about to find out why.
Now it's all getting serious because, if you're not at home, or don't have a trolley jack, we're going to use the jack supplied with the car to lift it. There are two typical types:
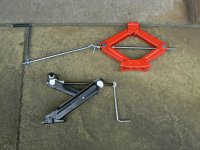
The red one is a very common design and I'll talk some more about that in a minute. The black one is for the Ibiza and is of a type which VAG seems to favour as my old Cordoba had an almost identical unit. Neither jack is, in my opinion "safe" and it's only too easy to have an accident with either type. The problem is they exert a very localized footprint on the ground so they have no inherent stability. If the car moves the jack has no ability to resist and the car will fall off the jack. I earned extra money by doing 24 hour standby on the breakdown truck and I've been to a number of incidents like this. Luckily I've never seen anyone hurt but if it falls off the jack after the wheel has been removed then the bottom of the car will be on the ground and, apart from the possible damage to stuff like brake backplates and suspension, it's very difficult to now get anything under the car to get it lifted back up again. So be very careful what you're doing and don't let anyone near or in the car when it's on the jack.
I can't stress this enough so lets look at this a little closer. The foot on the black jack is articulated around one swivel pin:
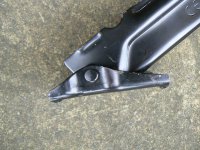
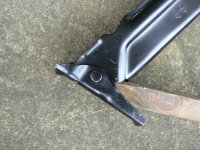
which allows the foot to stay flat on the ground as the jack is extended and lifts the car:
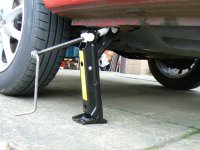
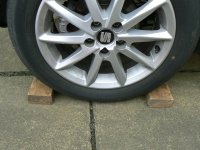
Look at how small the foot is though. It can't provide any fore and aft stability so if the car starts to move back or forwards it's just going to fall off. Hopefully though you've got the hand brake firmly applied and the chocks either side of the diagonally opposite wheel:
What many people don't think about at all though is the wheel opposite the one being jacked up. Now in this instance I'm jacking up the N/S/F wheel so let's take a look at the O/S/F wheel. Before I started jacking up the N/S/F the O/S/F looked like this:
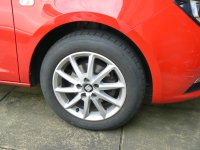
But now with the N/S/F jacked up just enough for the tyre to clear the ground, a lot of the weight of the front of the car is taken on the jack and the O/S/F now looks like this:
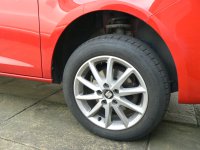
Still in contact with the ground, but not by much. So why is this a problem? because there's now very little weight pressing down on that tyre and, with the other one not in touch with the ground at all, it's going to be oh so easy to push the front of the car sideways and off the jack. If you're not on a sound and solid surface it's almost guaranteed to do this. By the way, with this type of jack you need to carefully place the foot directly, vertically, under where the contact pad on the lifting arm contacts the car. If it doesn't lift vertically it can push the car sideways. Also don't jack up the wheel you're working on more than necessary because the higher you jack it the more instability you introduce.
So now you can complete the removal of the nuts/bolts, remove the wheel and stick the new one on. Just be a bit careful putting the new wheel on the hub. If you get too violent with it and the surface the car is on has a bit of mud, gravel, etc on it, there's always the chance you could still push the car sideways off the jack! Scissor type jacks, like the red one, are very slightly more stable due to their bigger footprint:
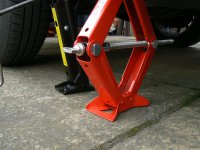
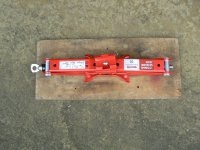
but are still not to be trusted. I also carry around a piece of 12 ply which I'd deploy if the surface was not very smooth.
I hope, having read this, you'll appreciate that you should NEVER stick any part of yourself, not even a fingertip, under a car supported by only a jack. This applies to hydraulic trolley jacks or any jack in my opinion. Trolley jacks stay up because hydraulic oil has been used to pump up a ram and take the weight of the car. All that's holding in this pressure is a rubber seal, bit like a big diameter brake cylinder if you like. A catastrophic failure of the seal, thankfully rare, will result in an instantaneous collapse of the jack! Again, DON'T go under any vehicle supported on a jack alone!
People ask where to put their axle stands so they can safely work under the car. This will differ from vehicle to vehicle but in general the subframes are a pretty safe bet. h
Here's a couple of pictures of how I support the Ibiza on the front subframe if I'm doing an oil change or perhaps working on the brakes etc:
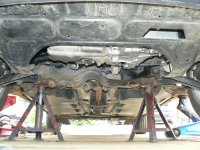
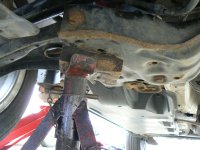
You'll notice the wee block of wood on the saddle? I always do that partly to protect the finish for rust purposes but mostly because the axle stand's saddle is much less likely to slip. By the way, I would never jack in the middle of a rear axle no matter how robust it looked. Torsion beams like those used in our Fiats are very likely to distort and if they do that means a new axle because the rear wheel geometry will be ruined by even quite a small bend in the beam. But even on the old type rear wheel drive cars I've seen an otherwise good axle, showing no signs of oil leaking, come back after being jacked on the axle, with an oil leak. I just won't take the risk. Goes without saying, I hope? that you never take the weight of the vehicle on the sump or gearbox casing. Different if you're just supporting the engine when disconnecting a mount, to do a timing belt for instance. But never to take the whole weight of the front of the car.
So take care folks, only do this on a smooth sound and level surface, certainly not a gravel driveway, but more than anything be very aware it could fall off the jack and keep your body parts well out of the way as well as keeping anyone else well away - and definitely not in the vehicle or even touching it - while you're doing it. Most manage it without even realizing the possible disaster that can ensue, but some, the ones we go out and rescue, do not!
So, for whatever reason, you find you want to take a wheel off. The first thing is, DON'T attempt to jack a vehicle up, with the included jack, on anything other than a really sound and reasonably level surface, even if this means driving on a flat tyre for a wee way. Better to risk ruining the tyre. - I'll talk more on this later. Once it's on a hard and level surface slacken the nuts/bolts. If you are at the roadside with a puncture your options are going to be limited to what's in the boot. If you're lucky enough to find a spare wheel, jack and wheel brace of some sort then you can proceed. If all you've got is a can of "gunge" then follow the instructions and hope the hole isn't too big!
For those with a wheel, jack and wheel brace, and have decided to have a go themselves rather than calling their breakdown service, it's likely the wheel brace will be something like this:

The one on the left is actually the one from our Panda and the one on the right is one that came with the space saver kit for the Mazda. You are likely to find the nuts/bolts are very tight. Even on quite a small car around 80 to 120 Newton metres is common (compare that to around 20 to 30 Nm for the likes of spark plugs and sump plugs, it's tight!) If your wheel nuts are very tight - not unusual - you're probably not going to shift them with one of these even if you jump up and down on the end of it! What may save the day is if you keep a length of pipe in the boot along with the wheel brace which you can slip over the end of the tool to increase it's leverage. This is well worth doing - so search out a suitable length of pipe right now! - if the nut/bolt is excessively tight these cheap wheel braces are not intended to be used with a length of pipe and will probably bend or fail in some other way and, frankly, you're going to need the breakdown man (or Dad if you're one of my kids or Mrs J, who famously said, when I suggested she learn how to change a wheel, "Why would I keep a dog and bark myself?" That really put me in my rightful place!))
If we escalate this to the next level you can buy a dedicated extending wheel brace, something like this: https://www.screwfix.com/p/rac-tele...bArm0i-yZlkgVNLy7zcaAj9JEALw_wcB&gclsrc=aw.ds My boys both bought one and they work quite well. Use in extended configuration to loosen and close up to short length for tightening. If you are inexperienced and tighten with it extended you can exert so much twisting force, without realizing it, that you might either strip the threads or snap the fixing. I've used my boy's tools and they certainly do the job but, I find them annoying when you have a nut or bolt which is just slightly to tight on it's threads to spin off by hand using the socket alone. The L shaped of the wrench is quite clumsy when you have to use it to do half a turn at a time. For this reason I prefer a power bar (some call them breaker bars) Here's my trusty old Britool on one of the Ibiza's wheels being used in conjunction with a deep single hex socket:

The great advantage of a breaker bar is that once you've loosened the nut/bolt you can then turn it straight out from the wheel and spin the nut/bolt out very quickly by rotating the shaft of the bar:

However, at this initial stage you're only going to loosen it by about half a turn and you do it with the wheel on the ground to stop it turning. You'll find it much more difficult to break it away after jacking the wheel off the ground. Whatever you do don't actually undo them all the way before you've got a jack under the car or it all gets a bit too exciting! You do know where your locking nut adaptor and any other necessary tools are don't you? My Ibiza has little black plastic caps over the wheel nuts which are so deeply recessed that it's very difficult to get them off without the special little plastic tool supplied.
I think a breaker bar and socket is probably about the best option for roadside work and I keep a 14" one, with a suitable deep socket, in the Ibiza's boot all the time. It is a bit of a more expensive option, and you have to have, or buy, a suitable deep single hex socket to use with it (the extending bar usually comes as a kit complete with a selection of suitable sized sockets) However a breaker bar is not all that much more, and you can use it for other jobs too.
It's not often you won't win with a modest size of breaker bar, but you can always escalate the attack with a longer bar and length of pipe if necessary:

However you're not going to be carrying that around with you under everyday conditions and you do need to wake up the "little gray cells" before use as you're definitely into breaking and wrecking territory now!
Assuming you've managed to loosen the nuts - just half a turn - it's time to think about jacking it up now. If you're at home a trolley jack is definitely the way to go. The width and length of a trolley jack, even a little one, gives much much greater stability:
I've had this one for over 40 years - I rebuilt it recently with a new pumping unit:

But. if you can afford one, a small professional one is really the best:

You can see how wide it is so even if you leave the handbrake off and out of gear, on a flat surface, the vehicle is going nowhere.
And on that subject, of course you need to firmly apply the handbrake and chock the wheel which is diagonally opposite the one you are jacking up. so here I'm working on the N/S/F (passenger front) so I will chock the O/S/R (driver side rear). That way, as the car is jacked up so the chocked wheel will be loaded more and this tends to lock the chocks under it's tyre. You can buy purpose made chocks quite cheaply. Here's some I use:

The red ones were bought for peanuts and live in the Panda's boot. The yellow ones came with my old Datsun 120Y estate and the 2x4 wooden blocks are there just to show you don't need to buy dedicated items - although they don't provide quite such good resistance. I wouldn't jack up a vehicle using it's own cheap jack without chocking and you're about to find out why.
Now it's all getting serious because, if you're not at home, or don't have a trolley jack, we're going to use the jack supplied with the car to lift it. There are two typical types:

The red one is a very common design and I'll talk some more about that in a minute. The black one is for the Ibiza and is of a type which VAG seems to favour as my old Cordoba had an almost identical unit. Neither jack is, in my opinion "safe" and it's only too easy to have an accident with either type. The problem is they exert a very localized footprint on the ground so they have no inherent stability. If the car moves the jack has no ability to resist and the car will fall off the jack. I earned extra money by doing 24 hour standby on the breakdown truck and I've been to a number of incidents like this. Luckily I've never seen anyone hurt but if it falls off the jack after the wheel has been removed then the bottom of the car will be on the ground and, apart from the possible damage to stuff like brake backplates and suspension, it's very difficult to now get anything under the car to get it lifted back up again. So be very careful what you're doing and don't let anyone near or in the car when it's on the jack.
I can't stress this enough so lets look at this a little closer. The foot on the black jack is articulated around one swivel pin:


which allows the foot to stay flat on the ground as the jack is extended and lifts the car:

Look at how small the foot is though. It can't provide any fore and aft stability so if the car starts to move back or forwards it's just going to fall off. Hopefully though you've got the hand brake firmly applied and the chocks either side of the diagonally opposite wheel:

What many people don't think about at all though is the wheel opposite the one being jacked up. Now in this instance I'm jacking up the N/S/F wheel so let's take a look at the O/S/F wheel. Before I started jacking up the N/S/F the O/S/F looked like this:

But now with the N/S/F jacked up just enough for the tyre to clear the ground, a lot of the weight of the front of the car is taken on the jack and the O/S/F now looks like this:

Still in contact with the ground, but not by much. So why is this a problem? because there's now very little weight pressing down on that tyre and, with the other one not in touch with the ground at all, it's going to be oh so easy to push the front of the car sideways and off the jack. If you're not on a sound and solid surface it's almost guaranteed to do this. By the way, with this type of jack you need to carefully place the foot directly, vertically, under where the contact pad on the lifting arm contacts the car. If it doesn't lift vertically it can push the car sideways. Also don't jack up the wheel you're working on more than necessary because the higher you jack it the more instability you introduce.
So now you can complete the removal of the nuts/bolts, remove the wheel and stick the new one on. Just be a bit careful putting the new wheel on the hub. If you get too violent with it and the surface the car is on has a bit of mud, gravel, etc on it, there's always the chance you could still push the car sideways off the jack! Scissor type jacks, like the red one, are very slightly more stable due to their bigger footprint:

but are still not to be trusted. I also carry around a piece of 12 ply which I'd deploy if the surface was not very smooth.

I hope, having read this, you'll appreciate that you should NEVER stick any part of yourself, not even a fingertip, under a car supported by only a jack. This applies to hydraulic trolley jacks or any jack in my opinion. Trolley jacks stay up because hydraulic oil has been used to pump up a ram and take the weight of the car. All that's holding in this pressure is a rubber seal, bit like a big diameter brake cylinder if you like. A catastrophic failure of the seal, thankfully rare, will result in an instantaneous collapse of the jack! Again, DON'T go under any vehicle supported on a jack alone!
People ask where to put their axle stands so they can safely work under the car. This will differ from vehicle to vehicle but in general the subframes are a pretty safe bet. h
Here's a couple of pictures of how I support the Ibiza on the front subframe if I'm doing an oil change or perhaps working on the brakes etc:


You'll notice the wee block of wood on the saddle? I always do that partly to protect the finish for rust purposes but mostly because the axle stand's saddle is much less likely to slip. By the way, I would never jack in the middle of a rear axle no matter how robust it looked. Torsion beams like those used in our Fiats are very likely to distort and if they do that means a new axle because the rear wheel geometry will be ruined by even quite a small bend in the beam. But even on the old type rear wheel drive cars I've seen an otherwise good axle, showing no signs of oil leaking, come back after being jacked on the axle, with an oil leak. I just won't take the risk. Goes without saying, I hope? that you never take the weight of the vehicle on the sump or gearbox casing. Different if you're just supporting the engine when disconnecting a mount, to do a timing belt for instance. But never to take the whole weight of the front of the car.
So take care folks, only do this on a smooth sound and level surface, certainly not a gravel driveway, but more than anything be very aware it could fall off the jack and keep your body parts well out of the way as well as keeping anyone else well away - and definitely not in the vehicle or even touching it - while you're doing it. Most manage it without even realizing the possible disaster that can ensue, but some, the ones we go out and rescue, do not!
Last edited:

