345884264_1724100544686172_4671623679724577340_n.jpg

Punto (Mk1) Project R the Mk1 Cabrio Restoration project

1998 Rosso Red Mk1 Punto ELX Cabrio, that has been very neglected.

Introduction

Project page for my 1998 Punto Cabrio Restoration project. This car was aquired in October 2023, with no service history and in a pretty poor state, however they are becoming extremely rare now in the UK, just a dozen or so of the 1.2 16v models left on the road and about 30 or so cabrios in total.

Pictures are from the forsale add and ones the previous owner sent me before I got it.
Progressing well Andy.:)
Was the water pump leaking, looking at the condition of the O ring?
It may be a good idea to back flush the radiator with hoses off, in case any of that brown water contains sludge blocking the core tubes.
When surfaces are all clean it will be interesting to see with a straight edge the condition of the cylinder block and head.
I assume piston heights are all the same with no discrepancies re earlier concerns? Easier to check now head off.
It always surprises me that after much use, it is still possible to see the boring and honing "cross hatch" markings down the bores from new.
A little messy, but I often put an equal amount of oil on top of all pistons as a check to see if one drains away earlier overnight indicating a poor piston seal. It does involve cleaning it out before reassembly, but can be a useful check.
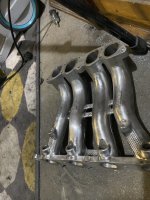
That process can also be used as a quick check with manifolds off and old spark plugs replaced using petrol or thin oil to check valve sealing if not being removed, as a poor one will leak into manifolds. Though I assume with yours you are overhauling the cylinder head anyway.
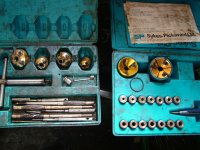
If replacing head bolts I find one ground on a grind stone with three flutes after wire brushing any sharp edges acts a a suitable thread tap to clean bolt holes.
 
The water pump was glued in with some sort of sealant, so either they didn't have an o-ring or it had been leaking.
Flushing the radiator is not a bad suggestion, I was thinking of taking the whole radiator out and trying to clean the inside of the expansion bottle as it is do dirty you can't see the fluid level in it anymore.

Pistons are all the same height, I checked them all with the height depth tools once the cambelt was off so I could set the timing on the bottom pulley.

the head is going to be rebuilt. Its really messy with sludge built up in and around the valve springs. I had to pick sludge out of the R10 Ribe head bolts before the tool would fit in them the sludge was that thick, further indicating a lack of servicing.

I have a reasonably good tap and die set to chase out the threads, I just need to see if there is one that matches the threads of the head bolts. The next few days/couple of weeks is probably going to be spent just cleaning things up. I may strip the engine down a bit further, take off the power steering pump alternator and starter motor just so I can check the condition of all the pipe work. I seem to think this engine had a steel coolant pipe that was prone to rusting ? as there is very little to this engine I could get the block out and see if the deck needs to be leveled, though I am being cautious as the sporadic use of thread lock on some of the head bolts leads me to think that maybe it has had a head gasket done before and so if it has had the head skimmed before there might not be much leeway to remove anymore material.

The engine was unbelievably filthy inside, so I am glad I have stripped it down, no amount of engine oil flushes or changes would have cleaned the mess up.
 
When I zoomed in on the water pump it looked like the remains of an O ring.
Be a good job when it's done and satisfying.:)
I think there was the remains of an old O-ring in there, to be honest it was a right mess, someone had really bodged fitting the water pump. There is a little play in the bearing as well so the old one will be going in the bin.

The cambelt seemed to be in good condition but handling it you can feel the rubber has gone quite hard and its not a supple and flexible as it should be, I think another symptom of a car that has stood for a long time but had been loved at some point in the past.
 
I hope you get it going well, it was a sweet engine, not massively over endowed on power suited the mk1.

When you said how slow it was I was a bit surprised...seems you've discovered why.
 
Cylinder head stripped down cleaned, combustion chambers given a light polish and the ports all given a going over to remove burrs moulding marks and anything else that will disrupt airflow.
IMG_2658.jpegIMG_2642.jpeg

The valves are all now clean and have been kept with all their own original parts, this engine has double valve springs which is impressive the collets have all been cleaned.
One of the discoveries is that the exhaust valves were so dirty and coked up even when fully open they would have had a considerable restriction in air flow.
They also had a about a mm of cack as were the intake valves the amount of carbon in the engine both in the combustion chamber and on top of the pistons would have massively decreased the displacement, airflow and increased the compression ratio this is probably why I was getting such high figures on the compression test
IMG_2621.jpegIMG_2618.jpeg
IMG_2660.jpegIMG_2661.jpeg

The air intake pipe work has also been cleaned up and will need a wash in the industrial parts washer (dishwasher) to get all the grit and grim out of the inside.

Attachments

  • IMG_2659.jpeg
    IMG_2659.jpeg
    1.9 MB · Views: 29
There's another guy with a big fiat sign, these things are just getting too common
 
Started lapping the valves last night, only got one cylinder done but was getting a pretty good seal, put some water in the head and left over night, this
Morning a lot of the water was still there.

Was having problems with the stick not sticking to the valves, basically the valves are just too small so I’ve ordered something better which should arrive same day
IMG_2700.jpeg
  • Like
Reactions: bugsymike
Depending on the valve, you can get ad drill on to the top of the stem
 
Depending on the valve, you can get ad drill on to the top of the stem
I know some do use this method with success, however I was taught that it was far better to use the sucker on the stick method as it revolves in both directions to give a better finish.
As an apprentice doing a six or 6 cylinder engines I certainly would have like to make life easier and I know there is a tool that fits on a drill which allows rotation in both directions similar to the hand method although I have never used one.
The best thing I did was to buy a set of Sykes Pickavant valve and seat cutters at auction, after cutting the seats at the correct angle, it only took a short while with the stick and grinding paste to give a good even, but critically a narrow seat. This increases the sealing ability of the valve spring shutting the valve as more pressure in a smaller area. A wide contact area is not the best answer.
By the way the "dirt" is actually a corrosion protection.;)
 

Attachments

  • DSCF1223.JPG
    DSCF1223.JPG
    474.2 KB · Views: 12
I bought a tool that attaches to a drill and it works by rotating the valve lifting it, turning it putting it back down and turning it again and it goes both clockwise and anti-clockwise. Total piece of crap, broke in about 5 minutes and so have gone back to the stick and suction cup. I have managed to get one cylinder to seal really well, zero water ran out of it after 12 hours. The other 3 still need work, but am getting good results with the stick and happy to continue this way. learning to listen to the valves and know when they are ground in

Also keeping a can of carb cleaner on hand to clean off the valve and the suction cup as anytime the tiniest amount of paste or grease gets on the stick it won't stick, but with a spray and wipe of carb cleaner it stick brilliantly till the next time you move the stick from one valve to another.
 
I know some do use this method with success, however I was taught that it was far better to use the sucker on the stick method as it revolves in both directions to give a better finish.
I used to do both, drill first to get rid of the pitting marks, then by hand and stick to get a better finish
 
I used to do both, drill first to get rid of the pitting marks, then by hand and stick to get a better finish
It can be a laborious job, so when I got hold of that seat cutting tool I was amazed how much easier it was, just a few twists of it and the cutters had got rid of all the pitting etc. then a bit of coarse followed by fine paste and jobs a "gud un".
The other box that had the valve cutting tool could reclaim quite sad valves so a good auction buy for me.;)
 
My usual impatience was getting the better of me. I came back to it last night and took my time. Ironically taking it slower meant I ended up going quicker. I seem to have managed to get all the valves to seal nicely now. I did them all by hand, course past first then finished with fine paste which I kept grinding till the paste was pretty much gone and the valve was super smooth against the seat. Probably a far better fit than from the factory.

Hands are now sore. Definitely a job they are not used to. Now I need to price up and order the following

Cambelt kit with pulley and water pump.
Oil
Oil Filter
Coolant
Air filter -- might as well complete a full service.
Hose clamps -- had to break a few during the removal process
Black insulation tape -- several wiring connectors have lost their tape or rubber gators around them have split.

A new thermostat has already arrived, and I spent some time last night attacking the engine with a steam cleaner to remove more of the grease and oil from the front end of the engine before it all goes back together.
 
Its all a little bit out of order here, but here is the video to go with all the bits on the intake side that I had to fix

Intake boot/hose goes on the 90's too, they are absolute unobtainium on the 1.6, I ended up bodging my own.
I think they have become the same on the 1.2 now as well. Lots of people post wanted ads on the various mk1 groups even in Italy for this part you would think there would be enough demand for someone to do a limited run of some replacement pipe. Maybe someone should message Sparco
 
Interesting that you can't reply to/quote an update. @ben is this something we can change?

Intake boot/hose goes on the 90's too, they are absolute unobtainium on the 1.6, I ended up bodging my own.
Afraid not, because updates aren't really a part of the thread, I just insert them virtually based on the timestamp...
 
I think they have become the same on the 1.2 now as well. Lots of people post wanted ads on the various mk1 groups even in Italy for this part you would think there would be enough demand for someone to do a limited run of some replacement pipe. Maybe someone should message Sparco
I fear a fair number of mk1 parts will get more scarce. I am still very tempted by a 3 door P90 or P85, the only issue is space & probable future ULEZ in my area...
Here is my 'good enough' bodge from years ago, it is not glamorous 😂
 
Back
Top