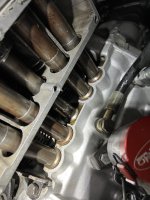
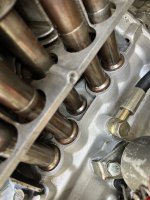
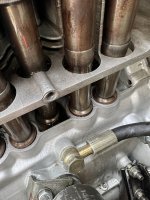
One of the problems with the Panda30 cylinder head is that it uses 2-part push-rod tubes, and the lower (and longer) tubes are just about impossible to find and buy. I have fitted a Panda30 head to the '695SS' engine that I am building, but it came only with the 'top' tubes---the ones that go between the the top of the head and a lower 'deck'. There are a number of ways around this problem. (1) NANNI RICAMBI now list spring-loaded push-rod tubes for the Panda30 (part number 0387S). I have recently purchased a set of the these tubes (mainly because they have a sale on at the moment) but I cannot discern any measurement difference between 'normal' spring-loaded push-rod tubes and the Nanni items, although their invoice DOES indicate that the correct parts were invoiced. I will concede that the 'normal' spring-loaded tubes that I compared the Nanni items with were bought from a different supplier. (2) Use VW 2-part adjustable push-rod tubes. I am using these tubes on my engine (the Nanni items were not available when I started building my engine) but the push-rod tube apertures on the 'lower deck' have to be opened up to allow the VW tubes to pass through, and the webs between the 'lower' deck and the top of the head have to be relieved to allow the adjusting nuts (on the tubes) to be turned. (3) As suggested by Jacques (Bouncing Bambino), cut away the outer edge of the lower apertures to allow the fitment of 'normal' spring-loaded push-rod tubes. I must admit, I hadn't thought of such a drastic option so can't give an opinion as to how successful this would be, or how much metal needs to be removed.
Which ever option is decided upon, one has to give thought as to what seals are to be used. My decision was to remove the old, dry and hard original seal rings in the top tube apertures in the head and fit slightly oversize, modern 'O' rings. I then had a slight chamfer put onto the top of the push-rod tube so that with a smidge of rubber grease on the 'O' rings, the tube could be (firmly!) pushed through the 'O' rings which would then be a tight fit. I also used a 'normal' silicon push-rod tube seal between the push-rod tube and the underside of the top tube aperture. BUT BEWARE, which ever push-rod tube option that you use, the under-side edge of the top push-rod tube aperture needs to be chamfered. If this is not done, the pressure of the push-rod tube pushing the seal up against the sharp edge of the top aperture will split the seal--this will (a) possibly allow the tube to leak at the top and (b) loosen the tube as the spit seal will break away, thus effectively reducing the length of the tube. I had to think hard as to how to chamfer the underside of the top aperture ( I don't have access to a lathe or a milling machine) and eventually, after a couple "not very good ideas", came up with a simple tool. I have never been successful in putting any pictures onto the Forum, so will send a couple of pictures of my tool to Jacques and ask him to kindly put them onto the forum, OR contact me direct (
[email protected]) and I will send to any one who wants them, the pictures and a decription of the tool and how I used it. Lastly, and it again doesn't matter which option you use, the very top of the push-rod tube needs to have some small grooves (4) put into it so that, as per factory 'concertina tubes, oil can drain from the rocker-chamber back down the push-rods.


 - happy to say that so far it has done the job! No more leaks on the tubes.


")