IMG_4676.JPG

Panda (Classic) 1993 Fiat Panda Fizz "Pandino"

Introduction

Hey everyone, let me introduce you to my first car! :)

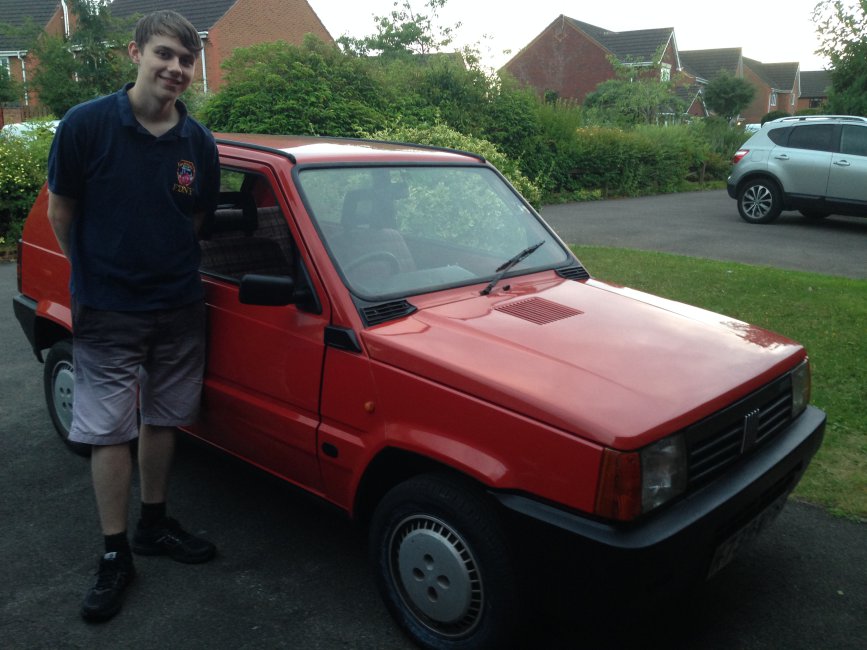
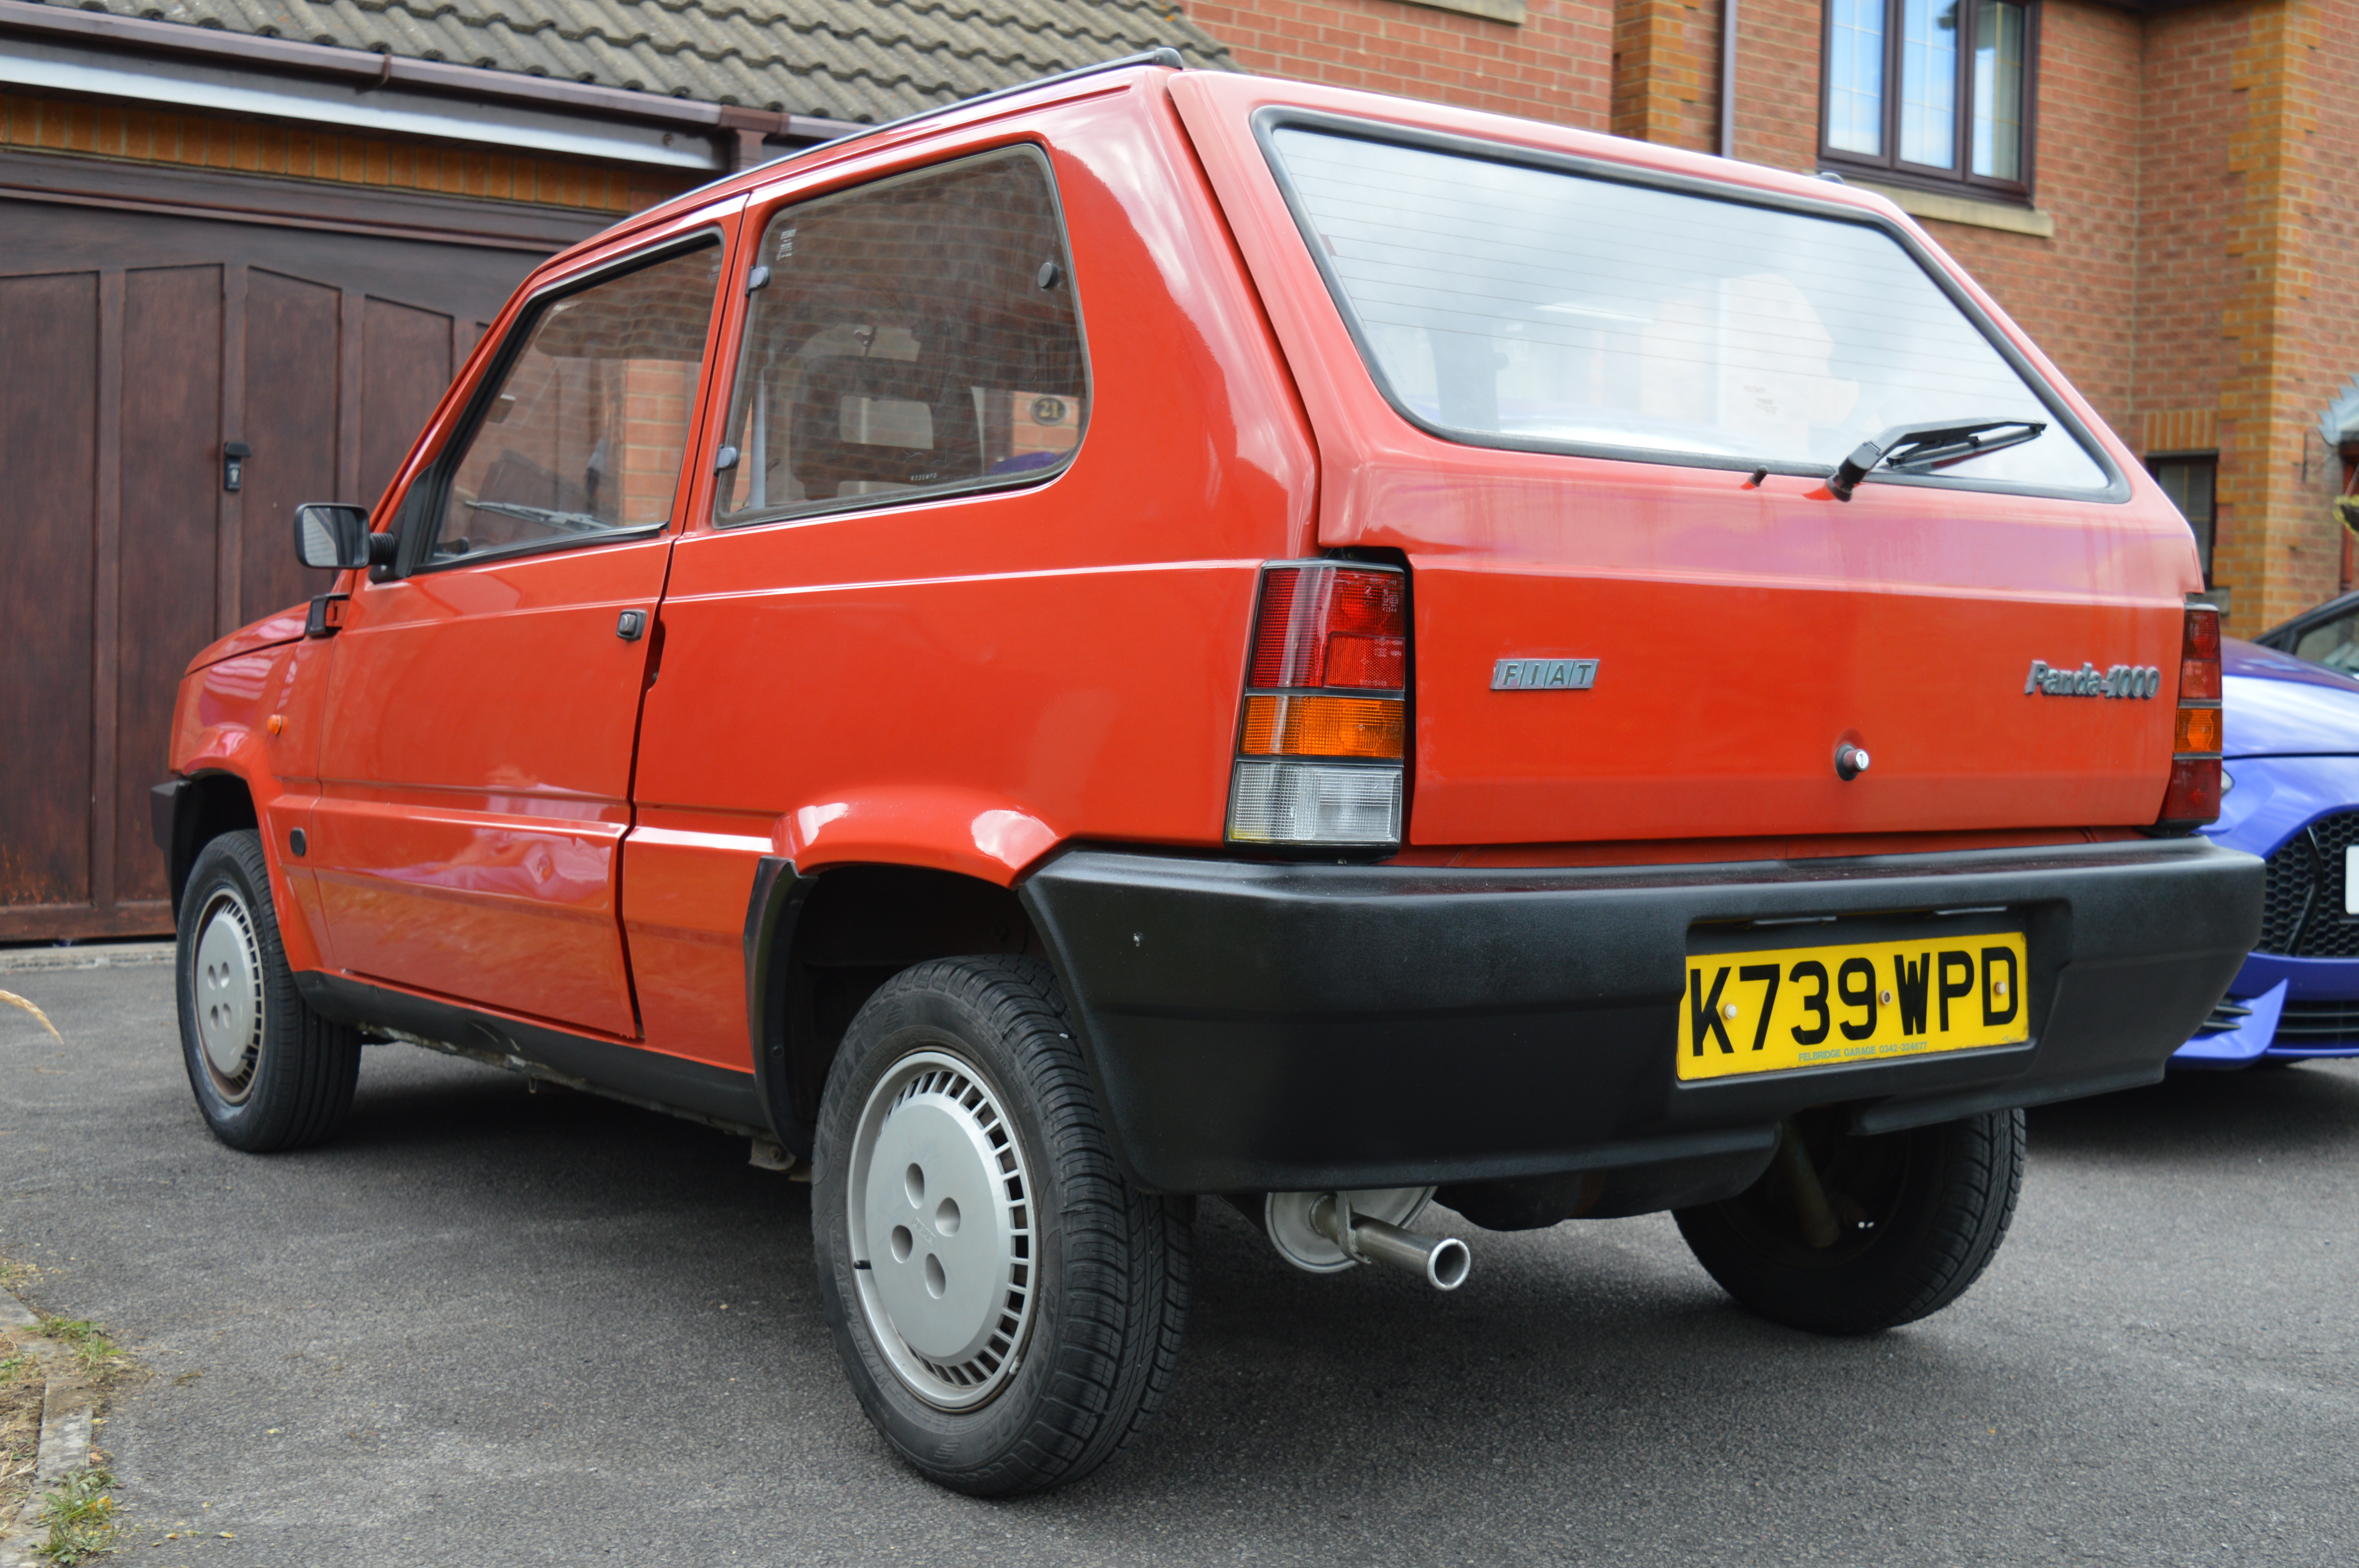
The car is a 1993 Fiat Panda Fizz, 999cc engine with fuel injection, only 26,000 miles at the time of buying. Nicknamed "Pandino" by the previous owner, and I'll make sure that name sticks! :D

Pictures are compulsory of course, so I've attached some of my first images that I've taken of the car. You'll likely find various other pictures in this thread when I get some things done to it! I attached the pictures to this post and I've uploaded one to the gallery so that I can have this one embedded! :rolleyes:
DSC_000824.JPG


*Following list is from original post, more has been done since, read thread for more*
What have I done already? Well I haven't even had the car for a couple of days yet, but I've done a few things...
  1. Used upholstery cleaner on the dirty ceiling, definitely needs some more though!
  2. Figured out how to do everything (i.e. parcel shelf removal, putting seats down, seat positions, mirrors etc)!
  3. Cleaned all the windows and mirrors!
  4. Checked all fluids and oil levels!
  5. Checked all lights/buttons!
  6. Checked tyre pressures, which I might decrease in the rear as they're running quite high!
  7. Took out the spare wheel/tyre, gave it a good clean but it is showing it's age, though it's been pumped up so it'll get me home if I need it now!
  8. Took the seal/cover off the heater matrix to remove the forest that was growing within it...
  9. Tried taking off the grille but couldn't get one of the centre poppers off and the front screws look a bit rounded off...
  10. Ran the car and moved it on the driveway!
  11. Put a blanket, a bag, a tool extension and a first aid kit in the boot!

*Following list is from original post, read thread for more*
What I plan to do next...
  1. Clean, clean, clean!
  2. Hopefully obtain new badges for the front and rear as all are discoloured!
  3. Try and clean the garage to fit the car in (or more likely at this time, find a suitable car cover for it)!
  4. Seal doors to prevent rust!
  5. Get some touch up paint for areas where paint has come away!
  6. Buy some Fiat Forum stickers of course!
  7. Potentially buy new number plates or at least replace some screws as they're looking a bit worn!
  8. What ever else I end up thinking of... follow the thread and read for more!

I also plan to go to some Panda classic events with others. I'll keep an eye out, but feel free to invite me to something if you've got something/see something going on!

That's about all I can think of right now! It feels so strange having a car, I'm very happy to have bought a car I really wanted. I've been looking for ages. :worship: If you have any questions about it then please do ask! I'm very happy to talk about my car! (y)
Also been looking at getting a dashcam for Pandino. I've been having a look, trying to find one that has good quality but doesn't cost an arm and a leg too...

Well DON'T bother with the Nano q 0903 that I've got! :mad: I'm having serious issues with it as too have loads of people I've been reading about on the manufacturer's site. Too many issues to start mentioning here but I've no time for stuff like that that's new and won't function and least of all IT based stuff that does it's own thing without anyone having interferred with it; it's getting returned.:bang::((n)
 
Happy 27,000 miles to Pandino today! :D

With Chas/Erwin the 1994 CLX now joining my Panda family temporarily, I have a couple of things I can use for Pandino. The wheels and potentially the lowering springs will be looked at. Still debating on whether or not to keep the wheels black or not, but I will be sure to get some new center caps - maybe Abarth style ones will fit with my Fiat/Abarth front grille badge as well? Either that or black Fiat caps :)

We will see what else will benefit Pandino in due course. One small but interesting thing is the little screwdriver you find in the washer fluid container - Pandino didn't come with one, but Erwin has one. The end of it is rusty where water has sat at the bottom of the compartment it stays in though, so I'm not sure what I can do to get it in a use-able state yet, but we shall see!

If anyone is interested in Chas/Erwin in the meantime then let me know on the thread for the CLX as mentioned earlier in this post.
 
The wheels from Chaz are going to be restored in either a white or a gold/bronze type colour. That's what I'm thinking so far, anyway! This will probably be done in March :)

Popped into Halfords to get some more Waxoyl. I'm going to do a little touch up to one of the wheel arches and then waxoyl them and the sills. These caught my eye while I was in there...
29.jpg

Tempting. At £19.99 as well, it's not too expensive, I'll have to think about this one :p
 
These caught my eye while I was in there...
View attachment 177131

Tempting. At £19.99 as well, it's not too expensive, I'll have to think about this one :p

Great idea. If you do decide to go ahead, be sure to bolt them to the bodywork by making a steel bracket for them to fit behind the bumper and wire via a relay. I fitted similar lights to my first Panda 20 years' ago but bolted them to the plastic bumper with no additional support; annoyingly they would bounce about and direct light all over the place due to the flexibility of the bumper.
 
Great idea. If you do decide to go ahead, be sure to bolt them to the bodywork by making a steel bracket for them to fit behind the bumper and wire via a relay. I fitted similar lights to my first Panda 20 years' ago but bolted them to the plastic bumper with no additional support; annoyingly they would bounce about and direct light all over the place due to the flexibility of the bumper.
Initially, I was thinking that they would bolt to the top of the bumper in front of the grille, not sure if that's where you had it before or not? Do you think it would still bounce around like that? Possible it might... it's never as easy as it first sounds though :p
 
top of the bumper in front of the grille, not sure if that's where you had it before or not?

That's exactly where I had them and I eventually took them off following damage to one of them in a collision. They looked great but in practice they shone all over the bloody place especially on rough roads and no doubt dazzled on coming drivers. :(

It should work if you remove the bumper and you made a 'L' shaped bracket mounted upside down and bolted to the bodywork behind the bumper, but with the other end of the bracket poking out above the bumper in order to bolt the headlamp to. The fixing needs to be rigid and the plastic bumper just doesn't cut it when it comes to mounting headlamps due to its flexibility.
 
You defiantly need them bolted to a good brkt Say 2mm - 3mm thick. To the body also to fully stabilise them a jubblie clip opened up an tapped to the top of the lamps and body giving adjustment Is normal other wise get the leister grillia kit with built in lights.


Keep on pandering
 
You defiantly need them bolted to a good brkt Say 2mm - 3mm thick. To the body also to fully stabilise them a jubblie clip opened up an tapped to the top of the lamps and body giving adjustment Is normal other wise get the leister grillia kit with built in lights.


Keep on pandering
Ah yes the Lester grille is one I considered a little while back, along with the arch plastic trims as well. Decided against them for now and went for a mk1 grille for now, I'm liking the look :)

I'll consider the lights in the future but thanks to you and Pandani for the info as otherwise I may have ended up doing it to the bumper!
 
Well if did you get a Sisley bumper from that scrapy ? if so why not French in the lights under the grill in to the bumper bolted to the body would look pretty cool like a panda trapper !!
 
Well if did you get a Sisley bumper from that scrapy ? if so why not French in the lights under the grill in to the bumper bolted to the body would look pretty cool like a panda trapper !!
Bumper was taken before I got to it so no spare bumper for the front. I have a spare rear bumper but that's not going to help ;) Quite like what FCY10 did with his Sergio Tacchini - put some round lights in each corner. Just remove plastic in shape of the lights to go in each side of the bumper and eventually it will fit... don't think I want to modify the bumper that much though, I want what I do to be reversible if need be (y)
 
Quite like what FCY10 did with his Sergio Tacchini - put some round lights in each corner. Just remove plastic in shape of the lights to go in each side of the bumper and eventually it will fit... don't think I want to modify the bumper that much though, I want what I do to be reversible if need be (y)

Dead easy to do, just drill a round hole, then use a flap wheel on a drill to gradually open out the hole until the light slips in and you can get it really neat. Technique doesn't work so well with square lights though. Mine are mounted straight to the inside of the bumper which works fine, but if you are doing that go for smaller lights than the ones you are looking at, heavy ones will need a more solid support.
 
Mm go for it bumpers are pretty cheap !
I see front bumpers for say £50 but all from Germany/Italy, is there a cheap supplier in the UK or just hunt the scrappies until one is found?
Dead easy to do, just drill a round hole, then use a flap wheel on a drill to gradually open out the hole until the light slips in and you can get it really neat. Technique doesn't work so well with square lights though. Mine are mounted straight to the inside of the bumper which works fine, but if you are doing that go for smaller lights than the ones you are looking at, heavy ones will need a more solid support.
Ah yes, remember you mentioning the flap wheel when I PM'd you a while back. While I remember, I believe the Uno Turbo wheels I've got from Chaz for Pandino do actually have 5mm spacers, but I'm yet to take the wheels off :p

Your lights are mounted inside the bumper, but I suppose you've secured it somehow rather than just letting it rest in there (albeit snugly)?

My partner's father has a set of round rally lamps somewhere that I can have but we've got to find them first. I think he had them on a classic Escort. Probably too big for doing what you've done though...
 
Pandino got some more attention today - I've been meaning to tend to the not so nice looking crack that had appeared down by the arch for a while.
30.jpg

After a sanding down of the cracked area, a little rust was of course revealed. I hoovered up the sand and dirt (and of course a little bit of the red paint on the floor, which really doesn't stick to the matting underneath), and then put some kurust on the area.
31.jpg

The excess was wiped and the kurust was left to dry for a bit, and then I got out the Cataloy knifing putty I had to fill in the cracked area. Applying it was not as easy as I thought, but this is what I ended up with...
32.jpg

Once I've got some time, I'll treat the area again and then paint it over. Then I shall attend to the other 101 jobs that need doing on both Pandino and Chaz... :rolleyes:

In the meantime, have a picture of Pandino after driving in the light snow we had (y)
33.jpg
 
With regard to the lights;

1. Get online snd grab some Hella equivalent models, slightly more expensive but worth it! All ring lights are budget (hence why they are sold at Halfrauds!) They have plastic backing which is not strong and the reflectors tarnish in less than a year which loses you a lot of light.

2. I have two front bumpers which you are more than welcome to have and cut up to practice mountings. Like it has been suggested, get the lights mounted to the front panel via. A bracket rather than just straight to the bumper :)
Thanks for letting me now. Ring are £20, the Hella equivalents are £65 :eek: But I suppose you do pay the price for quality!

I've looked and I like the look of these ones (rectangles take my fancy over round ones, unless I was mounting in the lower corners of the bumper) http://www.ebay.co.uk/itm/New-Pair-...462170?hash=item3ad4fd219a:g:qdMAAOSw-0xYc0--

So, more about this bracket via the front panel... would it just be a straight piece of metal welded to the front panel and then the metal protrudes from the rear of the top of the front bumper and the light is mounted to that? Or is it still mounted to the bumper with a bracket as support? You mentioned cutting up the front bumper to fit it, but what bit would be cut (sorry if that's a strange question, I tried to look at some pictures but there's not many close up where I can see the mount :p).

I'd take a look at the bumpers but you're 4 hours away from me (y)

---

So, here's the next issue I'm having, now with the horn. I decided today would be a good day to change my horn push to the Sisley one. I tried removing my current horn push but with no luck. The horn worked before I fiddled with the push but then it stopped working. I went to work for 6 hours, came back out to the car, and the horn still didn't work. When I had arrived home, I gave it another toot for good measure, and it worked. Several times, in fact...

Considering it had magically fixed itself, I took the horn push out properly this time (Haynes manual never told me about the screws on the back of the wheel!) and put the Sisley one in. Now, the horn doesn't work again. What I'm hoping is that it just starts working again and has no issues, but I'm not sure why it would do that? And why it stopped working then started working again today?

If anyone has any ideas at all then feel free to let me know... picture of the horn push in place now:
34.jpg

All screwed in and everything. Even tried taking it off again, cleaning all the contacts and springs, then putting it back together. Still no luck right now, but I'll try again after going to work again tomorrow :rolleyes:
 
This post contains affiliate links which may earn a commission at no additional cost to you.
It's all about electrical contact under the push button.
Re hella lamps I'll check what's on the loft of my place as plenty competitors samples from past.
I would say go for Britax lamps but the 7" round was the smallest so far to big.

Re bracket - structural integrity and strength is important otherwise you will be changing bulbs every month.
It is doable as add-on with no drilling but frame would have to be fabricated. I would suggest two flat plates sandwiched between body and bumper bracket- one each side, horizontal bar bracing them both and 'c' shape profiles overlapping bumper top far edge. Extra adjustable mini brace between lamp tops and top of front panel for extra lamp stability.
 
It's all about electrical contact under the push button.
Horn works now, been working every time I've tried it today :p Just needed a "rest period" after putting it in yesterday, apparently...
Re hella lamps I'll check what's on the loft of my place as plenty competitors samples from past.
I would say go for Britax lamps but the 7" round was the smallest so far to big.

Re bracket - structural integrity and strength is important otherwise you will be changing bulbs every month.
It is doable as add-on with no drilling but frame would have to be fabricated. I would suggest two flat plates sandwiched between body and bumper bracket- one each side, horizontal bar bracing them both and 'c' shape profiles overlapping bumper top far edge. Extra adjustable mini brace between lamp tops and top of front panel for extra lamp stability.
I quite like the rectangular lamps. If I did go for them, I'd probably want one's with covers on for added protection to them - won't be using them all the time. The Hella ones I looked at had them, but I'm not sure if I'll go for the extra lights yet - we shall see :)

The bracket is what I'm trying to get my head round at the minute. Without seeing the bracket, it's hard for me to visualise it, but I am sure that if I had the bumper off then it would become more clear. Do you have a picture/drawing of this sort of mount on the bracket? Cheers.
 
Horn works now, been working every time I've tried it today :p Just needed a "rest period" after putting it in yesterday, apparently...


I quite like the rectangular lamps. If I did go for them, I'd probably want one's with covers on for added protection to them - won't be using them all the time. The Hella ones I looked at had them, but I'm not sure if I'll go for the extra lights yet - we shall see :)


The bracket is what I'm trying to get my head round at the minute. Without seeing the bracket, it's hard for me to visualise it, but I am sure that if I had the bumper off then it would become more clear. Do you have a picture/drawing of this sort of mount on the bracket? Cheers.

Kolza S Is a perfect description. Do you have a vice No No !! An engineers vice If so get your self of to b& q. Get some flat bar 3.mm x 40 mm 1 mtr long. £7.00 Take off the bumper 8 mm bolts 13 mm spanner reveal the brackets then make a card board brkt
Try fit if works then use your steel bar to make the real thing using the vice Drill hole for the lamps and fixings bingo ! Brkts made To stabilise the lamp open up a 50 mm jubilee clip and self tap to lamp the to body or grill adjusting lamp angle either. Way with the tightening screw. 2 hour job wiring make take a little longer !
 
Back
Top