Technical EGR valve - remove, clean & modify.

Currently reading:
Technical EGR valve - remove, clean & modify.

shiningliao

New member
Joined
Jan 6, 2008
Messages
84
Points
18
Hi All,
I am going to remove the EGR and clean the valve. Possibly block it once for all....

I've read through all the relavent threads in this forum and some from other websites. Summary at here for other people to read in the future.


To understand EGR function and theory:
http://www.fordscorpio.co.uk/egr.htm

Rough guide for remove and clean EGR:
http://www.performancestilo.co.uk/index.php?topic=878.0
* You need to register to view it.

How to test EGR valve:
https://www.fiatforum.com/stilo-technical/131357-testing-egr-solenoid.html

Some discussion about remove the EGR:
http://www.pistonheads.co.uk/gassing/topic.asp?h=0&f=66&t=367761&i=20
* Read from the latest update to save time.
 
re: EGR valve - remove, clean & modify.

First question:

Which section of EGR to disconnect it?

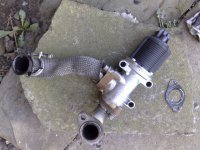
The rough guide from other web site shows remove the EGR with pipes connected to it. Please refer to the photo.

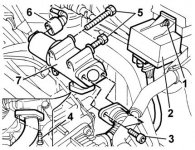
The FIAT Manual shows to remove the EGR without pipes connected to it. Please refer to the diagram.

I guess, remove with pipe is easier but difficult to clean the valve as you cannot see the valve. Any comment?
 

Attachments

  • egr_with_pipes.jpg
    egr_with_pipes.jpg
    69.9 KB · Views: 1,865
  • EGR core.JPG
    EGR core.JPG
    45.8 KB · Views: 1,564
re: EGR valve - remove, clean & modify.

Question 2:

I heard someone posted a method to block the EGR valve awhile ago. Anyone got the link? I cannot find it.


Question 3:

Does blocked-EGR requires remap? (To control right mixture of fuel and fresh air)
 
How to Block the EGR valve

Here you go:

egr_gasket.jpg


To block:
  • Loosen all 4 allen head bolts which hold the corrugated pipe in place (6mm allen key).
  • Completely remove the 2 bolts on the far flange (shown loose)
  • Carefully remove the gasket (shown on right)
  • Now using the original gasket as a template, make a new gasket using say the lid of a sardine tin (as I have, which is shown on the left)
  • Reassemble the flange with the new 'blocking' gasket.
  • Finally tighten all 4 bolts.

If all of this make no difference to how the engine runs (possibly it might run a little less smooth) then you can assume there's nothing wrong with your EGR system. This means you can put the original gasket back :)

If the engine runs a lot better then you've just proven your EGR valve is defective. This gives you four options:
  1. Do nothing - strictly speaking illegal :(
  2. Take if off completely and clean it
  3. Fit a reconditioned EGR
  4. Fit a new one
Mine was working fine and the soot you can see on that gasket, after I removed it, is what you can expect after just one day.
 
Last edited:
re: EGR valve - remove, clean & modify.

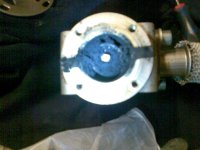
Just removed my EGR. The back of the valve full of carbon deposits. Soooooo dirty.
 

Attachments

  • Image067.jpg
    Image067.jpg
    550.5 KB · Views: 1,194
re: EGR valve - remove, clean & modify.

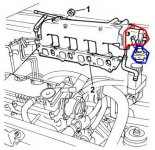
You wanted to know which was the stop valve or air shut off valve. I the picture above, it is the piece in the bottom right corner,with the EGR pipe going into the side of it.
 
re: EGR valve - remove, clean & modify.

You wanted to know which was the stop valve or air shut off valve. I the picture above, it is the piece in the bottom right corner,with the EGR pipe going into the side of it.

Just want to confirm the location of "air shut off valve". Is it the part in red colour? I guess the blue colour is the actuator that control the valve.

I am curious about when will this "air shut off valve" work? Why engine will shut off the air supply?
 

Attachments

  • Air Intake.JPG
    Air Intake.JPG
    32.8 KB · Views: 909
re: EGR valve - remove, clean & modify.

I have stripped the EGR valve to the minimum. This is the only way to see the valve and play with it.

Just a bit of push shows it jammed from time to time. After a good cleaning, it won't jam any more. I don't think EGR valve is easy to beak. It's very robust desgin, but requires clean from time to time.

Apart from EGR valve, I also cleaned the MAP sensor. The sensor hole were dirty. 50% of the hole are covered by dirt.

As for the air shut off valve. It's quite clean in my case.

Now, the car is running much better. Rev hard won't generate huge cloud of black smoke. I am very happy with the result so far.

Thank you for the help from many people. Especially john55. (y)(y)(y)
 
Last edited:
re: EGR valve - remove, clean & modify.

Cheers T (y)

I am now even more intrigued :yum: May have to get myself one of these.... maybe.

*** edit*** so what's different about this new gasket then? Anyone got a comparison piccie?
Had an interesting chat with the parts dept of Westover Fiat and they informed me the gasket design was changed no less than twice in the first year of manufacture - the last change being August 2002 :confused:

Going to speak to the service dept on Monday and see if they know of anything more recent :chin:

I'll certainly post a pic if I can get one (y)
 
re: EGR valve - remove, clean & modify.

JI am curious about when will this "air shut off valve" work? Why engine will shut off the air supply?
The throttle body or shut off valve (position pointed out by John55 (y)) is normally fully open both when the engine is off and also when running.

However, when you turn off the engine the actuator (which in turn is connected to the butterfly of the throttle body) is connected to the vacuum reservoir which causes the stop valve to shut firmly for approx 4 seconds. This kills the engine quickly and stops any overrun.

Once the vacuum dies then the stop valve flips open again.
 
Last edited:
re: EGR valve - remove, clean & modify.

Service news 10.21.08 is the information that the parts dept need.

Part no for perforated gasket 71751469
Part no for seals (2 required) 46773082

Fit gasket between the two seals.

The perforated gasket has three holes in it in a triangle shape, the holes are approx 5 mm in diameter, and the gasket is approx 0.5mm thick.

When cleaning egr valves the unit needs to be seperated from the electrical solenoid, the valve can be cleaned with carbon and gasket stripper, and the solenoid needs to be cleaned with brake cleaner, and operated manually using brake cleaner and wd40. When everything moves freely it can be rebuilt and refitted with the above parts.
 
re: EGR valve - remove, clean & modify.

When cleaning egr valves the unit needs to be seperated from the electrical solenoid, the valve can be cleaned with carbon and gasket stripper, and the solenoid needs to be cleaned with brake cleaner, and operated manually using brake cleaner and wd40. When everything moves freely it can be rebuilt and refitted with the above parts.
Thanks for the info NumanR (parts now on order) (y)

I'm a little confused though. Does this new gasket fit:
  1. Between solenoid and EGR
  2. On one of the flanges manifold side (shown in post#4)
  3. Beneath the EGR on the exhaust side.
Guess it should be more obvious when I get the gasket but thought I'd ask?
 
Last edited:
re: EGR valve - remove, clean & modify.

When cleaning egr valves the unit needs to be seperated from the electrical solenoid, the valve can be cleaned with carbon and gasket stripper, and the solenoid needs to be cleaned with brake cleaner, and operated manually using brake cleaner and wd40. When everything moves freely it can be rebuilt and refitted with the above parts.

Looking back on how I clean the EGR valve, I found a shortcut.

The carbon deposit mainly stay at the back of the valve. Between the valve spring and the electrical solenoid.

You can actually just remove the electrical solenoid. Use brake cleaner and WD40 to clean valve while it still attach to the engine. Use finger to push valve and make sure it's moving freely.

In this way, you don't have to remove the EGR valve body which can save lots of time. I didn't see much dirt on other sides. Exhaust is blowing over these holes, I don't think it will be too dirty. In my case, only lots of dirt between the electrical solenoid and the valve spring.
 
re: EGR valve - remove, clean & modify.

Here are those gaskets NumanR mentioned.
gaskets.jpg


From the shape it must fit one of the flanges on the ends of the corrugated tube which connects between EGR and stop valve. Would imagine it makes little difference which end you fit it to.

The black gaskets which are fitted both sides of this new gasket look to me to be identical to the standard gasket. It that's the case then strictly speaking you only need one as the other is already in place.

Costs:
New Gasket = £11.29
Original Gasket = £1.68
(x2)
 
re: EGR valve - remove, clean & modify.

Hi guys, the gaskets are put at the throttle chamber end, the holes cause the gases to mix better in the chamber rather than having a large amount of exhaust gas suddenly dumped in the chamber when the valve opens.
 
Back
Top