And you even had extra time to paint a man with a camera in it! Nice one matey- Look a good finish indeed. Good paint match too! I cannot see difference myself


You are using an out of date browser. It may not display this or other websites correctly.
You should upgrade or use an alternative browser.
You should upgrade or use an alternative browser.
General And so it begins MK2
- Thread starter Harllequin
- Start date
Currently reading:
General And so it begins MK2
Great skill....:worship::worship::worship::worship::worship:
Very nice ")
Cool colour too
Good luck
Cheers
Dave
Cool colour too
Good luck
Cheers
Dave
OP
OP
Harllequin
Member
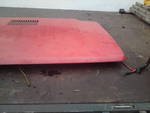
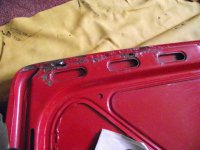
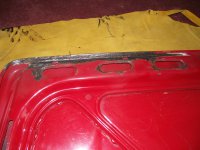
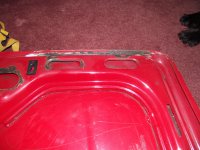
Ok another pic heave post inc
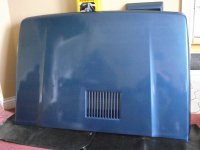
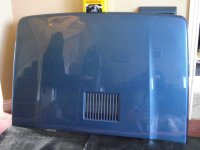
The bonnet is now ready to be fitted to the car, thanks to Mark who I bought the car from he kindly sent me this bonnet for the price of the postage
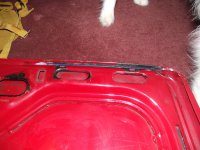
On the outside there was very little rust, just a few blisters here and there.
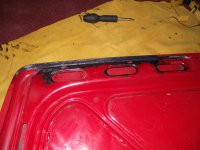
Inside the lip was rather bad, so it was out with the cutter and rust killer etc.
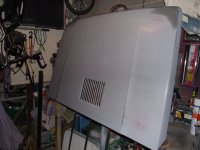
Usual sinding, rust killing, primer then paint, followed by a sand and polish.
Once its on the car I'll fill the lips with waxoil to make sure the tin worm can't get back in.
I'll get it on the car when it has hardened off a bit more in the house and add the pic of it fitted then.
I'll uplaod the pics in the order of: -
Old rusty red bonnet
Rust killing, primer
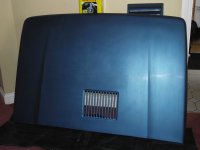
Bonnet painted and close up of finish
Bonnet sanded and close up of finish
Bonnet Polished and again close up of finish
16 pics in all
The bonnet is now ready to be fitted to the car, thanks to Mark who I bought the car from he kindly sent me this bonnet for the price of the postage
On the outside there was very little rust, just a few blisters here and there.
Inside the lip was rather bad, so it was out with the cutter and rust killer etc.
Usual sinding, rust killing, primer then paint, followed by a sand and polish.
Once its on the car I'll fill the lips with waxoil to make sure the tin worm can't get back in.
I'll get it on the car when it has hardened off a bit more in the house and add the pic of it fitted then.
I'll uplaod the pics in the order of: -
Old rusty red bonnet
Rust killing, primer
Bonnet painted and close up of finish
Bonnet sanded and close up of finish
Bonnet Polished and again close up of finish
16 pics in all
Attachments
-
 11 Rusty Bonnet.jpg2.6 KB · Views: 195
 -
 1 Rusty bonnet.JPG2.8 MB · Views: 24
 -
 2 Rusty Bonnet.JPG3.6 MB · Views: 28
 -
 3 Cleaned bonnet.JPG3.4 MB · Views: 28
 -
 4 Cleaned Bonnet.JPG4 MB · Views: 22
 -
 94 Bonnet painted.JPG2.7 MB · Views: 24
 -
 93 Bonnet painted.JPG2.6 MB · Views: 23
 -
 7 Primed Bonnet.JPG3.5 MB · Views: 24
 -
 6 Rust Killed Bonnet.JPG3.8 MB · Views: 29
 -
 5 Rust killed Bonnet.JPG3.1 MB · Views: 25
 -
 99 Bonnet polished.JPG4.7 MB · Views: 22
 -
 98 Bonnet polished.JPG2.8 MB · Views: 21
 -
 97 Bonnet polished.JPG2.6 MB · Views: 19
 -
 96 Bonnet Sanded.JPG2.6 MB · Views: 25
 -
 95 Bonnet Sanded.JPG3.6 MB · Views: 22
 -
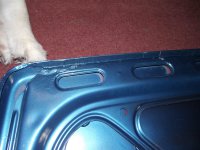 Inside painted 1.JPG3.2 MB · Views: 27
 -
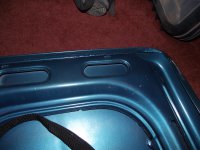 Inside painted 2.JPG3.6 MB · Views: 18
OP
OP
Harllequin
Member
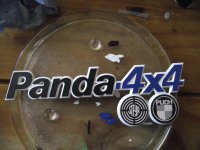
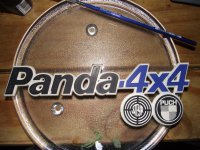
Attacked the badges now too,
I forgot to take the pic of the Sisley badge before but it wasn't the best.
The rear Panda badge also needed re painted as it was showing it's age, I've painted and laquered them all now so thats another job ticked off the list
I forgot to take the pic of the Sisley badge before but it wasn't the best.
The rear Panda badge also needed re painted as it was showing it's age, I've painted and laquered them all now so thats another job ticked off the list
Attachments


OP
OP
Harllequin
Member
Well took Bex out today over to my folks and then the trouble started
First off the Rad fan is not kicking in so that caused it to boil over a bit when sat in traffic.
Bypassed the fan swich while at for folks house and though that would get me home no problem. Wrong got 5 mile down the road and it boiled over again, even with the fan going all the time.
I've checked the oil and the water and there seems no contamination so I'm fairly sure the head has not gone.
That leaves thermostat or water pump I think. I think the thermostat is ok as the heater was nice and hot. :bang:
Anyone else had boil up and it not be the head? If so can you tell me what it was please so I can check that before I start pulling Bex to bits again
On the plus side I got the bonnet fitted though
First off the Rad fan is not kicking in so that caused it to boil over a bit when sat in traffic.
Bypassed the fan swich while at for folks house and though that would get me home no problem. Wrong
got 5 mile down the road and it boiled over again, even with the fan going all the time.I've checked the oil and the water and there seems no contamination so I'm fairly sure the head has not gone.
That leaves thermostat or water pump I think. I think the thermostat is ok as the heater was nice and hot. :bang:
Anyone else had boil up and it not be the head? If so can you tell me what it was please so I can check that before I start pulling Bex to bits again
On the plus side I got the bonnet fitted though
My 1988 Sisley 4x4 had a tendency to boil over when under load.
Once when going along a large uphill stretch of road (only a slight incline, but over quite a few miles) towing a dolly.
Other time when sitting at 85 for about 30min continuous or so. Just blew coolant out of the expansion tank through the pressure release valve in the cap, then heating went cold (that's when I'd notice there was an issue), and temp would hit 100C.
Pulled over and re-filled (always had 7L of water in the boot of that Sisley by chance) and then on our way again.
You say you hard wired the fan. Was is defo not working in the first place? Was it still running (the fan) whe it boiled over the 2nd time?
Jon.
Once when going along a large uphill stretch of road (only a slight incline, but over quite a few miles) towing a dolly.
Other time when sitting at 85 for about 30min continuous or so. Just blew coolant out of the expansion tank through the pressure release valve in the cap, then heating went cold (that's when I'd notice there was an issue
), and temp would hit 100C.Pulled over and re-filled (always had 7L of water in the boot of that Sisley by chance) and then on our way again.
You say you hard wired the fan. Was is defo not working in the first place? Was it still running (the fan) whe it boiled over the 2nd time?
Jon.
I think LWM had this and it turned out to be the water pump, something about the impellers slipping on the shaft I seem to remember.
OP
OP
Harllequin
Member
Yep it boiled over when the fan was hard wired and no it didnt kick in when the temp went up.
I'm in 2 minds if I should just strip the lot out and do the head as well as the water pump all in one
I'm in 2 minds if I should just strip the lot out and do the head as well as the water pump all in one
OP
OP
Harllequin
Member
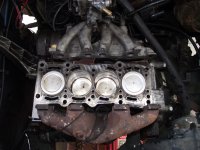
Well today I decided to strip it all down.
Got the head off, water pump out, thermostat out and all cleaned.
I could see no sign of the head gasket being gobe when I took it all to bits, the water pump seemed in good order too
Anyway got the head cheched and suprisingly there was no distortion there even after all these years / miles
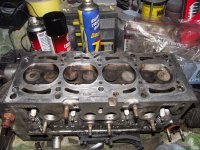
All the surfaces are cleaned and ready for the new gasket, bolts etc tomorrow.
Fitted the new water pump and fan swich on the radiator.
I've a new temp switch for the head coming tomorrow as well.
The only thing I did notice was the timing seemed to be a bit out while lining up all the marks, seemed out by 2 notches. I'm thinking that could have been the problem.
Anyway until tomorrow, I hope the parts come nice and early
Got the head off, water pump out, thermostat out and all cleaned.
I could see no sign of the head gasket being gobe when I took it all to bits, the water pump seemed in good order too
Anyway got the head cheched and suprisingly there was no distortion there even after all these years / miles
All the surfaces are cleaned and ready for the new gasket, bolts etc tomorrow.
Fitted the new water pump and fan swich on the radiator.
I've a new temp switch for the head coming tomorrow as well.
The only thing I did notice was the timing seemed to be a bit out while lining up all the marks, seemed out by 2 notches. I'm thinking that could have been the problem.
Anyway until tomorrow, I hope the parts come nice and early
Attachments

It's gonna drive like a completely different car if that timing was out!
OP
OP
Harllequin
Member
What a day :bang:
I got the new front wheel bearing fitted no problem
VmanC I'll post pics here for you of the fitting, it was so easy I was doubting if it was actually right!!
Went to my motor factors to collect my bits then came home, all going well and it was only 2pm.
Then started to prep the head for fitting, dipped the new head bolts set then in a stand to drip for the half an hour, lovely.
Then my folks called off for a cuppa, Fatha had a look at the head as I'd asked him to cast a second pair of eyes on it and he spotted one of the plugs was not as far into the head as the rest, so we took it out and sure enough it had been cross threaded
No problem think I I'll just re tap it. Got my tap set out and didnt have the correct one. Sure that my Dad had one we set off over to his, once there we discovered he didn;t have one either
Then went to the local nuts n bolts / tool shop, they didnt have one either, so onto a shop on the Team Valley. The time now being 4.30pm traffic was at a stand still :bang:
Got the required Tap there and set off for home, at a dead crawl, the 5 or so miles home took until 5.30pm
Anyway the plug holes are all now either re tapped or threads cleared.
On the plus side at least I didn't find this out after I'd fitted the head :worship:
I've now fitted the head and had to leave it at that, lamp oil being dim and me getting cold, so back onto it tomorrow, rather anoying that it would have all been done by now :bang:
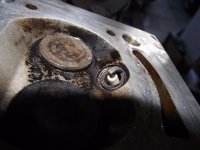
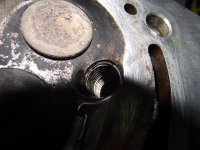
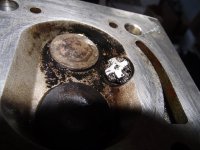
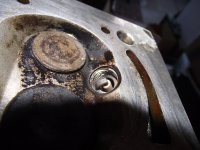
In case anyone is thinking it's a good idea to re tap a spark plug thread while the head is still on the block I've included pics of the nasty stuff it will put into your engine.
First pic is where the plug was managing to get too.
Second is the tap doing it's work.
Next is a nice pic of clear threads.
Lastly where the plug is now, right where it should be.
I got the new front wheel bearing fitted no problem
VmanC I'll post pics here for you of the fitting, it was so easy I was doubting if it was actually right!!
Went to my motor factors to collect my bits then came home, all going well and it was only 2pm.
Then started to prep the head for fitting, dipped the new head bolts set then in a stand to drip for the half an hour, lovely.
Then my folks called off for a cuppa, Fatha had a look at the head as I'd asked him to cast a second pair of eyes on it and he spotted one of the plugs was not as far into the head as the rest, so we took it out and sure enough it had been cross threaded
No problem think I I'll just re tap it. Got my tap set out and didnt have the correct one. Sure that my Dad had one we set off over to his, once there we discovered he didn;t have one either
Then went to the local nuts n bolts / tool shop, they didnt have one either, so onto a shop on the Team Valley. The time now being 4.30pm traffic was at a stand still :bang:
Got the required Tap there and set off for home, at a dead crawl, the 5 or so miles home took until 5.30pm
Anyway the plug holes are all now either re tapped or threads cleared.
On the plus side at least I didn't find this out after I'd fitted the head :worship:
I've now fitted the head and had to leave it at that, lamp oil being dim and me getting cold, so back onto it tomorrow, rather anoying that it would have all been done by now :bang:
In case anyone is thinking it's a good idea to re tap a spark plug thread while the head is still on the block I've included pics of the nasty stuff it will put into your engine.
First pic is where the plug was managing to get too.
Second is the tap doing it's work.
Next is a nice pic of clear threads.
Lastly where the plug is now, right where it should be.
Attachments
OP
OP
Harllequin
Member
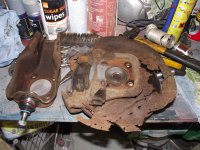
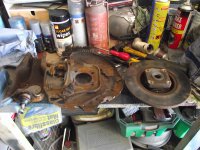
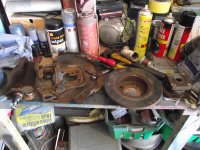
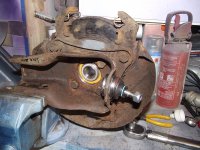
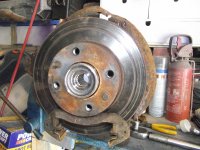
Ok the front wheel bearing.
My god, this was so nice to do
I poped the driveshaft out of the gearbox to see what would happen and the bits dont fall appart, upon checking old notes the tripod is attached to the driveshaft with a circlip.
I didnt take any pics of striping it down as I expected the pig of the job to be the actual bearing its self.
Anyway, I rempoved the bottom ball joint and the claiper, split the ball joint away from the lower arm and then took the whole hub assemble away from the car.
I then striped them into the bottom ball joint holder thingy bit and the hub, disk and caliper assembly.
While it was off the car I renewed the bottom ball joint, a lot easier job to do with this bit off the car than the drivers side was
I sliped the disk out from the caliper holder and that left me with the disk and bearing housing, at least I thought it was a housing.
Separated the "bearing housing" from the disk and then sat studying how to get the housing in bits to remove the bearing.
Gave up as the call came in from the motor factors that all the bits were in.
To my utter shock and astonishment the "bearing housing" IS the bearing!!!!
Re built it all when I got back and was finished before Chelle had the coffee made
All in all an hour at the most to do the ball joint and bearing. I know I need a back plate for the disk but that can wait until the summer when I replace the discs and paint it all up.
I'll let the pics show the rest.
Attachments

OP
OP
Harllequin
Member
Well thats it all back together, running 10 degrees or so clooler than it did, Timed to 2 before TDC and heating and cooling just as it should.
The bearing replacement has worked too, no more noise.
Its still running a bit hesitant though so next job will be HT leeds I think.
Its first trip out to test was down to the pub, had to be done really
The bearing replacement has worked too, no more noise.
Its still running a bit hesitant though so next job will be HT leeds I think.
Its first trip out to test was down to the pub, had to be done really
usedtohaveavaldisere
New member
- Joined
- Jan 9, 2010
- Messages
- 121
- Points
- 44
Attacked the badges now too,
I forgot to take the pic of the Sisley badge before but it wasn't the best.
The rear Panda badge also needed re painted as it was showing it's age, I've painted and laquered them all now so thats another job ticked off the list
Fantastic badge refurbishment!!:worship: how did you get your side trim canoe badges so shiny and mint. What paint did you use?
Many thanks.
Damien.
OP
OP
Harllequin
Member
The side badges were painted with a white under coat, then brush painted black, after that a quick spray with the 2k clear coat I was using on the bonnet.
The rear badge was all brush paint acrylic then also sprayed with the 2k clear.
Took a bit of time but enjoying to do
The rear badge was all brush paint acrylic then also sprayed with the 2k clear.
Took a bit of time but enjoying to do
usedtohaveavaldisere
New member
- Joined
- Jan 9, 2010
- Messages
- 121
- Points
- 44
Thanks for the tip, will give the side badges a go, do i need to unbolt them from behind? to separate them of the plastic arch surround?
Beautiful job by the way, im hoping to make my sisley concourse to!! don't worry no direct competition mine is met red.
great job, really enjoyed the thread.
Damien.
Beautiful job by the way, im hoping to make my sisley concourse to!! don't worry no direct competition mine is met red.
great job, really enjoyed the thread.
Damien.
OP
OP
Harllequin
Member
Mine were held on with plastic clips and double sided sticky, they had been off the car before so were easy to remove. I'd heat them good and hot with a hair dryer if they are being stubborn to come off.
OP
OP
Harllequin
Member
Well I think I've finally got the better of the tin worm as of Friday.
I've cut out and replaced the 2 rear wheel arches and welded new metal in their place. I didnt do any pictures this time as the process is just the same as the front whel arch was.
I also finally got to the bottom of the screaming noise from the front. It was a warped front disc combined with no type of shim on the brake pad.
So thats new discs and pads on the front too.
Lastly I did the carb jets.
I know its been a while since I last updated but I've just been driving it not tinkering with it.
Similar threads
- Replies
- 11
- Views
- 582
- Replies
- 0
- Views
- 245
- Replies
- 19
- Views
- 686