i ve got the engine on the bench so iam gona do a few jobs. valve clearance seams outa whack so iam gona look at that. any engine i re shimed in the past involved removing the cam i think on this engine its doable with the cam in. if ive got a load of shims to change it might be just as easy to take the cam out? maybe i should take the head off and grind the valves? then i would probably do valve seals and skim the head Where do i stop? rings? spose a compression test would tel me that. iam gona put a new flywheel end seal in also. maybe take the sump off for cleaning and inspection. the engine was oily when it came out of the car but there was no clues as to where the leaks were oil and dirt was evenly distributed every where, maybe that points to the cam cover gasket?


You are using an out of date browser. It may not display this or other websites correctly.
You should upgrade or use an alternative browser.
You should upgrade or use an alternative browser.
Technical valve shims and any other jobs to do while engine is on the bench. 999 fire engine
- Thread starter binhoker
- Start date
Currently reading:
Technical valve shims and any other jobs to do while engine is on the bench. 999 fire engine
the inlet valves are in tolerance. all the exhaust valves are out exhaust 1 and exhaust 4 i cant get a feller gauge in but i can turn the follower with my finger so maybe not a negative clerance.
ive worked out the shims i need but if i lap the valves the clearance will tighten up . maybe i need to do a compression test and decide if the head has to come off.
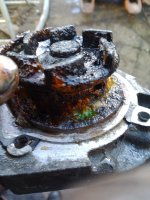
i took off the sump for a clean and had a poke around down there mostly normal except i found what looks like an iron chocolate button in there i expect its been in the engine since new. i can tell the sump has been off before by the instant gasket i wonder why the iron button was not discovered earlier.
i took off the sump for a clean and had a poke around down there mostly normal except i found what looks like an iron chocolate button in there i expect its been in the engine since new. i can tell the sump has been off before by the instant gasket i wonder why the iron button was not discovered earlier.
Attachments
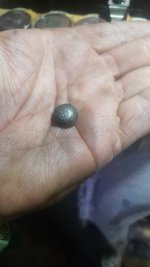
interesting.. looks like a bit of the engine casting. you could always change the core plugs if you suspect them being rusted. depends how bad the coolant looked and if there was sludge in the system i guess.
i highly recommend using an air line to blow out the oil spray bar as every time i have taken one off it always has bits in it which block the holes in it.
i cant really think of much else maybe replace the coolant pipe that goes into the water pump, or at least clean it up and paint if its rusty.
theres not much else you need to do to be fair.
oh always nice to replace shaft oil seals. all the ones on mine were weeping.
and replace the O ring seal around the distributor too.
hope this helps!
the coolant pipe is indeed rusty. i wonder do i have a better one, i replaced the 50mm core plug on the gearbox side the last time the gearbox was out. i think i also replaced the water pump at that stage. its getting new gaskets and seals on the crankshaft and oil pumpinteresting.. looks like a bit of the engine casting. you could always change the core plugs if you suspect them being rusted. depends how bad the coolant looked and if there was sludge in the system i guess.
i highly recommend using an air line to blow out the oil spray bar as every time i have taken one off it always has bits in it which block the holes in it.
i cant really think of much else maybe replace the coolant pipe that goes into the water pump, or at least clean it up and paint if its rusty.
theres not much else you need to do to be fair.
oh always nice to replace shaft oil seals. all the ones on mine were weeping.
and replace the O ring seal around the distributor too.
hope this helps!
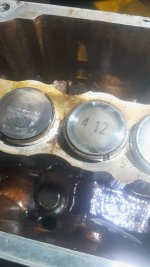
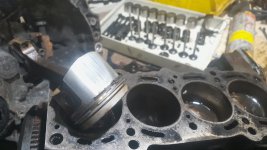
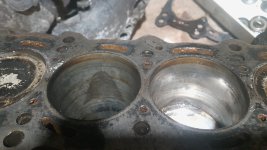
i should have done a compression test be fore dismantling the engine but i did an improvised leek down test by attaching a shradder valve to a spark plug ferrule, and pressurizing it to 80psi with a compressor. The pressure dropped to nothing in about 2 seconds so off came the head, valves didn't seam too bad but could take a clean up and bit of lapping. some of the valve oil seals were very bad so they will be replaced as will the head gasket. the bores look ok maybe i will check the rings in one of the cylinders while iam here.
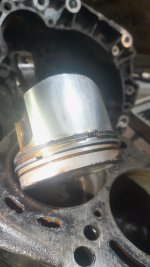
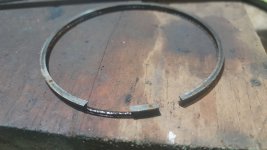
one of the bores showed a bit of ware so i hoped out the piston it looks abit scuffed. mesured the ring gap at 0,6mm Haynes gives 0.25 to 0.45 so ringgs are on the shopping list too maybe i shoud just drop the 4x4 cam shaft in to my spare engine? the spare engine has low miles but it hasnt run in years so could probly use some tlc
Attachments
so i dug out my spare engine, did a compresson test using diesel engine tester, a modified spark plug, some gas hose, and some hose clips. the result was 100, 160, 100,170 psi oiling the bores didnt change things much, the leaks seam to be on the valves and might improve if the engine was run a bit. the engine came in a rusty car with 40,000 miles on the clock, botom end looks tight even though there was some water in the sump when i dug it out. i expect f i put this engine in and run it it will leak oil at every seal. so probly best rebuild the entire engine wile its on the bench and add the 4x4 cam. the other option is buy a 1.2 but that will probably have done more miles than my current engine.
On the various engines I have rebuilt over the years, even if I don't intend spending much money on them, whilst stripped, the least I would do is hone the bores and fit new piston rings, correctly gaped and positioned (it's amazing how many engines on stripping I have found all the rings gaps lined up ), inspect mains and big end bearings, if in doubt replacing them. Then on the top end always recut the valve seats and lap them in, even if it means having to do the shims as in your case. It pays dividends even on basic lawn mower engines, but I have done it on 2.8 Sofim engines such as the Fiat Ducato, Iveco Dailys and many other vehicle engines.
I was lucky at an auction to buy a Sykes Pickavant valve seat and valve, sets of cutting tools. This meant that even badly worn they could be reused once that and a little lapping in was done. That , the honing tool, piston ring clamp, torque wrench, straight edge and feeler gauges to check block and head for "flatness".
I was always over generous with the engine oil in rebuilding especially pistons and bores, it may give a little smoke on start up but soon clears.
The satisfaction of flicking the key for the first time on a rebuild as it bursts into life is great.
), inspect mains and big end bearings, if in doubt replacing them. Then on the top end always recut the valve seats and lap them in, even if it means having to do the shims as in your case. It pays dividends even on basic lawn mower engines, but I have done it on 2.8 Sofim engines such as the Fiat Ducato, Iveco Dailys and many other vehicle engines.I was lucky at an auction to buy a Sykes Pickavant valve seat and valve, sets of cutting tools. This meant that even badly worn they could be reused once that and a little lapping in was done. That , the honing tool, piston ring clamp, torque wrench, straight edge and feeler gauges to check block and head for "flatness".
I was always over generous with the engine oil in rebuilding especially pistons and bores, it may give a little smoke on start up but soon clears.
The satisfaction of flicking the key for the first time on a rebuild as it bursts into life is great.
right gona order a head gasket and valve seals. i rebuilt Mercedes top end awhile back after timing chain failure. engine ran grand when i put it together but the bottom end failed 5000 miles later, crap had got in to the oil galleries during the rebuild and caused crank failure. i had to rebuild that engine twice, lesson learned.
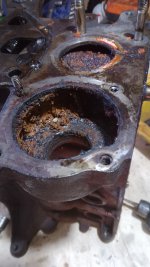
so the block of engine 2 is now totally stripped, bores look good, rings that in have checked are within tolerance. some rings are stuck but main problem is the coolant galleries are full of hardened brown crystalline substance. so i removed all the plugs and used a steel spike, phosphoric acid and a power hose to clear them out . i am not sure what the chemical makeup of the substance was or whether the acid had any real effect on the crystals but it helped with the rust
Attachments
yeah its nice that, we had a forklift the same. usually when different coolants have been mixed and then watered down because the system is not sealed and can let air (oxygen) in. its why sealed coolant systems are important!
it doesn't taste like licoricebottom end is rebuilt now. my gasket set came with a bit of rubber looks like a piece of licorice. no idea where it might go. maybe for a different engine.
cleaned up the valves for lapping today then noticed a lot of play in the exhaust valve guides. so gonna use the other head, my steel rule and feeler gauges indicate its not as flat as the other head which was very flat. think its gona work ok. so clean and lap the valves replace valve seals and fit the 4x4 cam then i am back to setting valve clearances which was where this rebuild started looks like i will replace every engine part except sump, oil pump, water pump and camshaft. skim the head? probably not
If not too bad, lubricated grinding paste on a sheet of plate glass, along with a bit of "elbow grease" may save the head. We used to do it on racing air cooled two strokes in the 1970s and more recently it saved an Iveco head for me. Has to be plate glass as normal glass isn't flat enough, usually available from local glass works scrap pile.If you ask nicely they may trim it to size , as a shop front window may not fit in your car.cleaned up the valves for lapping today then noticed a lot of play in the exhaust valve guides. so gonna use the other head, my steel rule and feeler gauges indicate its not as flat as the other head which was very flat. think its gona work ok. so clean and lap the valves replace valve seals and fit the 4x4 cam then i am back to setting valve clearances which was where this rebuild started looks like i will replace every engine part except sump, oil pump, water pump and camshaft. skim the head? probably not
i skimmed the cylinder head on Fallout using a sheet of fine wet and dry sand paper, 5x 1kg weights, a sheet of glass, ply board, and a windscreen wiper motor with home made linkage and a hose pipe spraying onto the coolant channels of the cylinder head so it came through the coolant holes and helped move any swarf away from the wet and dry.
set it up with the cylinder head upside down wet and dry wrapped around a large sheet of glass and ply board then stapled to the ply board to hold it in place with a bolt through one of the corners for the linkage to attach to. then i added the weights on each corner of the glass and middle. i also added some stuff for it to rub against so it didnt just fall off the head while it was "gliding" over it.
i left it running for a few hours moving around in a bit of a backwards forwards rotational pattern. after the first hour it showed up all the high spots. i just left it running until all the metal was "clean" and the same.
checking with a steel ruler and feeler gauges found no gaps when done!
We don't often improvise in this Country , but I often think about vehicles in third World Countries, they make do and mend in all sorts of ways at the side of the road, though I often wonder how they manage modern ECU issues.i skimmed the cylinder head on Fallout using a sheet of fine wet and dry sand paper, 5x 1kg weights, a sheet of glass, ply board, and a windscreen wiper motor with home made linkage and a hose pipe spraying onto the coolant channels of the cylinder head so it came through the coolant holes and helped move any swarf away from the wet and dry.
set it up with the cylinder head upside down wet and dry wrapped around a large sheet of glass and ply board then stapled to the ply board to hold it in place with a bolt through one of the corners for the linkage to attach to. then i added the weights on each corner of the glass and middle. i also added some stuff for it to rub against so it didnt just fall off the head while it was "gliding" over it.
i left it running for a few hours moving around in a bit of a backwards forwards rotational pattern. after the first hour it showed up all the high spots. i just left it running until all the metal was "clean" and the same.
checking with a steel ruler and feeler gauges found no gaps when done!
engine and gear box is in. still dealing with some rust patches prior to repainting bonnet. i have replaced ignition module coil and the wiring in between but haven't got a spark yet. i am blaming the hall sensor or whatever is inside the contactless distrubor. will replace that next. i also need plastic casing for my heater and an air filter box if any one has any of those?

Similar threads
- Replies
- 0
- Views
- 59