20130810_172857.jpg

Seicento Project FS Sei

Introduction

It's certainly been a while since I've updated any motor info on here!

As FS celebrates it's 10th Birthday next year, we've been trying to find something that we can work on over the coming months and show off at the shows we attend in 2014.

This far north there simply isn't a used car market. Well, there is, but there's generally sod all on offer under a grand.

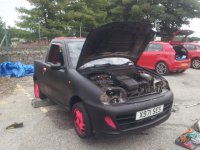
Saw this on ebay the other day and noticed it was for sale on here as well. The rest, as they say, is history.


999564_10200376171832385_1205576517_n.jpg


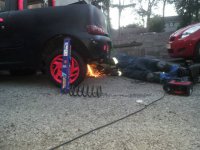
We've quite a lot to do - bar cosmetics, the immediate plan is to get the rear suspension working again and replace a snapped exhaust. Already got shocks from a local factors and a replacement exhaust from the local scrappy for a tenner. Good times :)

Some de stickering and de light tinting has already taken place. Hopefully on Monday/Tuesday we'll replace the shocks, springs and exhaust. MOT is due in September so we want to get it ready for a pre-mot in the next few weeks :)

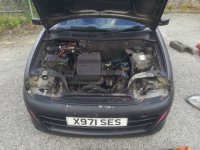
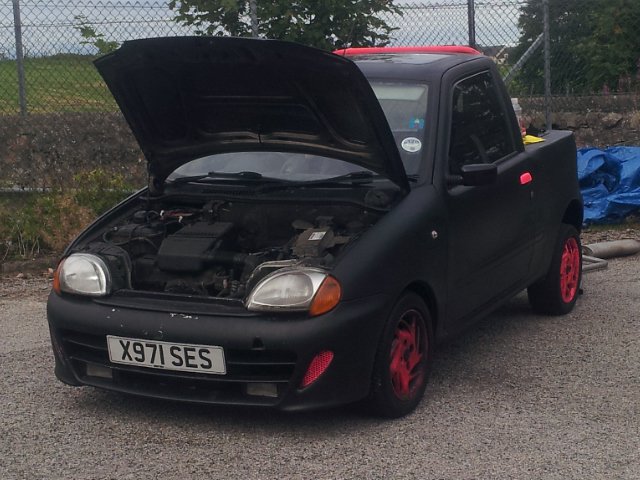
A long way to go but a fairly decent base to start from.

The interior has two bucket seats but they're fixed in place and I'm a short arse. Have been offered MK1 Punto Sporting seats, which I may well explore.

I'm under no illusion of how much we need to do to get this presentable, but already the amount of heads we've turned and enthusiastic waves we had on the drive back to Aberdeen is encouraging.

Watch this space.
Quick update.

N/S/R suspension has now been replaced. Bottom shock bolt on the O/S/R was seized so we spent most of last night trying to cut it out. Just about there but we ran out of daylight.

Old exhaust was snapped in two so the back half is gone and the plan on Friday is to fit a replacement standard exhaust - AND finish that O/S/R suspension.

Car is 90% destickerd too, just needs some tar and glue remover to get rid of the left over glue :)
 

Attachments

  • action.jpg
    action.jpg
    38.5 KB · Views: 186
Still undecided on quite a few aspects.

The Sei won't be staying black and pink, that's for sure. Got a few suggestions and options as far as colour goes, I think the best way to get this thing painted is going to involved changing all the panels. Handily enough we might have an Abarth Sei which we can gut for parts :eek:

Engine swap is on the cards, but that's post-MOT. (y)

It's not a pickup as such, it's technically an altered roof line at the mo. May explore options to increase the size of the boot, but again that's for later down the line.

Hoping to have this thing driving again by Friday night and a full list of neccessary work will follow.
 
Few updates.

Rear shocks and springs have been replaced - but the back is sitting a tad hgih. Suspecting we've maybe been given the wrong springs. Meh.

We've removed most of the exhaust, but the replacement we have may also be wrong. Diameter of the replacement, and the existing pipe, is far too similar to bodge a repair. That needs further investigation.

Most traces of the cars former life are now gone, we just need to get the wheels swapped over and the rear bar repainted and the pink be gone :D Have taken the tow covers away to be sprayed.

Lights untinted (painted brows?!) and indicator lenses cleaned up too.

Next on the list of things to do - get that bloody exhaust fitted, get the brake lines replaced and fix the handbrake :)
 

Attachments

  • 20130810_172857.jpg
    20130810_172857.jpg
    244.6 KB · Views: 150
  • 20130810_134509.jpg
    20130810_134509.jpg
    281.3 KB · Views: 139
  • 20130810_143722.jpg
    20130810_143722.jpg
    285.1 KB · Views: 162
Great progress guys :) it's probably sitting high due to the weight loss it's revived at the back but I have to say I like its "jacked up" appearance :D how about a mini 4X4 look? 14" (or even 15") alloys with 4x4 tyres and a roll bar at the rear just behind where the driver sits? I think it would lend itself well to that look?
 
This looks so sick!! I saw a cinquecento one on ebay other day it needed all respray and work tho. If you guys need any car graphics or anything i have my own company so just drop me a mail i can do anything at all! Looks sweet guys
 
Great progress guys :) it's probably sitting high due to the weight loss it's revived at the back but I have to say I like its "jacked up" appearance :D how about a mini 4X4 look? 14" (or even 15") alloys with 4x4 tyres and a roll bar at the rear just behind where the driver sits? I think it would lend itself well to that look?

Thanks for the comments and feedback folks. Very much appreciated (y)

Gade - the rear is sitting MUCH higher than a standard Seicento - 1.1sx. I must admit, the arse in the air stance is quite interesting but sadly it's far too high. That's another worry for another day though!

Not sure about the mini 4x4 look, but we'll rule nothing out yet eh :D

Jamie - thanks for the offer, will certainly bear that in mind. M5HAW does a lot of our stickers etc for FS so we've got an offer of similar from him, but again appreciate the offer :)

Having a few nights off this week, but that doesn't mean we're doing nowt. Hitting this again big time next weekend and in the meantime I need to work out what the priority work is and make sure we have the parts etc on site so we don't have to keep nipping away for stuff. Still, for a weeks work I think we're doing ok!
 
Here's some before and after pics to give you an idea of the difference in height

Before new suspension

FS_bbq_012.jpg


After

Saturday_011.jpg


I doubt it's going to stay like that :D
 
Sit rep - the amount of hidden issues we're finding with this car keeps growing. Quite seriously, I reckon that this is going to end up as pretty much a full rebuild. Sadly, it's all entirely neccessary :(

So, today...we managed to get the car into dry storage where we can also work on the car regardless of weather. That's at least one positive we can take from the day!

We started by stripping down the rear brakes.

removing_brake_shoes.jpg


Time for new shoes..

wear_on_shoes.jpg


This might be why we have no working hardbrake

levers_broken.jpg


MrCento and I headed to B&Q for a hacksaw and when we came back Lewis, our other pair of hands for the day, pointed out that the brake pistons were beyond nackered and had pissed out brake fluid. Sigh. So, new levers, pistons and shoes are on order and the rear brakes should be back in full working order next week - well, barring a full renewal of the brake lines.

Old with the old

old_handbrake_cable.jpg


...and in with the new!

new_handbrake_cable.jpg


With the cars arse in the air I decided to start brushing down the underneath, ready for some hammerite. Boot floor is just about there, but we'll need to do a bit of welding as we already know. The rear bumper bracket on the n/s is absolutely shot. We're hoping to book a local DIY garage for a morning in early September, where welding and brake pipes will be the main priorities for the MOT.

Having done as much as we could at the rear of the car we put the drums on for the time being and decided to concenrtate on the exhaust & front brakes.

Aug_17th_016.jpg


Aug_17th_019.jpg


O/S took a wee bit of fiddling but got there in the end. Then, just like every other time we think we're making progress on this bloody car, we find another issue!

On removing the front wheels we found some universal spacers. Initially we had no idea why, but then when we were trying to rebuild the N/S we discovered the reason.

The caliper piston wasn't retracting true because it was surprise, surprise ****ed. This meant Mark looked even closer at the set-up and found even more problems. There was a split in the shock absorber mounting bracket and it had been ground down. Looks like clearance between this and the wheel, hence the spacers. How the hell we managed to get this thing back home to Aberdeen without killing ourselves isn't worth thinking about :eek:

Aug_17th_025.jpg


At this point we realised we wouldn't be rebuilding the front n/s brake today. Like with the rear brakes, we've reassembled enough to refit a wheel and get the car off of axel stands.

Next week the plan is to finish off the rear brakes completely. We've given up on the idea of fixing the exhaust until our donor vehicle is up the road, like most repairs on the car the old pipes seem to have been bodged to make do so we'll take the old system off completely, fix up properly and then rettach to the car. To be honest, we may fit the donor engine while the front end is already being gutted (y)

Now, if you were paying attention you'll remember I said earlier in this post that I began prepping the underside of the car for some paintwork. Well, it wasn't the only bit of the car to see some paint removal..
20130817_160632.jpg


bye_bye_pink_018.jpg


A dissapointing day in so much as we keep finding bodged repairs/bodges and issues - however that's just the risk of buying an ebay car. Next week we continue rebuilding and hopefully by mid September most MOT issues will be adressed or repaired. Fingers crossed :slayer:
 
Well, another productive day at the lockup is over and done with. Thanks particularly to Malfunction, his brother Colin, marti155, lewisp and not forgetting Ryanfaescotland who brought along the best gift of the day. HOT WATER

We met up off site and, in small groups, headed to the workshop to pick up where we last stopped. The rear brakes!

20130831_121658.jpg


With the new brake parts all here, at last, we set about stripping the brakes to replace the handbrake levers, cylinders and shoes. This started off fine, until Lewis began having difficulty with reassembly. Colin stepped in for a look and quickly discovered that the backing plate was a bit out of shape. Further, the bolts weren't moving freely. The application of a gentle heat wasn't enough, so we had to make a pitstop to B&Q...

20130831_122502.jpg


20130831_131556_resized.jpg


So, Lewis and I returned with some shiney shiney tools and a couple of bottles we could spray water with....just in case.

Discussion with Colin and Mal soon turned to the underside of our car. But more about that in a second. With the proper tools, or in this case fire, the o/s brake was stripped, the backing plate bashed back into shape, and the drum rebuilt.

20130831_142320_resized.jpg


20130831_152554_resized.jpg


Success. Just as we began celebrating our good fortune appeared to continue. Martin had arrived, brigning along some exhaust parts, lowering springs and - best of all - new front calipers. Yay.

Colin had some engines to swap over and work to do, so he and Mal called it a day and began preparing for the short drive back into town. Before they left though, some serious discussion about the issue of rust took place. As some of you will know, we'd though about booking Cammachmore next Saturday. I'd thought that around five hours would be enough time to get the floor patched up. Turns out, I was wrong. Big style.

I don't have any pics, but suffice to say there is a lot more welding required than we initially thought. The entire boot has been sealed with expanding foam and the inner arches are caked in that crap too. We've made a start on removing the worst of it, but there is a long way to go and thats before we can even introduce a grinder or welder to the car. Today has made it abudantly clear that this is a much bigger project than we initially thought. The inner arches will need welded, a good chunk of the floor will need plated up, the inner boot really needs welded shut rather than just being caked in foam. Colin, a qualified mechanic, is reckoning 5 hours of welding might do the job - as long as the prep is already done. Yikes.

With the rear brakes finally complete (yay) and the handbrake now working (YAY!) we decided that the rear lights and bumper should come off of the car for the time being. The plan is to let Stuarty have a look at the current state of play, before deciding what to do next. We might put the idea of a big fix it meet next weekend on hold, particularly if we DONT end up welding. We may continue stripping the car and preparing metal for an eventual meet off site, but I'm not sure that'll be next weekend.

Since picking up FiaSco, I'd often wondered how the rear lights were held in place. I'd even looked a few times, but had that usual fear and had decided I was better off not knowing. Today, sadly, that had to change. Turns out that the eejit who owned the car previously used that oh-so-fire retarding expanding foam to effectively glue them in place. What a knob.

20130831_154108_resized.jpg


Actually, as I upload that image of Marti155 weilding a hammer, I realise my last statement isn't quite accurate. The offside light was held on with a long threaded bar AND some expanding foam. The near side light was entirely held in place with expanding foam. Sadly, we had no choice but to smash the NS light in order to remove it. The next issue was the clearance between the now closed boot lid and the top bumper mounts. A bit of melting and the bumper was also (forcefully) removed. Bastard.

20130831_171357_resized.jpg


20130831_172352_resized.jpg


Knowing that a lot of welding will be required just to keep this thing from turning to dust, I decided to start stripping out the interior. The bucket seats were an easy few minutes, the carpet took even less time. Sadly it looks like there's been some standing water in the footwell, which is obviously not good and something we'l need to address. If you look closely, just by the door pillar, you can see the effect that's already had on the floor plan.

20130831_180105_resized.jpg


Last week we had issues rebuilding the front brakes BUT, thanks to Martin's spare calipers, we now have a fully bled and fully functional braking system.

20130831_174126_resized.jpg


So, today, we managed to:

Rebuild the rear brakes
Get a working handbrake
Rebuild front brakes
Bleed Braking system
Remove rear lights and bumper (eventually)
Remove seats and interior carpet
Damn near set fire to the whole bloody car....

Just as we were beginning to feel quite proud of ourselves the cars shoddily wired moo horn decided to short out and start smouldering.

So yeh, a productive yet still frustrating day. We're beginning to see progress but it now feels like we owe it to ourselves - and this car - to do the work properly. We're not quite sure what to do next - preperation for welding is obviously a big priority, so hopefully with Stuarty aiming to look over the car in the next few days we can make preperations for next weekend.
 
Cheers man,

The foam was clearly used to act as a barrier between the tailgate and the slam panel, as otherwise there'd have been a gap.

effectively thats maybe four full days spent on the car? The fact we now have a fully working brake set up is a positive and hopefully the first of many (y)
 
Quite a lot has happened since last weekend! We found ourselves another yellow sei, with the original plan being to strip her for bits for FiaSco - however, with the tin worm as excessive as it's proven to be we've had a bit of a rethink. Due to the overall decent condition of our second car we're seriously toying with the idea of getting her tested, back on the road and - in the short term - liveried up as our wee publicity vehicle. That would buy us some time to strip the pickup back to a bare shell, do the welding etc properly and rebuild her at a better pace. That's the plan anyway!!!


In a nutshell, last night (Saturday) I managed to book a flat bed to recover the 'donor' from abyss down in Dundee. After a number of setbacks, including a lack of any spark, lack of petrol and a visit from plod after an anonymous tip off about too much car activity, I got home sometime around 2.30 this morning.

So - today...We arrived on site at around 2pm, a little later than hoped but it took Daryl a little while to get the truck through town traffic. With Yellow now parked up next to FiaSco, we set about investigating the reasons for no spark.

yello1.jpg

Andrew and Lewis played about with the spark plugs, re-tracing abyss's steps last night simply to confirm there was no spark. A bit of rubbing down on the earthing points made no difference. Chasing cables to look for any slightly loose connections made no difference. To be sure the engine was indeed receiving petrol, we checked the filter and lines. The filter and pump were definately sending petrol towards the front of the car. So, back to wiring.

A bit of note comparing between yellow and FiaSco took place. Yes, they're two different engines but there's not a huge amount of difference?

yello2.jpg


It really did seem that we'd be leaving the lock up, again, with that feeling of disappointment. But eventually a bit of fettling with some earthing seemed to spark life into yellow. At this point, I'd love to remember exactly what wiring it was that needed a slight nudge, but it's been a long couple of days. I'm sure lewisp or Ransoman will remember.

yello3.jpg

Today was interesting in that we actually started robbing bits off of FiaSco to try and get Yellow running. I suspect this might be a familiar pattern, now that we're going to have to pretty much strip FiaSco back to bare metal. In the short term, it might be easier to get Yellow through an MOT and then down to m5haw for a bit of vinyl. Realistically there's maybe a couple of hours work, adjusting the clutch cable and finishing off the work that Mark and Daz started.

Yellow runs, and for a car that hasn't moved in ages runs fairly well. I suspect an HT lead or plug needs changing, as the idling sounds a little off. I had hoped to attach a vid, but I'll do that tomorrow. Next weekend we're going to try and get the engine & clutch running 100% and then take things from there. Reassembly of the front end, to give us one fully functioning (and road legal!) car is looking more and more likely. Seems a shame to gub this wee beauty :)
 
Last edited:
Are you looking to sell the wheels on that yellow sie ? Im after some preferably cheap. Thanks
 
ah the old, lets buy this and cut it up as its cheap only to discover its better than what you are fixing already. If this has not happened to you in your life you are not a true petrol head!

Yellow looks to be pretty nice car from them pics! Has it got big spacers on front, wheels look really far out compared to normal.
 
I'm not sure - plan is to try and rebuild the front this week so we'll have a looky.

If we can find some wiring and a bulb holder for that sidelight then we can crack on and refit the front end. Although all the brakes etc were renewed in her earlier rebuild we're likely going to swap the good bits off of FiaSco for the time being. No point letting shiney parts sit and gather rust...

And you're right - we REALLY couldn't chop this one up. Which means we'll probably be looking for a third cento now :D
 
Back
Top