Having recently become the proud owner of a mint 2004 Punto, my only annoyance with the car was the partially dead display on the OE CD Player - and the fact that I could not easily attach my iPhone to it.
After a little shopping around (and a bad experience with a Belkin FM Transmitter - which would not stay attached to the Cigar Lighter) I stumbled across this head unit in Halfords. For just £45 you get full iPod / iPhone connectivity - plus conventional Aux in. You do not get a CD player but, let's be honest, who really uses CDs anymore (he says - expecting an immediate backlash from those who do!!!)
One huge benefit of not having a CD player (for Punto owners) is the fact the Head Unit takes up considerably less space behind the dash - so you immediately overcome the problem of struggling to accommodate the extra wiring.
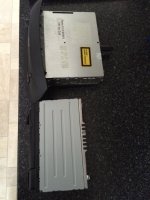
When purchasing the unit, Halfords will probably suggest that you purchase their Harness Adaptor - YOU DO NOT NEED THIS - the included Sony Harness Adaptor is easily configured for the Punto - and I guess most cars.
As with any modification to your car make sure you do your research before you start and fully plan and understand what you are doing. Right - Let's get started.
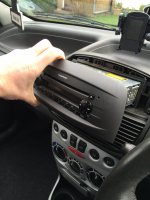
The old head unit is easily removed using the standard removal keys - or if they are not available, for very thin screwdrivers pushed into the keyways.
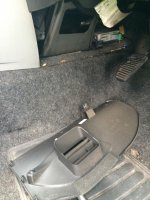
Next, you will need to remove the small heather vent panel in the driver's footwell (this will provide access for your switched live wire).
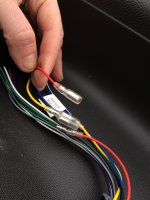
The switched live wire is the key to making the stereo work correctly. Without this, the Head Unit will not switch on and off with the ignition - or at all in fact. Your new Sony Head Unit uses the red wire in the Harness Adaptor as it's switched live and, handily, this also has a Bullet Connector halfway along it's length - allowing you to break the link between the two Harness plugs and insert your own switched live. Disconnect this link as shown below.
Now, you need to find power to put into this switched live. The absolute easiest way to do this is by taking a spur from the Cigar Lighter. You can do this in two ways; (1) Remove your Centre Console and 'plumb' some wiring into the live feed to the Cigar Lighter or....(2) Use a Piggy-Back fuse adaptor to take the feed from the fuse box. Of these two options, the second is an absolute winner as it saves a lot of interior trim dismantling and also allows you to fuse the stereo appropriately.
So, your next step is to run a cable from the Head Unit location to the Fuse Box. Here is the Head Unit end with a bullet connector neatly crimped on to connect with the harness....
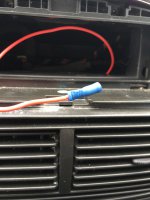
Now run the cable behind the dashboard and cable tie to the loom. The other end needs to have the Piggy-Back Fuse adaptor added - I did this by crimping a further bullet connector to hook up with the Piggy-Back lead I got from Halfords......
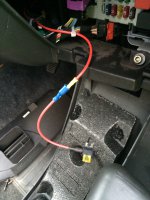
The Piggy-Back connector (as you can possibly see) has a standard Mini-Fuse male connector and two female ports. Basically, you're going to need to pull the Cigar Lighter fuse (number 44 in the cabin fuse box)......
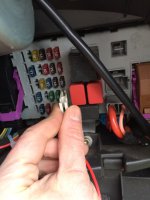
And insert the neatly crimped and connected Piggy-Back Connector into the F44 position....
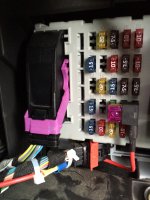
The Piggy Back connector has, as I mentioned, two fuse ports. Insert the 20 Amp (for the Cigar Lighter) into the bottom one and add a fuse for your new Head Unit in the top one - I could only find Mini-Blade fuses down to 3 Amp.....which will be fine for this application.
You can now connect the Sony-supplied harness to the car's wiring harness......
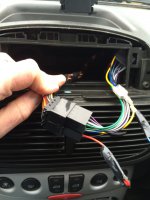
Now.......before you do anything else, plug the Head Unit in and check that it all works.....
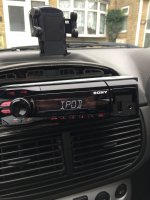
Assuming it does....happy days......if it doesn't........go back and thoroughly check your connections.
The final stage is to mount your facia panel and then to insert the mounting chassis that was supplied with your Head Unit. It will be a fiddle to get in - but it will go. Make sure you push the mounting claws in the chassis firmly out - to secure in and then add an aerial adaptor to your new Head Unit....
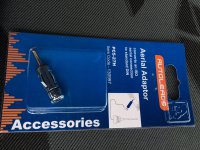
Before finally connecting up the Head Unit and finally slotting it home. Job done!!......
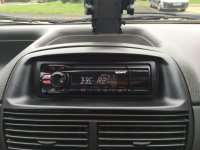
Now you can enjoy the convenience of your entire music library in you car and also get a head unit that looks Waaaaayy better than the standard Fiat one.
After a little shopping around (and a bad experience with a Belkin FM Transmitter - which would not stay attached to the Cigar Lighter) I stumbled across this head unit in Halfords. For just £45 you get full iPod / iPhone connectivity - plus conventional Aux in. You do not get a CD player but, let's be honest, who really uses CDs anymore (he says - expecting an immediate backlash from those who do!!!)
One huge benefit of not having a CD player (for Punto owners) is the fact the Head Unit takes up considerably less space behind the dash - so you immediately overcome the problem of struggling to accommodate the extra wiring.

When purchasing the unit, Halfords will probably suggest that you purchase their Harness Adaptor - YOU DO NOT NEED THIS - the included Sony Harness Adaptor is easily configured for the Punto - and I guess most cars.
As with any modification to your car make sure you do your research before you start and fully plan and understand what you are doing. Right - Let's get started.
The old head unit is easily removed using the standard removal keys - or if they are not available, for very thin screwdrivers pushed into the keyways.

Next, you will need to remove the small heather vent panel in the driver's footwell (this will provide access for your switched live wire).

The switched live wire is the key to making the stereo work correctly. Without this, the Head Unit will not switch on and off with the ignition - or at all in fact. Your new Sony Head Unit uses the red wire in the Harness Adaptor as it's switched live and, handily, this also has a Bullet Connector halfway along it's length - allowing you to break the link between the two Harness plugs and insert your own switched live. Disconnect this link as shown below.

Now, you need to find power to put into this switched live. The absolute easiest way to do this is by taking a spur from the Cigar Lighter. You can do this in two ways; (1) Remove your Centre Console and 'plumb' some wiring into the live feed to the Cigar Lighter or....(2) Use a Piggy-Back fuse adaptor to take the feed from the fuse box. Of these two options, the second is an absolute winner as it saves a lot of interior trim dismantling and also allows you to fuse the stereo appropriately.
So, your next step is to run a cable from the Head Unit location to the Fuse Box. Here is the Head Unit end with a bullet connector neatly crimped on to connect with the harness....

Now run the cable behind the dashboard and cable tie to the loom. The other end needs to have the Piggy-Back Fuse adaptor added - I did this by crimping a further bullet connector to hook up with the Piggy-Back lead I got from Halfords......

The Piggy-Back connector (as you can possibly see) has a standard Mini-Fuse male connector and two female ports. Basically, you're going to need to pull the Cigar Lighter fuse (number 44 in the cabin fuse box)......

And insert the neatly crimped and connected Piggy-Back Connector into the F44 position....

The Piggy Back connector has, as I mentioned, two fuse ports. Insert the 20 Amp (for the Cigar Lighter) into the bottom one and add a fuse for your new Head Unit in the top one - I could only find Mini-Blade fuses down to 3 Amp.....which will be fine for this application.
You can now connect the Sony-supplied harness to the car's wiring harness......

Now.......before you do anything else, plug the Head Unit in and check that it all works.....

Assuming it does....happy days......if it doesn't........go back and thoroughly check your connections.
The final stage is to mount your facia panel and then to insert the mounting chassis that was supplied with your Head Unit. It will be a fiddle to get in - but it will go. Make sure you push the mounting claws in the chassis firmly out - to secure in and then add an aerial adaptor to your new Head Unit....

Before finally connecting up the Head Unit and finally slotting it home. Job done!!......

Now you can enjoy the convenience of your entire music library in you car and also get a head unit that looks Waaaaayy better than the standard Fiat one.

