General Franko the 1971 500L

Currently reading:
General Franko the 1971 500L

Good news is the courier dropped the panels off to my neighbour & my lovely wife has taken them one by one and put them in the garage! Must resist the temptation to get repairing Franko & start the decorating tomorrow!
 
That's good news Sean. I think it's a good call, decorating first. Got to keep the other half happy. My missus would have waited til I got back no way would she collect them and put in them in the garage for me. Oho ooh quick she's coming!!!!!!!!!!!!

I missed my parcel from Holland today with spares, normally Parcel Force drop it at the local post office to collect but for some reason this guy didn't. Oh well I'll have to wait til Monday
 
All my panels have arrived excepted the 2 engine bay panels & 1 nsf inner arch which were out of stock. After spending an hour unpacking it all and disposing of the packaging material I checked the panels and they are free from damage. Dispite being made in Italy especially for the 500, when you compare the new with the old you can see the pressings are not quite as good quality. Basically they just aren't finished off as well.
First job was to hang the ns door. I bolted it on and within 10 minutes if fitted the hole and just needed a few tweaks to line it up properly. It will need some sanding & dressing up on some edges etc but apart from that I am very pleased.
Done some decorating today and then out in the garage for a few hours whilst the PAINT WAS DRYING!.
Gone for broke and cut the 1/4 off - leaving just the edge next to the door so as to keep an eye on if things move. Im leaving the floor in for now which should stop the car moving too much. I figured there's no easy way to secure the A post from moving time the inner & outer sills are removed. There's so much rust it flexes already.
I worked out the design of the sills and cut them out. Removed the sill strengthener, and decided to make the small extension piece on the side of the rear seat floor as I hadn't ordered these.
Carried out a small repair to the B post. Need to do another repair where it meets the inner sill, I will do this after the sill is in. Cut out the rust on the inner A post, need to make a new section for that before fitting the inner sill. Hopefully get the inner sill in tomorrow.
Bad news is the inner rear wing is very rusty, water has clearly been running down from the roof or air vent and corroded the inner panel as they just didn't apply any paint to the inside panels. Not should which way to go. There is a new inside rear arch and inner wing panel available for £100 or I could try making one using part of the old 1/4 panel or front panel that has some similar shaping which would reduce the amount of shaping a piece of flat steel. I shall think about that later!
 

Attachments

  • IMG_4438.JPG
    IMG_4438.JPG
    444.7 KB · Views: 91
  • IMG_4447.JPG
    IMG_4447.JPG
    437.2 KB · Views: 95
  • IMG_4444.JPG
    IMG_4444.JPG
    552.7 KB · Views: 74
  • IMG_4451.JPG
    IMG_4451.JPG
    520.1 KB · Views: 82
  • IMG_4449.JPG
    IMG_4449.JPG
    532.2 KB · Views: 74
  • IMG_4455.JPG
    IMG_4455.JPG
    528.2 KB · Views: 94
  • IMG_4454.JPG
    IMG_4454.JPG
    507.5 KB · Views: 93
  • IMG_4453.JPG
    IMG_4453.JPG
    528 KB · Views: 85
Door fit looks good Sean. The only complete panels I have had to have were the bonnet and the rear panel below the engine bay lid. The spot welds were a bit messy I just took the rough bits off with an angle grinder but essentially the panel shape was good.

The rear inner wing is unusual. You often find the bottoms with penetrating rust but I have never seen one like that, that has rotted through to the engine bay half way. It looks like it is an easy repair for a man of your talent.

Tony
 
You jammy so-and-so Sean--my n/s door took 3 evenings of hard work to get the door to fit well---1 of the hinges was welded on about 15/20 degrees out of alignment and we had to do areal bit of head scratching to work our way round the problem. the rest of your work is inspiring--and daunting. well done.
thumb.gif
 
Well, I have now completely removed the ns sill. I have made up a new section of the inner A post. This provides strength to the Door post and also makes the vehicle more rigid. Plus it gives me something to weld the inner sill to.
The new inner sill has been welded in place, and taken off the black paint on all surfaces that may need spot welding, coating surfaces with zinc weld through primer on those that will be hidden to prevent corrosion.
The rear seat strengthener is welded in place.
I then removed the lower rear section of front outer/inner wing giving access to the lower A post and front sill section. This allows me to be able to cleanly remove the last remaining section of the outer sill.
When I first offered the new sill up it had the correct gap at the back but a massive gap at the front. With a little grinding on the lower A post I soon got the sill to the position required. First clamped in place with vice grips and when satisfied I drilled some 1/8" holes through both panels and used a few self tappers to hold in place as these give more access when opening the door and also give me some solid reference points if I need to remove the sill again.
With the outer sill nicely in place I noticed the lower front edge of the door was sitting in slightly. I did notice this when I first fitted the door but presumed it was due to the front wing had been replaced.
Mark from Motobambino did mention the doors did have a slight problem with the front lower corner, but as he said with a few taps with the hammer on the inner edge of the door skin, the contour lined up lovely with the sill.
Next step is to finish removing the 1/4 panel, offer it up, trim it up and then cut the sill to join it as I prefer fitting the full 1/4 and cut the sill panel to fit rather than the other way. Its easier and gives a better result.
 

Attachments

  • IMG_4449.JPG
    IMG_4449.JPG
    532.2 KB · Views: 60
  • IMG_4457.JPG
    IMG_4457.JPG
    485.8 KB · Views: 67
  • IMG_4460.JPG
    IMG_4460.JPG
    492 KB · Views: 64
  • IMG_4461.JPG
    IMG_4461.JPG
    454.7 KB · Views: 68
  • IMG_4462.JPG
    IMG_4462.JPG
    436.5 KB · Views: 80
  • IMG_4464.JPG
    IMG_4464.JPG
    467.1 KB · Views: 75
  • IMG_4463.JPG
    IMG_4463.JPG
    469.7 KB · Views: 73
Looking good Sean. Good progress.

How many panels did you end up buying in the end?

Tony
 
29 all in all, still waiting for 3 to arrive. It's like having 2 cars in the garage.
It's coming on, however panels aren't brilliant fit & inner rear 1/4 might cause a problem. Peter Is on the case for me as he knows someone who is cutting one up!
 
Finished removing the last of the 1/4 panel edges & removed the inner arch.

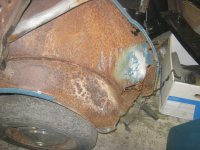
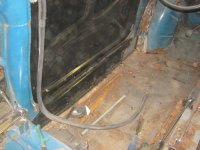
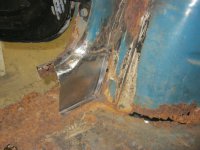
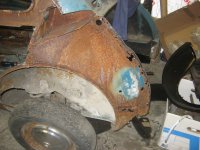
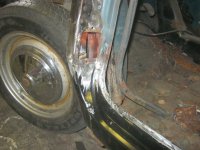
This shows the full extent of the corrosion to the inner wing. For what I can see water has been getting in an additional hole left from changing a sun roof and water has run down the inner roof rail and found its way down the inner wing.

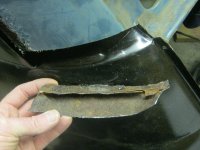
I have cut the lower part of the roof off where it joins the 1/4 panel. Mainly because I cannot get in there to split the joint and also because it is corroded so I might as well make a new one. It will probably be neater & I know the rust will be gone.

The wheel house looks to be ok as this is made of thicker metal and has more paint protection than the inside of the other panels which probably left factory in bare metal.
We must understand these were a very cheap vehicle sold in their masses to get the Italians back up and running after the war. They did not make these things to last this long, only to be reliable. So anti corrosion processes weren't that great, a bit like our own vehicles of the time. Also they did use poor quality metals, unlike what is used today.

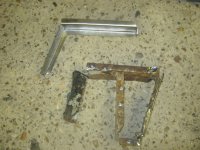
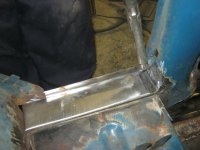
The good news is I think I can make one using part of the old 1/4 panel that has similar shaping. I have sent e-mails to every company I can think of to see if they have a shell being scrapped where I could salvage this part from, so I shall hold on for now - plenty of other stuff to do.

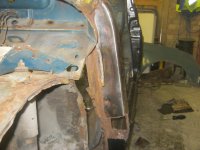
Offered the new 1/4 up, not bad fit. Just needed some dressing up near the joints as the contours did not quite line up with the original. Once happy with the gaps I cut through the 1/4 panel & the underlying panels to get the best joints I can.
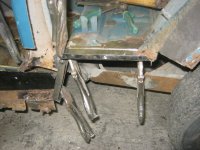
Then removed the small sections cut off the old panels & new sill and clamped the 1/4 in place then secured it with a few self tappers.

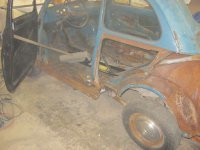
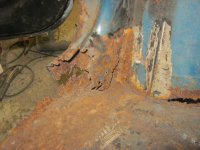
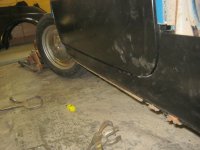
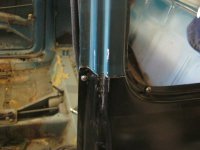
Next the A post. Gave it a bit of a clean up, the light surface rust cleaned up quite nicely. Decided to cut some of the lower section off as it was heavily corroded. This part needs to be strong otherwise the door will creak or even drop if it is weak.

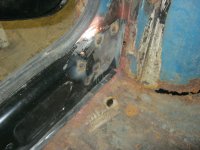
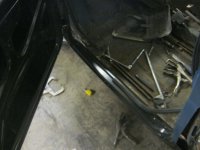
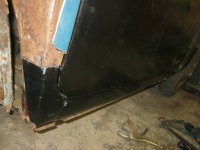
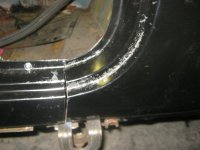
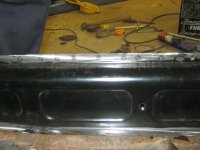
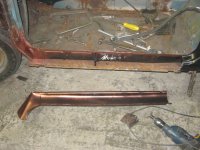
Removed the outer sill, cleaned all the joining edges.
Beware these panels do not have electrolytic paint, why I don't know? Manufactures usually supply panels with this paint on them and it allows you to spot weld through it. Instead I have had to clean the paint off then spray the welded surfaces with zinc weld through primer.

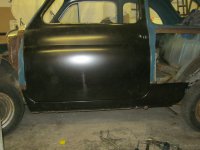
Placed the sill back in its place using the self tapper screws, went straight back in its original place. rehung the door to make sure the gaps were ok then mig welded the front section to the A post, welded in a new section, then spot welded along the top of the sill to join it to the inner section.

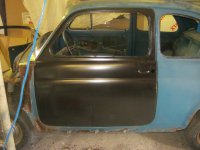
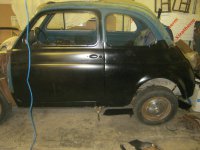
Franko now has his inner & outer sills and a solid A post holding the door in the correct position. Its looking a whole lot better than the other side.
thumb.gif
 

Attachments

  • IMG_4478.JPG
    IMG_4478.JPG
    549.1 KB · Views: 53
  • IMG_4472.JPG
    IMG_4472.JPG
    498 KB · Views: 53
  • IMG_4481.JPG
    IMG_4481.JPG
    489.1 KB · Views: 62
  • IMG_4482.JPG
    IMG_4482.JPG
    458.2 KB · Views: 67
  • IMG_4483.JPG
    IMG_4483.JPG
    457.7 KB · Views: 59
  • IMG_4479.JPG
    IMG_4479.JPG
    488 KB · Views: 70
  • IMG_4487.JPG
    IMG_4487.JPG
    527 KB · Views: 68
  • IMG_4486.JPG
    IMG_4486.JPG
    540.3 KB · Views: 70
  • IMG_4484.JPG
    IMG_4484.JPG
    559.6 KB · Views: 76
I just got into your thread Franko? (your nickname? )
You're taking this restoration head on; I guess you've been planning it for some time.
You clearly know what you're doing, which is handy because this one is obviously about as rusty as they get, with the possible exception of my own.
Is this all done in the last week or so? Amazing.
It focuses me on getting back to grips with my car which is just about ready for paint.
Keep it coming because we all find it very interesting.
Peter in Scotland.
 
Last edited:
Good work Sean. That rear inner wing is really rotten. When you say an extra hole for the sunroof, do you mean someone had drilled an additional hole in the roof and left it open to the elements?

Where the sunroof is attached to the roof, the end on each side is secured by a self tapper. It's a really poor bit of design, as it prone to rust, as when it gets wet it gets trapped when the sunroof is put back down. But as you already said these cars weren't meant to be still knocking around 50 years later. I am going to have to come up with a plan, as screwing a self tapper into a nice new paint job doesn't really appeal too much.

Tony
 
Hi Roger & Peter, thanks for your comments and nice for you to join us.
Franko is the name of my Fiat 500, I find it gives a personal feel to a restoration when you talk about it. my name is Sean by the way if you haven't already picked up from the previous posts.


Peter I have read your posts for the restoration of you car, I have it saved in my favourites and check out various parts as required. Great work undergone there, especially the roof rails.
thumb.gif
I think I may have thought twice about that one. As mentioned before I used to be into Minis years ago, and the one thing that would deter me from buying a Mini was if it had corroded roof seams/rails.


This 500 was the best out of the 4 I looked at. The others all had heavy corrosion around the sun roof, one could of had 2 sun roof's.


Tony, you were correct, when I took the sun roof rail off (that's all that was left of it) all the studs broke and there was 3 holes in the roof on both sides where the rail had been screwed down with self tappers. Only thing is there was only 1 screw. So 2 holes were exposed - hence the flow of water going where it shouldn't. Amazing how one little bodge leads to a whole load of work.


idea.gif
I considered maybe a captive nut in each side and then use a brass screw so as to prevent corrosion. Ideally there should be a seal in between the rail & the roof. This could be either mastic or thick double sided tape as used on door mouldings on modern cars.


Last of the panels turning up tomorrow, im not sure if to start the other side first and wait to see if an inner wing turns up or try making one and then get the lh side finished first. Have to see how the mood takes me!
rolleyes.gif


Sean
 

Attachments

  • Blind Rivets.jpg
    Blind Rivets.jpg
    5.7 KB · Views: 341
Good call Sean there is a similar plastic former that holds the quarter lights into the top of the door frame. Which I am guessing is done to prevent corrosion, but they obviously forgot the sunroof bit. My car did have self adhesive rubber tape between the holes on the sunroof mount that looked pretty original.

On the inner wing I would be amazed if you find one from a someone scrapping cars. I am always on Ebay looking at what people are selling in 500 land. There are some total sheds, far, far, far worse than Franko. They have loads of bids on and go for silly money. People just don't scrap them.
 
Good afternoon Sean and Tony. I think I first registered with this forum when I had my Cinq many moons ago. Fancy you being here too indeed! Then again, we do have a fairly niche interest....turquoise blue Fiat 500f cars under restoration. :) With my Android tablet it's very easy to use.
I agree, very lucky to find one anyone would call scrap, even if it actually is. Van der Laan had a page with a chopped off roof for sale a while ago. Might be worth a try. I would go for adapting a panel as Sean mentioned.
It's' the speed of Sean's activity together with the care and skill that amazes me and you too I bet Tony.
 
Last edited:
Hi Franco ,lots of work! Are you keeping the same colour? I have one in the very same blue and year that i brought over from Sicily last year and it turns lots of heads!
You're right about the others he had for sale, my mate saw them when viewing the very rusty Ape!
Keep up the great work!
Franco (little Frank)
 

Attachments

  • image.jpg
    image.jpg
    1.1 MB · Views: 39
Hi Little Frank, that's a nice little 500 you have there.
Not sure about the colour. As you can imagine after changing all the panels there isn't going to be much left the original colour. Have a feeling the wife might have an opinion on the colour! We shall have to wait and see on that one.
I originally went to see the Ape, I fell in love with the little fella but every thing was rusty, seized or damaged and parts missing. As much as Enzo there was telling me everything was available, I did my research before viewing and I couldn't find anything for it. On inspecting it, I decided to walk away. I had already received images of all the 500's a month or so before, but the corrosion put me off. But as you know I got sucked in by Franko which was the best of the 4 left.


Peter, I did try Van der Laan as I saw that 500 with the roof off, but all I got back was a reply saying "No". that's that then!
Didn't get any joy from any over supplier either.
So I have been busy today making one. just going back to the garage to weld it up and should put a few images on later.
 
Back
Top