General Franko the 1971 500L

Currently reading:
General Franko the 1971 500L

Another job done. Getting back into the swing of this.
There's a few more of these small repairs to do around the screen aperture and then time to move on to the major stuff once my new panels arrive (got to order them first!)
thumb.gif
 

Attachments

  • IMG_4019.JPG
    IMG_4019.JPG
    523.2 KB · Views: 70
  • IMG_4272.JPG
    IMG_4272.JPG
    428.6 KB · Views: 61
  • IMG_4322.JPG
    IMG_4322.JPG
    423.8 KB · Views: 86
  • IMG_4324.JPG
    IMG_4324.JPG
    459.2 KB · Views: 87
Hey Sean I think we are starting to see what a master with the metal you are. Top quality work, I think this thread is going to prove to be very interesting.

Tony
 
Really nice work happening here - how are you forming these small pieces with such ease???
 
Thanks Dunnah01,
Just basic panel beating/restoration process.
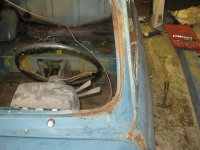
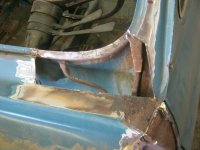
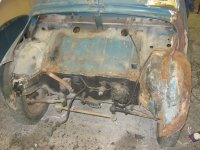
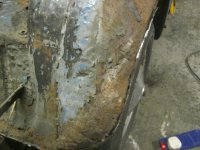
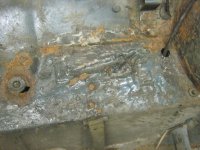
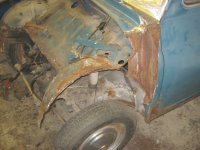
1. Decide how far you need to cut back to get rid of external & internal rust.
2. Think about how you are going to form the panel. 1 or 2 pieces depending on your skills & equipment.
3. Make some cardboard templates for the pieces you want, these can also be used to make sure the contours are correct when forming the panels & to help line up before welding.
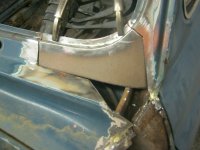
4. cut your pieces from sheet steel (same thickness or slightly thicker in some places to add strength.
5. Form them up, you can use jenny/rollers, folders, strecher/shrinker etc if you have the equipment or good old panel beating. A vice, tubes, wood, sockets, anvil, pliers, hammer & dollies or anything else that you can use to shape the metal to whatever you want. You can also stretch metal by keep hitting it, or shrink it using peening method (sharp edge of a panel beaters hammer) or if you have oxy acetelyne, heat it up to cherry red and use a hammer & dolly.
6. one you have all your pieces cut & formed, tack them in place making sure the surfaces are as flush as possible to reduce steps when grounding welds down.
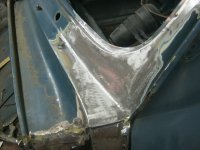
7.When you are happy everything lines up and other parts/panels fit then weld them up an inch at a time to reduce heat distortion. Make sure you get good penetration as you will be taking the top off so you need weld all the way through the panel.
8. knock the heads off the welds with a grinding wheel (dont go too mad) then change over to a grinding disc (36 to 80 grit) and sand the welds flush to the panels trying not to take too much out of the sheet metal - especially Fiat as it is not that thick.


That's it.


If I get a chance I will take a few photos of the next piece I do.
 
I have taken the plunge and ordered my panels from Motobambino. They should be here Monday.
Thanks to everyone for there advice on buying parts, I save nearly £600 from my first price up.
Sorry Tony your offer was very kind but I can be very impatient and have next week off so I need them quick.

Mark @ Motobambino done me a really good deal and assured me the panels are made by Rhibo in Italy, this is the only mass producer of Fiat 500 body panels in Italy now (there where 2 up until 12 months ago when Rhibo bought out Olman). I have gone for new doors, apparently they are ok but may need a few tweeks (what pattern parts don't).

So I thought I would go and do a bit more to Franko. I have cut the inner front panel off -oh dear!
It is clear that Franko has had a prank in his earlier life. The NSF wing was replaced & the front section of the nsf inner arch. So I have cut it off! I have a new one on order so no point messing around.


I should be able to save the little inner wing extension & repair the inner wheelhouse.
It will all look lovely once repaired properly & sand blasted. The back half of the inner wing was only held on by 3 spot welds. Im going to leave the bottom half of the inner wing in place as it will be a guide point for fitting the inner sill. Plus I am concerned over the strength of the shell if I take it out before placing a reinforcer in place. The door hasn't dropped yet so that's a good sign.

Next step is either the sill panels or attempt some repairs on the roof. This is where it could go a bit bandy!


Attachments

  • IMG_4427.JPG
    IMG_4427.JPG
    552.2 KB · Views: 67
  • IMG_4424.JPG
    IMG_4424.JPG
    589.8 KB · Views: 61
  • IMG_4425.JPG
    IMG_4425.JPG
    619.1 KB · Views: 66
  • IMG_4433.JPG
    IMG_4433.JPG
    483.9 KB · Views: 69
A vice, tubes, wood, sockets, anvil, pliers, hammer & dollies or anything else that you can use to shape the metal to whatever you want

But these are what I've tried and all I seem to do is hurt myself and swear a lot. All credit to you for showing true skills and patience.

I got quite a few bits from Motobambino and it's well worth a visit to meet them if you ever get a chance, they are true enthusiasts and really know there 500's (and many other classics as well)
 
Thanks, that really made me laugh! You wouldn't believe how many cuts & scrapes I have had over the years. And I'm not telling you about the burns in places where you wouldn't expect them. I remember one time I had my head up inside a moggy minor wing welding some rust that was spitting & popping and every time i got burnt I would bang my head on the inner wing. Not to mention my boss dragging me out by my heels because the inside of the moggy was ablaze.
Happy days!
 
I do wonder why we do it at times - but then that's part of the 'experience' as I understand it.

Keep the posts coming as my resto' has stalled due to lack of workshop and it's this stuff that kicks me (in the burnt bits?) to get the workshop built.
 
It's amazing when I see pictures like these Sean. My car must have lived a pretty dry stored life I am thinking, as the only penetrating rust I had was a hole in the top of the near side rear wheel arch. How lucky was I.

Should be able to get back on with my 500 tomorrow. I have spent the last 2 weeks replacing the fences in the garden that got damaged in the recent storms. So tomorrow is new brake line day!!!!!!!!! Can't wait I have been itching to get back to it.

Judging by you work so far, I would imagine rapid progress next week with the new panels.

Tony
 
Tony you were lucky, from what I see these little 500's rot from the inside out as they did not undergo the same anti corrosion treatment as modern day cars. As you can see from the photos, the inside of certain panels have surface rust all over as they had little/no paint on them unless a spray gun got near them with a waft of paint.
I have next week off, but I have got a bedroom to start decorating. But whilst the paint is drying I am sure there will be some down time to get some more done on Franko.
Will be good to see some more photos of your 500. Must be quite close to being finished now? perhaps you could give it a run down to Herne bay when its finished?


Sean
 
Yeah I know what you mean about the paint on the inside Sean. My sprayer gave it a good covering inside and out he said he put loads of paint on it. I don't know if you read my thread on the other forum? But I covered mine inside on the bits you don't see underneath the carpet and seats, in the engine bay and bonnet with 3M anti chip which gives a rubberised finish. It's also similar to the original finish in the engine bay, so hopefully it should keep the rot worm at bay for a few years.

Yeah I will a look at planning a trip down to you once I get it finished, it's only about 50 miles away. I think it will still be a couple of months away as I need to sort the wheels out. I am not sure whether to get the originals sand blasted and sprayed or buy new ones. New ones are €55, but adding shipping costs, as they are quite heavy will obviously push that up. I would imagine the cost to refurb wouldn't be much different?

There is a place in Tonbridge called spit n polish who do the alloy wheels on my modern car. They are not cheap but do a good job. I might pop down there with a wheel and see if the do steel ones and how much.

Tony
 
Tony, with reference to the wheels you could try a company on the isle of sheppey who refurbish wheels J W Smart Services 0800 5335 399. They do a really good job with alloy wheels.
But if you are looking for sand blasting & powder coating then i would maybe find a local powder coating company. I recently has a subframe & a whole load of parts for an MGB blasted & powder coated for £50 at a place in Margate.
Although you might want to get them blasted and paint them your self which would be even cheaper?
 
That's cheap Sean. I wonder how much the place in Margate would charge to get 5 wheels blasted and powder coated? Do you think it would be less the £100?
 
Tony;
try 'banded wheels essex'--they have a web-site and they charge £35 per wheel for blasting and painting and £15 per wheel for just blasting.
thumb.gif
 
Yeah good spot Sean. I just googled around and didn't find them!! I will take a wheel down their next week, as you said its only just down the road from me.

Found a place in Gillingham called Lepsons but they quote over £50 a wheel. I might just go for sandblasting and paint myself as you said. Powder coating colours don't appear to come in any shades of silver, that come close to what the wheels were originally.

One of the sites in Holland F. D. Ricambi allows you to put the parts in the basket and you can see the shipping costs before ordering. It works out at about £180 for four new wheels including shipping, so that maybe the way to go but either way I would need to get someone to take the tyres off the old ones and rebalance but that will have to happen whatever path I decide to take. When you factor in the paint costs and my time it would probably work out cheaper to buy new and stick the old ones on EBay
 
Cheers Hobbler at least it gives me an idea of the price I am looking at. I looked them up, they have a Facebook page and look like they do some top work.
 
Doh! I'm on a train to London & just got text from courier to say panels arriving today! They were supposed to be Monday, no one home to see them in so had to divert them back to
Monday. Shame I could have been enjoying myself tomorrow.
 
Back
Top