Technical Toe in adjustments after new parts

Currently reading:
Technical Toe in adjustments after new parts

turbo500

Member
Joined
Mar 20, 2013
Messages
251
Points
118
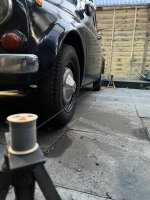
I finally got around to replacing all the joints up front however I noticed that the the toe was pointing out.
I was in a hurry so I ended up getting it as straight as I could but the track rods are definitely not even on both sides.

Maybe I’m being a little thick, but can I make them equal without removing the tie Rod ends from the sockets? Or do I need to remove everything to get them measured?

I’m getting confused with the fact that I can spin the Rod but it looked as if it wasn’t found anything in terms of steering angle…
 
Assuming yours vehicle is already fitted with a steering rack conversion, generally on most vehicles it is possible to slacken the lock nut on the track rod end and screw the shaft in or out to suit , ideally equal amount of thread showing both sides of vehicle and whatever adjustment to correct tracking is done to both sides of vehicle to hopefully keep steering wheel in correct position.
However if yours still has a steering box etc, then you will have a threaded bar each side of vehicle with two threaded trackrod ends fitted to each bar, the principle is still the same start with all ends screwed in with a good safety margin equally on both rods, ideally well greased to allow easy adjustment, with this earlier arrangement there are two clamps on each bar which pinch the trackrod ends when tightened to secure from turning
One danger of adjusting one side only which I seen at some "fastfit "depots is one track rod end screwed right in and the other hanging on the last threads waiting for a serious accident!
If well greased, once clamps or nuts have been slackend it should be easy to reach under car and give a turn to each side equally as necessary when adjusting.
Just a thought if you say turning them isn't making any difference , is it possible if you have original steering setup that you have the wrong threaded ends on the bars or bar? Yyou should have a bar that as you turn it it, it lengthens overall one way and shortens the other.
I only have tracking data as far back as 1977 Fiat 126 which gives toe in of up to 3.5mm and max toe out of .5mm, but no doubt some on on Forum will have correct figures.
Once correctly adjusted ensure all nuts and clamps secure.;)
 
Last edited:
Assuming yours vehicle is already fitted with a steering rack conversion, generally on most vehicles it is possible to slacken the lock nut on the track rod end and screw the shaft in or out to suit , ideally equal amount of thread showing both sides of vehicle and whatever adjustment to correct tracking is done to both sides of vehicle to hopefully keep steering wheel in correct position.
However if yours still has a steering box etc, then you will have a threaded bar each side of vehicle with two threaded trackrod ends fitted to each bar, the principle is still the same start with all ends screwed in with a good safety margin equally on both rods, ideally well greased to allow easy adjustment, with this earlier arrangement there are two clamps on each bar which pinch the trackrod ends when tightened to secure from turning
One danger of adjusting one side only which I seen at some "fastfit "depots is one track rod end screwed right in and the other hanging on the last threads waiting for a serious accident!
If well greased, once clamps or nuts have been slackend it should be easy to reach under car and give a turn to each side equally as necessary when adjusting.
Just a thought if you say turning them isn't making any difference , is it possible if you have original steering setup that you have the wrong threaded ends on the bars or bar? Yyou should have a bar that as you turn it it, it lengthens overall one way and shortens the other.
I only have tracking data as far back as 1977 Fiat 126 which gives toe in of up to 3.5mm and max toe out of .5mm, but no doubt some on on Forum will have correct figures.
Once correctly adjusted ensure all nuts and clamps secure.;)
Toe-in on a 500 should be between '0' and '2mm'----I always set my toe-in to '0'. Each track-rod should have 1 left-hand thread and 1 right-hand thread section at the 2 ends. This ensures that as you turn the track-rod it will either lengthen or shorten. You do NOT need to remove the track-rids to adjust them, BUT before you fit them, you should ensure that the 2 ends have the same length of ball-joint thread into the track-rod. The reason for them having to be the same length is that if they are of unequal length you could negate the "Ackerman" effect. This effect enables the inner wheel to turn in slightly more than the outer wheel does---get it wrong and you could have tyre squeal, even on 'open' bends at slow speed.
 
so I think I’ve understood the issue. Left track rod is pretty bent…and so depending on which way it was turned it was throwing off my steering and measurements 😵‍💫

I’ve got it to a decent point I think. Is there a guide or some tips you recommend for setting up the toe; are you using a rope or tape measure?
 
Trouble is you are talking about accurately measuring a difference of a couple of mm, so if wrong handling and excessive tyre wear can occur.
I am lucky I have an old Dunlop Alignment gauge.
If you are just doing a basic setting before driving to a tyre depot it may be possible with care to use a tape measure to check at the same height the difference across from the back of the front wheels to the same place at the front of the front wheels.
On the road I have found if wheels are toeing out the car will wander and be hard to steer in a straight line without correcting, also squealing going around corners and if toeing in to much it will excessively "self centre" after a corner.
Also after a few miles you can feel by rubbing your hand across the tread which way it is by the "feathering " of the rubber.
A bit late now I know , but ideally the measurements of the old steering arms before removal would have been a good starting point;).
Whenever changing a trackrod end I would measure the threads exposed with a pair of calipers and also count the number of turns to wind off the old one, so when new fitted it was usually a minor adjustment needed.
I assume you are replacing the bent trackrod.
 
Hey Mike,

I did think about measuring before and after, however I had noticed a bend in the left track rod, and the chances of me getting the bent rod back in the same spot/with the bend the same way after installing new ends would have been pretty hard. Either way, i will be replacing the track rods as soon as I get a shipment over here.
 
Trouble is you are talking about accurately measuring a difference of a couple of mm, so if wrong handling and excessive tyre wear can occur.
I am lucky I have an old Dunlop Alignment gauge.
If you are just doing a basic setting before driving to a tyre depot it may be possible with care to use a tape measure to check at the same height the difference across from the back of the front wheels to the same place at the front of the front wheels.
On the road I have found if wheels are toeing out the car will wander and be hard to steer in a straight line without correcting, also squealing going around corners and if toeing in to much it will excessively "self centre" after a corner.
Also after a few miles you can feel by rubbing your hand across the tread which way it is by the "feathering " of the rubber.
A bit late now I know , but ideally the measurements of the old steering arms before removal would have been a good starting point;).
Whenever changing a trackrod end I would measure the threads exposed with a pair of calipers and also count the number of turns to wind off the old one, so when new fitted it was usually a minor adjustment needed.
I assume you are replacing the bent trackrod.
I too use the old Dunlop "Toe-in" gauges, old fashioned and basic theymay be, but they still do a very efficient job. In order to make sure that my track-rods ARE the same length,I made a very simple gauge to check them with----I will check the length of it tomorrow and let you know what it is. It will at least give you a sound 'basic' measurement which will allow you to drive the car safely to a tyre company. Unless you are fairly au-fait with using 'bits of string', I would suggest that you get a tyre company to do the final alignment
 
Is there a guide or some tips you recommend for setting up the toe; are you using a rope or tape measure?

You can do it with some string (I actually find a strong cotton thread easier for accuracy) and 4 axle stands or other sturdy but moveable objects. It’s a bit of a faff but it works.

You need to make a string line down each side of the car that is parallele, both to the car and each other, and extends past the length of the car. The line should be level with the centre of the wheel.

I start by settling up two lines and moving the stands till each line is 100mm from the centre of the wheel (the wheel trim bolt makes a nice datum here). Then I compare the distance between the two string lines in front and behind the car. If the lines are parallel then this will be equal.

In my case the front ends were ~15mm closer to each other. Then there is a bit of trial and error to change the stand position till the lines are parallel to each other and the car. I ended up with the lines set at 106mm from each front wheel and 100mm from each back wheel.

Now that is done, if i ever have to repeat this process, I now I can go straight to 106/100 and be really close.

Ok so that’s the annoying, time consuming set-up done. The next bit is easy…

Simply measure the distance from the string to the front edge if the wheel and compare that to the distance from string to rear edge of wheel. You are measuring to the wheel rim edge, not the tyre.

If the distance is greater at the front edge you have toe in, if the distance if greater at the rear edge you have toe out. For each axle you need to measure both sides of the car and add them together.

So when the book says 0-2mm toe in, you would want to measure 0-1mm on each wheel.

It’s a slow and awkward process, but with care it works and doesn’t require and special tools.
 

Attachments

  • BAE46EE1-4BFD-46EB-891A-C986CFC3AFE6.jpeg
    BAE46EE1-4BFD-46EB-891A-C986CFC3AFE6.jpeg
    1.8 MB · Views: 30
A bit time consuming, but in the absence of the correct tool you have to do what you can.
Many years ago I worked at a Moskvich Dealership and one of their specialist tools was a wheel alignment gauge, it was spring loaded and over a pit you engaged it on the back of both front wheels where it gripped the wheel rim in a groove in the tool , there was a thin chain hanging down both sides which you set to just touch the ground, you checked a position on a sliding gauge and then carefully rolled the car backwards which brought the whole gauge towards the front of the vehicle to a point where the two chains again were just touching the ground and you the measured the difference on the sliding gauge.
It needed to be done on a pit, but the good thing about it was it sat on a fixed position on the wheel rim so took into count any distortion.
I suppose if you secured a length of mig wire or similar to the rear of the inside rim across both front wheels and marked it, then rolled the car backwards and measured it again at the front at the same spot with a bit of care that may work also.
The advantage is the car is not jacked up which can affect readings.
As promised, the length of my track-rod 'gauge'-----it is 35.8cm long. I measure between the threaded section (just under the securing nut) of the the track-rod ball joint.
 
Back
Top