Wow, thanks for all the thoughts. I was wondering too if the radiator could be part of the problem with an airlock but as you say that would not explain what appears to be coolant in the oil. The old radiator cracked along with the heater core. It found the aluminum radiator that is in it now at a local shop and it bolted right in so I said why not and I replaced the heater core from Midwest Bayless. It could be something still is wrong there. Not sure.
I replaced the head gasket, valve cover and cam cover gaskets a couple years back as the engine was leaking a good amount of oil when I got it. I had a machine shop look at the cylinder head and they cleaned it and said it was flat i replaced the water pump at the same time. I thought I got the gaskets on right but who knows. Most of the oil leaks stopped after that but I added the oil cooler mainly to add volume and the engine ran good and still does even now (but starts to overheat). I will probably remove the oil cooler when I open up the engine again to inspect as it maybe restricting air flow.
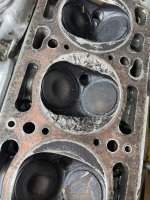
When I opened up the engine back then one cylinder seemed to have problems (see picture). I cleaned everything up but it may have overheated before I had it. The odometer has 83000 on it. Does not burn any oil.
I think I will take your advice and try to open it up again and see what I can find.
1st things 1st. Did you re-torque the cylinder head after a few hundred miles? How much mileage have you covered since changing the head gasket?
Did you check the thermostat for correct operation? Have you still got the original radiator, maybe connect up a hosepipe and check if was flowing correctly or was possibly contributing to overheating. I'd be surprised if there was anything wrong with the original rad as the condition of the waterways in the head and block suggest that the car was well looked-after as regards coolant changes.
If you neglected to re-torque the cylinder head, I'd suggest doing it now, put some cheap new oil in the engine, re-install the original rad, check the thermostat and try running the engine again. You might get lucky.
I'm not a fan of aluminum radiators on older cars, especially fitting the crossflow type on cars designed to run with vertical flow rads. If you do intend to keep the al. rad, might I suggest you ensure it is rubber mounted (it doesn't seem to be at present), al. rads don't like being subjected to vibration or stress.
The original standard rads should work fine unless the engine had been modified significantly. Bleeding all the air out of a crossflow rad cooling system can be difficult - systems designed to have a crossflow rad as standard usually have bleed screws/points high up (higher than the rad) and a procedure to be followed - afaik, some modern cars now call for vacuum filling of the cooling system to avoid air-locks.
The method I used on Fiat 124s with the standard radiator is to fill the system through the rad filler neck, start the engine, allow to warm up, blip the throttle occasionally (you'll notice the level drops as the engine is revved up, this shows the water pump is working normally and helps to burp out any air locks) and keep the rad topped up, wait until the cooling fan has cut in and then out, top up the expansion tank to the max. mark ( coolant should then start to run from the expansion tank pipe into the rad), refit the rad cap, then the expansion tank cap. Only check the rad level when the engine is cool/cold - normally there's no need to remove the rad cap, just check/adjust the level at the expansion tank. The level should stay stable - up to the max mark when the engine is hot and never drop lower than the min. mark when the engine is cold - otherwise you have a leak somewhere.
I forgot to mention to check out the expansion tank... Inside there a metal tube with perforations/holes and with the top pinched close. Make sure that the holes are clear, otherwise coolant can't flow from the expansion tank to keep the rad topped up.... Also check the hose between the expansion tank and rad is clear.
Thanks for posting the pics. Whew, where do I start, especially after expanding them....
O.k., I've calmed down, removed my perfectionist hat and returned to the 'real' world (the one where nothing is perfect and even where a person has lots of money to spend, it's probably not advisable nor economically justified re vehicle resale value to do so).
I see an engine that's probably in decent useable condition. The damage to no. 3 piston top and combustion chamber was likely caused by some foreign object being ingested into that cylinder - possibly one of those little 5mm nyloc nuts that hold the air cleaner body onto the carb. or maybe a washer?
Such damage doesn't matter much, unless the piston top land (the part of the piston above the top ring) get distorted and crushes the top ring - this can only be ascertained by pulling the piston and I wouldn't advise this (you'll likely just open a can of worms by doing this, one thing leading to another). However, I would try as best as possible to smooth down any sharp lumps (using a scraper, file or rotary burr etc) to avoid any risk of hot spots in the combustion chamber which might result in pre-ignition.
If the engine isn't burning oil/ no excessive piston blow-by from the crankcase breather, then the bores and pistons are serviceable.
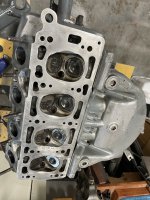
You said the machine shop cleaned and checked the head - I won't ask what they used (left lots of scratches and debris in holes) but I hope you thoroughly cleaned that head and all it's oil feed holes before refitting. Machine shops over here don't like skimming these Fiat cyl. heads - the inlet valve seats protrude into the head face, so the issue then becomes do they use a fly-cutter (normal for al. heads but not when fitted with hard metal valve seats) or a surface grinder (normal for iron heads but not aluminum ones). You can check both the top face of the cyl. block and the cyl head face for flatness using a decent steel rule if you don't have a precision straight edge - shine a light from the other side to see any warpage.
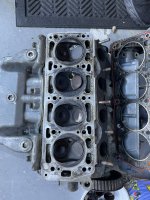
Top face of cylinder block - needs a thorough clean. I assume this pic was before reassembly, so would have been cleaned.
A word of advice- make sure all bolt holes in the block are cleaned out. I usually run a tap down each hole to ensure correct, unhindered torqueing to the correct figure and suction/blow any oil or coolant for the same reason.
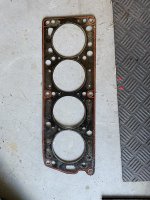
Looking at the head gasket witness marks on the cylinder head, I'm suspicious whether the correct gasket was used, the fire rings (cylinder sealing rings) in the gasket between cyl's 2 and 3 seem very close. But I realise that the pic is when you removed the cyl head the last time but check any head gasket that you do intend to use against both the head and block as there have been variations. (e.g. iirc, the bore spacings were different on later engines).
Don't forget to check the spark plug hole threads - this is an ideal time to repair any damaged ones by Helicoiling or similar (beats having to do one in situ, especially the no. 4 one).


 ) but no rebuilt full engines. My recommendation would be to remove your cylinder head, see what you find and then take it from there (hopefully a light head skim, if needed, and a new gasket will fix the problem).