Hello guys and girls and others, I am bruised, battered, damp and grubby after a return match against a Fiat Multipla wishbone (replacement) today. But I managed it.
After struggling with my last wishbone replacement 2 years ago (I only just got the bloody thing fitted then - badly - after 5 hours and 4 miles from home...), some time back I thought of a tip to make the installation a lot easier, which I tried for the first time today. The other tip comes from watching how the pro at my local garage did the job.
Note: You follow either tip at your own risk, but they worked for me.
Tip 1: Simplifying insertion of wishbone bolts
Background: When fitting a new wishbone in the past I have found it really difficult locating and starting the wishbone bolts into the wishbone brackets because when the wishbone is placed in position, above the subframe and below the wheel hub, it is at a downwards angle of about 30 degrees to the horizontal which places a load on the wishbone brackets/bushes, meaning the latter have to be levered down to their final position parallel to the subframe to enable the bolts to be inserted into the wishbone brackets. Particularly difficult if you are working on your own.
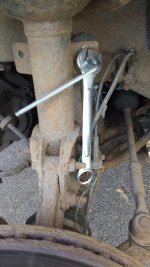
Solution: After loosening the balljoint pin in the pinch bolt clamp by the usual method... Jack up the wheel hub until the wishbone is as near horizontal as possible. I put the jack under the brake disk. So as not to restrict later full removal of the pin from the pinch bolt, put the jack on the *outside* of the wheel hub/car. To assist raising of the wheel hub and wishbone, I undid the top end of the droplink and removed the droplink balljoint from the strut, so that there's no resistance from the anti roll bar pulling down on the strut and hub.
With the wishbone now horizontal there is no load on the wishbone brackets/bushes, which: a) makes removal, insertion and positioning of the wishbone easy, and b) greatly simplifies insertion of the wishbone bolts into the wishbone brackets (in fact I could push the rear wishbone bracket down the now short distance onto the subframe *by hand* with no effort).
**Caution**: The car will already be jacked up and supported on an axle stand, so take care raising and lowering the wheel hub as some of the car's weight may shift onto the wheel hub off the other means of support, and vice versa.
Also, I found it necessary to undo the ARB bracket (2 x 13mm bolts) to get the rear wishbone bracket under the ARB.
Tip 2: Correct installation of wishbone balljoint pin
Background: The last time I did a wishbone, when installing the new wishbone, I didn't know how far/high into the pinch bolt clamp to push the balljoint pin. So I just pushed the pin up into the clamp as far as it would go, with the result I could not get the pinch bolt through the clamp. Not realising what I'd done wrong I ended up hammering the pinch bolt through the clamp knackering the thread and meaning I couldn't torque up the bolt. It required a new pinch bolt and sorting by the local garage.
I had followed an otherwise excellent step-by-step Multi wishbone replacement procedure I found online, *but* it missed out one vital step - ensuring the balljoint pin is at the correct height. Hence the cockup.
(And there wasn't much help on getting the wishbone bolts installed either).
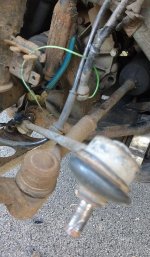
Solution: There is a cut-out in the balljoint pin which the pinch bolt fits through (thus when fitted the pinch bolt locks the pin into position vertically in the clamp), so you have to line up this cut-out vertically with the pinch bolt hole(s) in the clamp. What I did is start with the balljoint pin inserted, but low down, in the clamp. Working from the front of the car ie. eyes at the front, I shone a torch from the rear-of-the-car direction through the pinch bolt hole(s) in the clamp. When the pin is too low (or too high) you can see the pin obstructing the hole in the clamp. To raise the pin and cut-out to the correct height, I gently tapped on the bottom of the wishbone balljoint with a hammer, it didn't need much force (use a small block of wood to cushion the balljoint if desired). Keep checking the pinch bolt hole in the clamp and test trying to push the pinch bolt *by hand* through the hole(s) in the clamp. Once the pin is at the correct height in the clamp the pinch bolt goes through the clamp no problem, no need to force it.
Note: If you push the pin too far/high into the clamp, I found it a PITA to knock the pin back down again (with a new wishbone and bushes there is a greater force pushing the pin upwards than with the old, knackered wishbone and bushes!), so start with pin low and tap it up gently and keep checking for the correct height.
After cocking up my last wishbone installation 2 years ago, I watched how the garage mechanic sorted the balljoint pin to get it to the correct height in the clamp: hammer on the bottom of the balljoint to raise the pin, and a long lever to lever the wishbone and pin down - but I found the lever method really difficult with the car on the deck and therefore no room to manoeuvre the lever, compared to working with the car raised up on a garage ramp.
It did not go entirely smoothly today (I've omitted all the cuss words): despite using the first tip I still had a problem starting the long bolt into the rear wishbone bracket, it wouldn't bite. So I ended up taking the wishbone off the car again, and running the bolt up and down the bracket bolt hole. The bolt went in eventually with the wishbone on the car.
Also I cross-threaded the long bolt in the front wishbone bracket (have read others say they had similar problems with the front bracket), so I had to undo all the other bolts again, take the wishbone off again, and run a bolt up and down the bracket hole to clean up the thread.
To avoid the same problems when I do the other wishbone, prior to installation, I intend to test the bolts in the wishbone brackets first.
However, the whole thing was a lot easier, with the hub and wishbone jacked up, than last time.
FYI: The front bush on the old wishbone was obsolutely knackered/loose. The new wishbone is Birth (Ebay).
I've got the NS wishbone to do shortly. After this learning experience/trial I think it'll go MUCH smoother and faster!
After struggling with my last wishbone replacement 2 years ago (I only just got the bloody thing fitted then - badly - after 5 hours and 4 miles from home...), some time back I thought of a tip to make the installation a lot easier, which I tried for the first time today. The other tip comes from watching how the pro at my local garage did the job.
Note: You follow either tip at your own risk, but they worked for me.
Tip 1: Simplifying insertion of wishbone bolts
Background: When fitting a new wishbone in the past I have found it really difficult locating and starting the wishbone bolts into the wishbone brackets because when the wishbone is placed in position, above the subframe and below the wheel hub, it is at a downwards angle of about 30 degrees to the horizontal which places a load on the wishbone brackets/bushes, meaning the latter have to be levered down to their final position parallel to the subframe to enable the bolts to be inserted into the wishbone brackets. Particularly difficult if you are working on your own.
Solution: After loosening the balljoint pin in the pinch bolt clamp by the usual method... Jack up the wheel hub until the wishbone is as near horizontal as possible. I put the jack under the brake disk. So as not to restrict later full removal of the pin from the pinch bolt, put the jack on the *outside* of the wheel hub/car. To assist raising of the wheel hub and wishbone, I undid the top end of the droplink and removed the droplink balljoint from the strut, so that there's no resistance from the anti roll bar pulling down on the strut and hub.
With the wishbone now horizontal there is no load on the wishbone brackets/bushes, which: a) makes removal, insertion and positioning of the wishbone easy, and b) greatly simplifies insertion of the wishbone bolts into the wishbone brackets (in fact I could push the rear wishbone bracket down the now short distance onto the subframe *by hand* with no effort).
**Caution**: The car will already be jacked up and supported on an axle stand, so take care raising and lowering the wheel hub as some of the car's weight may shift onto the wheel hub off the other means of support, and vice versa.
Also, I found it necessary to undo the ARB bracket (2 x 13mm bolts) to get the rear wishbone bracket under the ARB.
Tip 2: Correct installation of wishbone balljoint pin
Background: The last time I did a wishbone, when installing the new wishbone, I didn't know how far/high into the pinch bolt clamp to push the balljoint pin. So I just pushed the pin up into the clamp as far as it would go, with the result I could not get the pinch bolt through the clamp. Not realising what I'd done wrong I ended up hammering the pinch bolt through the clamp knackering the thread and meaning I couldn't torque up the bolt. It required a new pinch bolt and sorting by the local garage.
I had followed an otherwise excellent step-by-step Multi wishbone replacement procedure I found online, *but* it missed out one vital step - ensuring the balljoint pin is at the correct height. Hence the cockup.
(And there wasn't much help on getting the wishbone bolts installed either).
Solution: There is a cut-out in the balljoint pin which the pinch bolt fits through (thus when fitted the pinch bolt locks the pin into position vertically in the clamp), so you have to line up this cut-out vertically with the pinch bolt hole(s) in the clamp. What I did is start with the balljoint pin inserted, but low down, in the clamp. Working from the front of the car ie. eyes at the front, I shone a torch from the rear-of-the-car direction through the pinch bolt hole(s) in the clamp. When the pin is too low (or too high) you can see the pin obstructing the hole in the clamp. To raise the pin and cut-out to the correct height, I gently tapped on the bottom of the wishbone balljoint with a hammer, it didn't need much force (use a small block of wood to cushion the balljoint if desired). Keep checking the pinch bolt hole in the clamp and test trying to push the pinch bolt *by hand* through the hole(s) in the clamp. Once the pin is at the correct height in the clamp the pinch bolt goes through the clamp no problem, no need to force it.
Note: If you push the pin too far/high into the clamp, I found it a PITA to knock the pin back down again (with a new wishbone and bushes there is a greater force pushing the pin upwards than with the old, knackered wishbone and bushes!), so start with pin low and tap it up gently and keep checking for the correct height.
After cocking up my last wishbone installation 2 years ago, I watched how the garage mechanic sorted the balljoint pin to get it to the correct height in the clamp: hammer on the bottom of the balljoint to raise the pin, and a long lever to lever the wishbone and pin down - but I found the lever method really difficult with the car on the deck and therefore no room to manoeuvre the lever, compared to working with the car raised up on a garage ramp.
It did not go entirely smoothly today (I've omitted all the cuss words): despite using the first tip I still had a problem starting the long bolt into the rear wishbone bracket, it wouldn't bite. So I ended up taking the wishbone off the car again, and running the bolt up and down the bracket bolt hole. The bolt went in eventually with the wishbone on the car.
Also I cross-threaded the long bolt in the front wishbone bracket (have read others say they had similar problems with the front bracket), so I had to undo all the other bolts again, take the wishbone off again, and run a bolt up and down the bracket hole to clean up the thread.
To avoid the same problems when I do the other wishbone, prior to installation, I intend to test the bolts in the wishbone brackets first.
However, the whole thing was a lot easier, with the hub and wishbone jacked up, than last time.
FYI: The front bush on the old wishbone was obsolutely knackered/loose. The new wishbone is Birth (Ebay).
I've got the NS wishbone to do shortly. After this learning experience/trial I think it'll go MUCH smoother and faster!
Last edited:
")