Please notice this is a left side driven car. And as I am a family man, I drive a 5-door car.
Why make an ICE install like this, as it could be made much better? Well, this build is definitely not in the high-end area, but it works, and has no side-effects on the car. If you have a low budget, are happy with the OEM head unit but lack the sound stage a subwoofer produces, this is the dive. If you have ever tried a sub, you can't ever manage without it, and this guide will help you succeed.
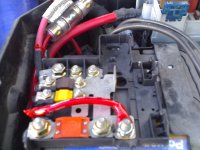
1. Pull out the fuse from the inline fuse box. Wire the cable from the battery. I had a free "bolt" there, so it was an easy fit with a new nylon lock nut. Attach everything as you prefer. You might have to drill or dremel out some space from the battery cover so it won't grind on the cable's shielding when refitting.
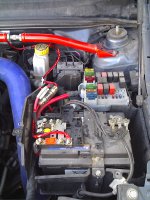
2. Fit the cable out of the battery box and attach it loosely to something that does not move to much or get too hot.
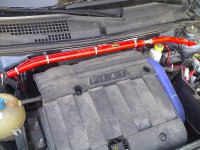
3. The cable will fit nicely along the strut brace.
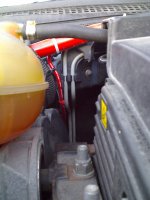
4. There is a hole in the bulkhead in the middle of this picture. A rubber grommet, about 5 cm wide is easy to drill through. It can also be removed, but as there are elements as heavy carpet and sound proofing on the inner side, it is fairly easy to lever a small drill down there and fire through. Pull the cable through with a steel wire or similar. The hole must not be drilled too large. It must fit like a glove or even tighter to make it waterproof.
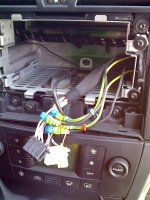
5. Pull out the original head unit. I used a pair of u-shaped knitting pins, adopted from my wife. Unplug the antenna, speaker connection block (black) and power/CAN connection block. If you have a yellow Blaupunkt mini-ISO back there, make a note of it's position, as it fits two places, and pull it out as well. I must admit I never checked it this is a remote cable for the boot power outlet, but anyway it is not connected to the ignition.
You must choose if you want the rear or front to send the signal to the amplifier. I suggest the rear, as the sub will most likely fit the boot or similar, and it is easy to use the fader control on the radio to decide the volume of the bass, without compromising the front speakers.
The rear speaker cables are located outermost on each side of the black connection block. The upper row is positive, and lower is negative. So only hack into the two wires on each side of the block if you want the amplifier to receive the rear signal.
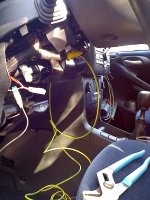
6. Remove the undertray from the steering column, 3 screws. Slide it out of the steering wheel adjuster lever. The orange wire is sending a switched 12V+ signal which can be used to power of the amplifier remotely. Unplug the white connection block to get some working space. Pull a cable from the head unit's bay and down towards the pedals. Hook it up with some clips and trace it up to the orange wire. Connect it with a signal thief - I have no idea what it's called in English... Refit the undertray. Using this method, the amplifier will always shut off with the ignition, and never run your battery flat. It will not power up if you forget to shut off your radio (menu controlled) or not even in the radio's "20 minutes mode".
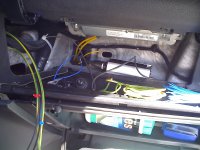
7. Open the upper glove box and remove the inner trim. Two screws hold it in place. You need a short screwdriver. The trim can now be pulled out with some force. It is not held in place at the air-condition vent, as I thought. Pull 4 speaker wires and the amplifier remote (from the orange wire at the ignition) from the HU bay and into the ribbed area of the glove box. Remember to mark the wires so you know which one goes where.
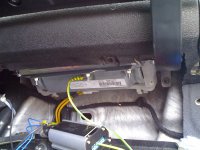
8. Pull the RCA signal cable up from the passenger's footwell and up to the open glove box compartment. Put your signal converter in there, and plug in the RCA cable. Attach the speaker wires to it, and ground the converter. The passenger side airbag is mounted underneath the dash with too long bolts. It's easy to clamp the converter's ground to it with an extra nut.
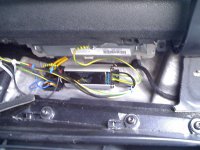
9. This depends on the size, surface and build of the converter, but I attached mine to a part of the dash's metal frame with an industry double side adhesive. Slide the amp remote cable down where the RCA came up. Tidy everything up, strip and tape as you prefer and refit the head unit. Insert the trim of the glove box and shut it.
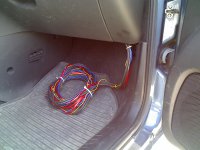
10. Now you have some meters of cable to stretch. There should be one live power cable (battery positive), a pair of RCA cables and one amplifier remote cable (thin, and the color of your choice). Tidy them up and strip them together. The RCA signal cable is usually shielded, and can be put besides the red power cable (professionals would disagree with me). On the frame of the dashboard there is a bend, right beside the fuel cutoff switch. This bend is perfect to house the cables and keep them out of sight. Use a cable tie/strip for the fitting. This also makes it very easy for the next step, removal of the plastic trims along the doors.
It is necessary to remove the lower trim at each door. Remove the rubber (weather) seal. After removing some small screws, they pop of straight up. Use some force, but not with tools. Attach your cables in the pre-mounted cable keepers. Some cables are factory fitted, but there is enough room. The trim on the B pillar is impossible to remove without removing the front seat, as it slides down... Anyway, a wire can be stretched through as a pulling aid for your new cables. Be careful with the side airbag connector in there.
A tricky part is to pull the cables from the rear seat to the boot as it is very tight back to the arch. But it is possible.
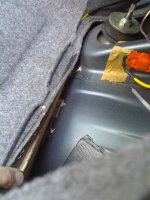
11. Measure a piece of plywood with 15 mm width to fit between the wheel arch and boot trim. You don't have to make it bigger than the amplifier itself. The plywood can now be routed down from the drawer compartment above the wheel arch. Cut off the upper / front corner to ease the install and get it further to the front, as the arch trim (still in the boot) rounds off there. Use some kind of super glue to attach it to the steel. This is just to make a base for the amplifier. Never bolt it directly to the bodywork, as you will ground the amplifier's chassis.
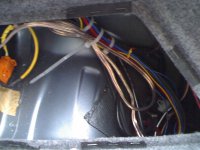
12. The cables are now through, and the last 12V- (battery negative) cable can be attached. There is a grounding point on the wheel arch which is very suited for this need. You can see it in the picture to the left of the white connection block. Use the same cable diameter as the red 12V+ coming directly from the battery.
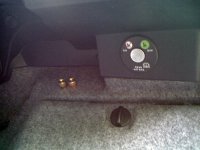
13. This is optional, but very necessary for me. Speaker outputs out of the way of all the crap in the boot. Precut a little wood plate (not metal) so it fits on the inside of the trim. Hold it (be careful) and drill two holes through the trim and the plate. Mount the speaker terminals with pre-soldered wires for direct attachment to the amplifier.
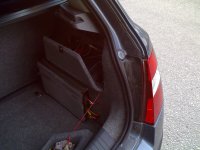
14. Drill holes for the wires to keep them fit, and use ties to prevent them from sliding in and out. The picture shows testing of the amplifier's position. Slide the amp over the wires as this area is soft and has no wood on the inside. I drilled a couple of new holes in the amp (there were originally four holes). Mount the amplifier to the plywood. Make sure the screws don't penetrate it and touch the metal of the arch so it doesn’t ground. Insert the in-line fuse at the battery.

15. Build a subwoofer enclosure. Great with some helping hands to keep your efficiency at a low level or completely away, as these personalities tend to get very sore if their help is declined.
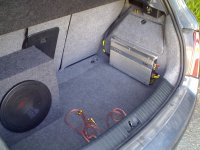
16. Now you can enjoy your new ICE install that takes up minimum space. Or you can load up the boot with any prefabricated enclosure. In my situation the boot is always filled with at least one stroller, shopping bags and generally a lot of family stuff like clothes and gadgets. The enclosure fits between the baby’s seat in the rear (where there at no feet) and the driver’s seat.
Why make an ICE install like this, as it could be made much better? Well, this build is definitely not in the high-end area, but it works, and has no side-effects on the car. If you have a low budget, are happy with the OEM head unit but lack the sound stage a subwoofer produces, this is the dive. If you have ever tried a sub, you can't ever manage without it, and this guide will help you succeed.

1. Pull out the fuse from the inline fuse box. Wire the cable from the battery. I had a free "bolt" there, so it was an easy fit with a new nylon lock nut. Attach everything as you prefer. You might have to drill or dremel out some space from the battery cover so it won't grind on the cable's shielding when refitting.

2. Fit the cable out of the battery box and attach it loosely to something that does not move to much or get too hot.

3. The cable will fit nicely along the strut brace.

4. There is a hole in the bulkhead in the middle of this picture. A rubber grommet, about 5 cm wide is easy to drill through. It can also be removed, but as there are elements as heavy carpet and sound proofing on the inner side, it is fairly easy to lever a small drill down there and fire through. Pull the cable through with a steel wire or similar. The hole must not be drilled too large. It must fit like a glove or even tighter to make it waterproof.

5. Pull out the original head unit. I used a pair of u-shaped knitting pins, adopted from my wife. Unplug the antenna, speaker connection block (black) and power/CAN connection block. If you have a yellow Blaupunkt mini-ISO back there, make a note of it's position, as it fits two places, and pull it out as well. I must admit I never checked it this is a remote cable for the boot power outlet, but anyway it is not connected to the ignition.
You must choose if you want the rear or front to send the signal to the amplifier. I suggest the rear, as the sub will most likely fit the boot or similar, and it is easy to use the fader control on the radio to decide the volume of the bass, without compromising the front speakers.
The rear speaker cables are located outermost on each side of the black connection block. The upper row is positive, and lower is negative. So only hack into the two wires on each side of the block if you want the amplifier to receive the rear signal.

6. Remove the undertray from the steering column, 3 screws. Slide it out of the steering wheel adjuster lever. The orange wire is sending a switched 12V+ signal which can be used to power of the amplifier remotely. Unplug the white connection block to get some working space. Pull a cable from the head unit's bay and down towards the pedals. Hook it up with some clips and trace it up to the orange wire. Connect it with a signal thief - I have no idea what it's called in English... Refit the undertray. Using this method, the amplifier will always shut off with the ignition, and never run your battery flat. It will not power up if you forget to shut off your radio (menu controlled) or not even in the radio's "20 minutes mode".

7. Open the upper glove box and remove the inner trim. Two screws hold it in place. You need a short screwdriver. The trim can now be pulled out with some force. It is not held in place at the air-condition vent, as I thought. Pull 4 speaker wires and the amplifier remote (from the orange wire at the ignition) from the HU bay and into the ribbed area of the glove box. Remember to mark the wires so you know which one goes where.

8. Pull the RCA signal cable up from the passenger's footwell and up to the open glove box compartment. Put your signal converter in there, and plug in the RCA cable. Attach the speaker wires to it, and ground the converter. The passenger side airbag is mounted underneath the dash with too long bolts. It's easy to clamp the converter's ground to it with an extra nut.

9. This depends on the size, surface and build of the converter, but I attached mine to a part of the dash's metal frame with an industry double side adhesive. Slide the amp remote cable down where the RCA came up. Tidy everything up, strip and tape as you prefer and refit the head unit. Insert the trim of the glove box and shut it.

10. Now you have some meters of cable to stretch. There should be one live power cable (battery positive), a pair of RCA cables and one amplifier remote cable (thin, and the color of your choice). Tidy them up and strip them together. The RCA signal cable is usually shielded, and can be put besides the red power cable (professionals would disagree with me). On the frame of the dashboard there is a bend, right beside the fuel cutoff switch. This bend is perfect to house the cables and keep them out of sight. Use a cable tie/strip for the fitting. This also makes it very easy for the next step, removal of the plastic trims along the doors.
It is necessary to remove the lower trim at each door. Remove the rubber (weather) seal. After removing some small screws, they pop of straight up. Use some force, but not with tools. Attach your cables in the pre-mounted cable keepers. Some cables are factory fitted, but there is enough room. The trim on the B pillar is impossible to remove without removing the front seat, as it slides down... Anyway, a wire can be stretched through as a pulling aid for your new cables. Be careful with the side airbag connector in there.
A tricky part is to pull the cables from the rear seat to the boot as it is very tight back to the arch. But it is possible.

11. Measure a piece of plywood with 15 mm width to fit between the wheel arch and boot trim. You don't have to make it bigger than the amplifier itself. The plywood can now be routed down from the drawer compartment above the wheel arch. Cut off the upper / front corner to ease the install and get it further to the front, as the arch trim (still in the boot) rounds off there. Use some kind of super glue to attach it to the steel. This is just to make a base for the amplifier. Never bolt it directly to the bodywork, as you will ground the amplifier's chassis.

12. The cables are now through, and the last 12V- (battery negative) cable can be attached. There is a grounding point on the wheel arch which is very suited for this need. You can see it in the picture to the left of the white connection block. Use the same cable diameter as the red 12V+ coming directly from the battery.

13. This is optional, but very necessary for me. Speaker outputs out of the way of all the crap in the boot. Precut a little wood plate (not metal) so it fits on the inside of the trim. Hold it (be careful) and drill two holes through the trim and the plate. Mount the speaker terminals with pre-soldered wires for direct attachment to the amplifier.

14. Drill holes for the wires to keep them fit, and use ties to prevent them from sliding in and out. The picture shows testing of the amplifier's position. Slide the amp over the wires as this area is soft and has no wood on the inside. I drilled a couple of new holes in the amp (there were originally four holes). Mount the amplifier to the plywood. Make sure the screws don't penetrate it and touch the metal of the arch so it doesn’t ground. Insert the in-line fuse at the battery.

15. Build a subwoofer enclosure. Great with some helping hands to keep your efficiency at a low level or completely away, as these personalities tend to get very sore if their help is declined.

16. Now you can enjoy your new ICE install that takes up minimum space. Or you can load up the boot with any prefabricated enclosure. In my situation the boot is always filled with at least one stroller, shopping bags and generally a lot of family stuff like clothes and gadgets. The enclosure fits between the baby’s seat in the rear (where there at no feet) and the driver’s seat.

