Multipla Engine Out Diesel

Currently reading:
Multipla Engine Out Diesel

Chainsaw

New member
Joined
Apr 30, 2014
Messages
6
Points
1
Location
cheltenham
Hi All, has anyone taken an engine out of a Diesel Multipla, I just acquired another (a Mk 2) but the engine sounds as though the Big Ends has gone on at least one cylinder, the oil smells bad and I suspect that the fuel as got into the oil causing it to thin and has bu**ered the shells

I've done loads on my Mk1, back subframe off, all bushes and bearings changed etc so not afraid of it but any advice would be appreciated.

The clutch is on its way out and a cambelt change is probably needed so its a good chance to do it all.

However there are probably many pitfalls that someone has already fallen into so all help gladly appreciated:)
 
My should-have-been-in-May rebuild looks as though it will now happen in September and engine/gearbox removal is on the to-do list. I've not done it before so can make any comments from personal experience yet, but from a bit of research it sounds as though the best way to do it is by dropping the engine/gearbox out of the bottom of the car. As I haven't got a pit or four post ramp, I intend to do this by lowering the engine to the ground, then using a scaffold gantry and a pulley block to lift the front of the car up enough to pull the engine out from under it. Apparently the engine/gearbox was was fitted from underneath at the factory.
 
Thanks for that I thought the same when I was doing the Strut bearings/rubbers, but how high the body needs to go is a bit of a worry.

No chance of having it out from above or do you think the hole will be too small??
 
Most remove them from above - see the 'Smurf- was the Toad' thread - but reading older threads on the Yahoo owners group site makes me think dropping the engine is the way to go. If the bumper/radiator/condensor/airbox etc is removed beforehand, pretty much all that's left in front of the engine is the spaceframe cross member, and that's quite high up relative to the engine so I'm hoping I won't need to lift it too far. It also gives a great place to wrap a lifting strap around.

I also intend to remove the wings, wheel arch liners, bonnet and scuttle panel to improve access. It'll also mean I can scratch them when I'm wrestling with the engine!
 
Having taken the engine out of both of mine to place the good engine into the good body (I'm scrapping the older one) 03 plate into 53 plate. I removed both from underneath. One in my garage the other on my drive.
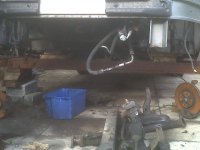
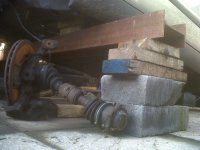
I used an RSJ I had lying around and a couple of wooden blocks to protect the car. Placing the wooden blocks on top of the RSJ, I then jacked each side of the car under the RSJ and placed breeze blocks (I would have used concrete block but they are expensive).
The next bit is from experience.
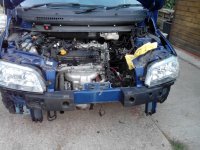
Yes remove both wheel arch plastic, take the bonnet, bumper and intercooler. I also removed the radiator and disconnected the air con pipes from rad and to the compressor pump on the engine. (it wasn't pressurized and wasn't working anyway) You might get away without doing removing that bit but it does mean that after removing the mickey mouse thin metal member the rad sits on you get much more clearance to slide the engine out the front without lifting the engine to ridiculous heights.
I removed the Subframe first completely the second time I did it after unbolting both shafts, unbolting the tie rods, shocks at the bottom steering track rod ends (I replaced mine anyway) and lifted the hub off the bottom control arm. So much more room. You can tie the Hub and shaft to the Shock so you dont have to bleed brakes but I removed mine. DONT forget to undo the steering pinch bolt inside the drivers footwell after removing the plastic footwell consol (big one piece).
I hope you have an 18mm impact socket and a long brake bar because thats what held me up two bolts on the subframe connecting to the body.

Undo all the engine mounts for engine while suspending the engine an gearbox, I used more the one sling to spread the load.

Before dropping disconnect as many electrical connections as possible, but you should have plenty of room round the back if you have removed the subframe.

I lowered mine bit by bit (I also placed a piece of pvc tape on each electrical connection as I removed them and wrot its description on) you can mix SOME up as they are exactly the same on the ends, especially the yellow ended two pin ones with green band seal!

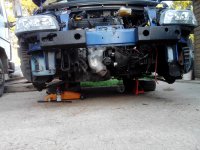
I dropped the engine onto a dolly and slid it out the front.

Regards Tim
 
Can't post 'Thanks' on this thread for some reason, but 'Thanks' anyway :).

I don't suppose you took any photos? Also, where were you jacking/supporting the body so that it didn't get in the way when pulling the engine and gearbox out?
 
Last edited:
I will take a photo tomorrow. but I can describe it now.
It is very near the tipping point / balance point, I would as a safety precaution put something heavy in the boot thoroughly chock back wheels before proceeding and place the handbrake on goes without saying (oops just did;).)

The jack points I used, remember some wooden blocks to give clearance from bodywork, are the box section just behind where the round rubber domed jack points are.

Because the RSJ is across the entire width of the car and I wanted the car close to the RSJ (not teetering on to of lots of blocks of wood) you might find it presses on the exhaust so I undid the exhaust piece from the CAT or DPF (three nuts) to the mid section (you will need to do it anyway)

A tip is give every bolt you are libel to need to undo a liberal squirt of release / penetrating oil. Ceased bolts where the biggest pain in the backside you can imagine, putting bolts back is the easy bit (especially keen on my favorite accessory, copper grease(y)if you ever suspect you might have to remove again at a later date)

Tim
 
Hi Tim
Thanks for the info, ant photos would be great as I'm struggling with the image of the Multi sat on its bum with its nose in the air

I'll probably start tomorrow as I'm pretty sure that the Big ends have gone (its that unmistakable noise when revving it) plus it needs a ned clutch and belts etc

I'll take photos also and publish them as I go so we'll see how bad it all gets!!
 
as promised
 

Attachments

  • IMG-20140901-00017.jpg
    IMG-20140901-00017.jpg
    47.9 KB · Views: 34
  • IMG-20140901-00018.jpg
    IMG-20140901-00018.jpg
    49.7 KB · Views: 31
  • IMG-20140901-00019.jpg
    IMG-20140901-00019.jpg
    51.2 KB · Views: 33
Hi all

After a leisurely weekend of undoing things here's a photo of where I am. Just about to pull off the drive shafts and then drop it out. Taking off the radiator mounting, bonnet bar and battery box gives loads of space to stand in and get your hands behind the block.
Take lots of photos if you do this its cheap and easy and don't forget to put nuts and bolts back onto where they came from

Part 2 to come
 

Attachments

  • IMG_20140907_185726.jpg
    IMG_20140907_185726.jpg
    1.2 MB · Views: 30
  • IMG_20140907_185732.jpg
    IMG_20140907_185732.jpg
    1.1 MB · Views: 31
Back
Top