Oblong
New member
Hi, Im hoping someone can help, I've never posted before but have read posts on the forum for a while. Had the Multipla for a couple of years now. Here goes..
I have an 04 Multi and plan to upgrade the speakers and head unit this weekend. I also have a subwoofer to add but am going to see how the 'easy' bits go before taking that on...
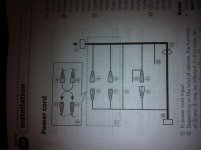
I've been reading the new head unit (Pioneer DEH-3300UB) installation instructions and am not sure how to find out whether the factory ISO power connector is compatible with the one on the new stereo. The instructions say "The pin position of the ISO connector will differ depending on the type of vehicle. Connect (9) and (11) when pin 5 is an antenna control type. In another type of vehicle never connect (9) and (11)."
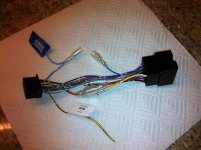
(9) and (11) are the ends of the unconnected blue wires - with the plastic ends. See pics below (tried to get them in the right place!)
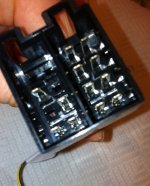
I've searched the net and I *think* it's ok and I can connect it as fiat isnt mentioned as one of the exceptions, but I'd like to be a bit more certain. anyone know how I can find out for sure or what to look for, how can I tell if pin 5 of the multipla connector is "an antenna control type"?
Also, on the subwoofer (it has a built in amp), there is a thin blue wire described as the 'remote turn on' which needs to be connected to the remote cable on the head unit. If that is the blue wire seen with a label on in the pic, then how should I connect them? Just strip, twist together and cover with tape?
Thanks in advance.
I have an 04 Multi and plan to upgrade the speakers and head unit this weekend. I also have a subwoofer to add but am going to see how the 'easy' bits go before taking that on...
I've been reading the new head unit (Pioneer DEH-3300UB) installation instructions and am not sure how to find out whether the factory ISO power connector is compatible with the one on the new stereo. The instructions say "The pin position of the ISO connector will differ depending on the type of vehicle. Connect (9) and (11) when pin 5 is an antenna control type. In another type of vehicle never connect (9) and (11)."
(9) and (11) are the ends of the unconnected blue wires - with the plastic ends. See pics below (tried to get them in the right place!)
I've searched the net and I *think* it's ok and I can connect it as fiat isnt mentioned as one of the exceptions, but I'd like to be a bit more certain. anyone know how I can find out for sure or what to look for, how can I tell if pin 5 of the multipla connector is "an antenna control type"?
Also, on the subwoofer (it has a built in amp), there is a thin blue wire described as the 'remote turn on' which needs to be connected to the remote cable on the head unit. If that is the blue wire seen with a label on in the pic, then how should I connect them? Just strip, twist together and cover with tape?
Thanks in advance.
Attachments
Last edited:
 and the Multi is also our family car we use for longer trips so that's my justification! I'm not spending much on it and it's removable (more justification).