A few points to note!
A relay must be fitted in the circuit.DO NOT try and wire fog lights directly to any other circuit,do not go near the body computer or try and utilise the original menu/rear fog multifunction switchbank as doing so will cause damage to your car and will invalidate your warranty! The purpose of this relay is to switch a large current (from your battery) safely to your fog lights.If you are unsure seek advice.
You will need.....
Black cable (14 gauge)
Spade terminals,4 insulated blue,3 insulated red (depending on terminal size of fitted switch) & 4 uninsulated red (the negative speaker terminal sized ones for fog light connection)2 ring terminals.
3 blade type fuse holders & 3 x 20 amp fuses.
Black loom tape & insulating tape.
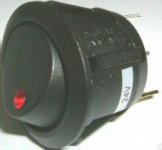
Switch (I prefer the type pictured below)
Fog lights,original fit from Fiat & dont forget the six mounting screws (three each side) or pattern/aftermarket fog lights.
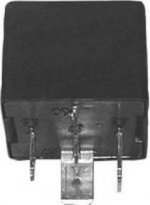
Standard 4 (or 5 ) pin relay (pic below) ...
Tools...
Soldering iron
Sidecutters & terminal crimps
Cordless drill & conecutter (dependent on type of switch to be fitted)
Screwdriver
5mm allen key (for fog light retaining bolts)
A relay must be fitted in the circuit.DO NOT try and wire fog lights directly to any other circuit,do not go near the body computer or try and utilise the original menu/rear fog multifunction switchbank as doing so will cause damage to your car and will invalidate your warranty! The purpose of this relay is to switch a large current (from your battery) safely to your fog lights.If you are unsure seek advice.
You will need.....
Black cable (14 gauge)
Spade terminals,4 insulated blue,3 insulated red (depending on terminal size of fitted switch) & 4 uninsulated red (the negative speaker terminal sized ones for fog light connection)2 ring terminals.
3 blade type fuse holders & 3 x 20 amp fuses.
Black loom tape & insulating tape.
Switch (I prefer the type pictured below)

Fog lights,original fit from Fiat & dont forget the six mounting screws (three each side) or pattern/aftermarket fog lights.
Standard 4 (or 5 ) pin relay (pic below) ...

Tools...
Soldering iron
Sidecutters & terminal crimps
Cordless drill & conecutter (dependent on type of switch to be fitted)
Screwdriver
5mm allen key (for fog light retaining bolts)
Exterior
Fitting.......
Engine bay area,
Start off by removing the blanking plates where the lights fit into,these need a firm push 'in the way' as they are retained by strong retaining clips.
Fit foglights using the previously purchased screws,3 each side,two at top and one underneath.Note there is a slight gap around the lights this is normal.
Next mount your 4-pin relay (or 5 pin in which case just ignore the center terminal 87a) to any suitable place (I mount it next to battery fuse box) and connect as follows.......
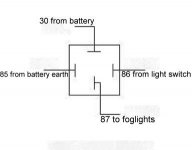
Terminal 85 to battery earth.Remember you will also need a earth wire going to each foglight aswell so connect these to battery now & using loom tape,tape these up to the live wires going to the foglight (from terminal 87)...keep things looking neat and hidden,its worth spending the extra time making it look good/safer than a quick rush/bodge job!
Terminal 87 goes to the foglights.I crimp the live to left & right fog light into the same blue insulated spade terminal and use loom tape to follow the original wiring loom as it passes over the radiator to the drivers side headlight,keep it neat & hidden away and obviously away from sharp edges/moving parts etc Black wiring (14 gauge) is obviously best as its harder to see thus again looks neater & more professional.
Fuse (20amp) both the left and right foglight wires as near to terminal 87 of the relay as possible,dont forget as these fuses protect the wiring from relay to lights,it is more than likely that if a problem (short circuit) occurs it will be here and it will be a 'dead short' straight from battery to earth!
At the lights themselves are two small spade terminals this is where the red uninsulated speaker spade terminals come in.Crimp these terminals to both the earth and the supply (from relay terminal 87) wires and slip on.I use a small amount of heatshrink as the red terminals are uninsulated by a small piece of black tape should surfice around each...obviously you dont want them to touch...thats why you fitted 20amp fuses to each of the foglight supplies.
Terminal 30 to the positive battery terminal,via a ring terminal,fuse this wire with a 25amp in-line blade fuse.
Terminal 86 go into the car to the fog on/off switch inside the car,do this as follows...
Remove 2 screws on passenger side scuttle panel,if you look in you will see a large rubber grommet in the bulkhead...carefully put a small hole at top (above wires using a awl or similar,remember you are only passing one thin wire through) to make a small hole & pass at least 4 foot of black 14 gauge (from relay terminal 86) cable through,carefully not to pierce/damage any of the existing wires of the main loom going through this grommet,also use a little black sealant afterwards to prevent water penetration.
(n.b.I just pass the wire between the scuttle panel and bulkhead but put a little tubing to protect it)
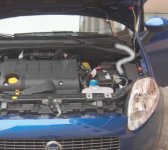
The white line in the pic below shows route of wire going inside car & posistion of bulkhead rubber grommet under scuttle panel.
Interior
Fitting........
Interior,
Remove glovebox (by sliding peg to the right in glovebox,left hand side) and at the bulkhead where you will see the previously passed through wire.Pull this wire through and route this wire to the right towards the centre consul,remove the centre consul side trim by carefully pulling it at the rear of the trim (theres 3 retaing clips there) then moving it towards rear of car ,theres a plastic locating peg that goes into a bracket so remember to make sure this is in line when refitting.
You can refit glovebox & consul side trim now as there is no further need for these to be removed.Its a good idea to use a couple of cable ties to make sure the wire doesn't flap about or catch on anything.
Route wire as indicated by white line in the picture below...
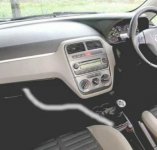
Remove the gear lever surround by lifting up (gear leather trim is velcro fit) & unplug the cigarette lighter connector by pressing tag in & pulling downwards. Pull the cigarette lighter wires through the gear lever opening as far as possible.
Drill & posistion switch,I mount mine just to the left of the handbrake on the slope section as when the switch is operated the 'switch on' LED is clearly visable from the drivers posistion and its not obtrusive and looks factory fit.
Note,picture below for switch position is for left hand drive,red dot marks switch position.
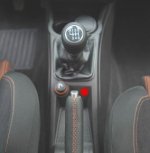
Wire up the switches 3 terminals as follows,check termination on switch as may vary.but basically you have 'supply in','supply out' & 'earth' which is used to bring on the LED when the switch is in the on position.
1)Sidelight supply to switch...solder 6inch section of 14 gauge wire from cigarette lighter sidelight supply.This is ok to use as you are only using it to switch the relay contacts not directly power the foglights.
2)Earth...solder 6 inch section 14 gauge wire from cigarette earth.
You can of course use 'scotch lok' type connectors for the above if you find it easier.
3)Switch output the wire you have brought through the bulkhead from relay terminal 86 to the remaining terminal using spade connector.
Refit all removed trim/panels & turn on sidelights (ignition on) & flick the front fog switch & hey presto front fog lights.


