As many of you have noticed all Stilos manufactured until year 2003 come with something we can call "manufacturer flaw" when talking about the gearbox mount. It is no accident that there's a sticky thread in the Stilo section, where many described the problem as it is.
I'll use this guide to try to describe the problem in detail, to point where it comes from, and eventually to learn you all how to fix it with your bare hands and some tools.
As far as I know all FIAT Stilo diesel and probably all petrol cars manufactured between year 2001 and 2003 come with the problematic gearbox mount with ePER number 46781889. After 2003 FIAT acknowledges the problem and starts making another replacement gearbox mount with ePER number 51711216. All old gearbox mounts should be pulled out from the market, but you should be very careful when buying yours, it's strongly recommended to use the replacement mount as all design flaws with the old mount have been fixed.
The problem with the original gearbox mount lies in the rubber it is made from, as it has the tendency to harden very quickly during the years. My car was manufactured 29.03.2002 and after 7 years the mount was long long gone. Once hard enough it transfers the vibrations from the engine and gearbox to the whole chassis of the car.
Typical symptoms that your car uses the "defective" gearbox mount and needs replacement:
- strong vibrations on the steering wheel (you can feel them at all times when the car is running)
- vibrations on the front hood (clearly visible)
- vibrations on the gear change stick
- vibrations all over the car's chassis
- even your pedals can vibrate
- last but not least the noise and nasty metalic rattle described by many in the sticky Stilo rattle thread
If you have all the above symptoms, but you still think your gearbox mount does not need changing, here's another symptop I personally found. Try turning on your climatic. Once turned it will transfer the load to the main engine mount and almost all the vibrations in the coupe and on the steering wheel will be gone. Turn off the climatic and all vibrations are back.
Tools Needed and Fixing the Problem
Now let's get to the interesting part, fixing the problem by replacing the gearbox mount in front of your home.
You'll need:
- 13 mm spanner
- 15 mm spanner
- 18 mm spanner
- 19 mm spanner
- jack and something that will hold the motor while unhooking the gearbox mount
Finally before the real process, please be aware that even though the whole process of changing the mount looks easy you need to know very whell what you're doing, so if there's something you can't do please don't start it at all. Everything you do is at your own risk and all the responsibility is on you.
The Whole Process Step by Step
Step 1: Open the bonnet, and unscrew all the plastic you won't need, both the accumulator and the engine, now remove them


Step 2: Set free the accumulator and remove it from the engine compartement too


Step 3: Remove the big white/grey fuse box

Step 4: Unhook all the D4 connectors you see, please keep in mind that you need to know what you're doing because after the whole work is finished you'll need to hook them back in.
Step 5: Remove the whole accumulator box - you'll need to remove three bolts with the 13 mm spanner

Step 6: Now that the accu box and everything else is out you can clearly see the gearbox mount. You can also quickly inspect the mount and see what is to be unscrewed next


Step 7: Now that's the tricky part where you need to be very very careful, you're soon going to have to stabilize the engine while there is no gearbox mount. When I was changing mine, I used massive three log beneath the engine, but you can always use a jack or whatever you have. It is very important to stabilize the motor, otherwise it will most certainly fall down under the load and with no mount to hold it to the car's beam.
Step 8: You need to very carefully unscrew one or two times the main nut, by doing so the engine will fall down a little bit. After that you need to stabilize the motor and support it with something underneath. That step is necessary because you won't be able to unhook the mount easy if the whole spindle is standing as it is in normal position

Step 9: Now once the motor is stabilized you need to unscrew the main nut as well as the four bolts that hold the gearbox mount to the car's front beam
NOTE: One of the two inside bolts that hold the gearbox mount does not need to be removed, you only unscrew it to free the mount, you'll need it in place so you can place the new gearbox mount after that exactly where it has been before. You'll see that those two bolts only hold the gearbox mount and does not need to be unscrewed at all to unhook the mount
Step 10: Now that all the bolts are out you only need to make some effort and unhook the old gearbox mount from the car


The Old Gearbox Mount, The New One, and Close Inspection
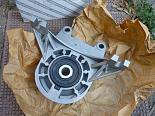
Here's how the new gearbox mount number 51711216 looks like:


Here's how the old one looks like:


Now as you can see the original mount has a lot less rubber than the new one, plus it looks somewhat different and you might think that it won't fit in the place where you just unhooked the old one from, but don't worry everything fits perfectly and no modifications or whatsoever are needed. Also the new gearbox mount stands little higher than the original one, but that's not a problem too.
By looking at the two mounts you can now see where the problem lies. From the picture you see that my old mount looks perfect, it is like new and at first sight does not need changing. Yeah ... but let's try to move it and you'll immediately feel that even with a crowbar you can barely move it 1 or 2 millimetres, the new mount you can move all the way up and down with you hands!!!!!!! The old rubber is so hard that it has become like metal, that's the problem, it transfers almost all the vibrations from the engine to the chassis.
Now we know what is causing all the rattles on our beautiful Stilo, let's get back to work
Putting Back the new Gearbox Mount in the Car
Step 11: Put back the new gearbox mount and centre it with the bolt we didn't unscrew intentionally. That's another tricky step. You need to know that the bolts for the gearbox mount are self-sealing bolts. They need to be tighten right, otherwise you'll ruin the carving, the bolts and you don't want to do that. The bolts may look like they're going in little sideways, but as long as you can bolt them with your hand they're just fine.


Step 12: Your new gearbox mount is already on its place fixed with the four bolts, now you need to start jacking up the engine until the whole car starts going up and the spindle pops up over the new gearbox mount.


Step 13: Now bolt the main nut tightly, after that please be sure to check all the bolts and nuts again, that's your engine mount you don't want anything to be loose


Step 14: After Everything is tightened you can remove the jack from beneath the car
Step 15: You need to put the accumulator box back in, connect all D4 connectors as they were before that, connect the accumulator and finally put the plastic top back


Step 16: The momenth of truth, everything is tightened and you only need to start the car and see the result

You Have a New Car I know
The whole process took me around 45 minutes, but again if you don't know what you're about to do please leave the car to your car dealer and let him handle it.
Now the car runs smooth, there are no vibrations NO AT ALL FINALLY. Everything is perfect now, it's time for you to enjoy it.
That's it from me
If you have any questions feel free to ask me here or in the sticky JTD rattle thread.
Bye all