DRL's on a Seicento
General Info.
Tools needed:
- a ratchet (with extentions)
- + Screwdriver
- Torx size-30 bit for a ratchet
- Size 8 and 10 bits for a ratchet or a spanner
- A drill ( 4 to 5 mm)
- A Dremel (with cutting blade suitable for plastic, and a milling cutter)
- Soldering Iron/station

Parts needed:
- Tape or heat-shrinks
- Vaseline
- Glue/sealer
- 4 large screws (I prefer + screws)
- 4 heavy spiral-like Rings (so you can adjust the height)
- The DRL's (can be found HERE) (or use comparable ones)
- A LED dimmer (to make the DRL's dim with headlights on) (found HERE)
- Also you need to have the right type of bumper on your Sei.
- 2 LED Sidelights (this is optional, but recommended) (found HERE)


Time needed:
- You need like, the whole day, assuming you're not a pro, and you want to do things carefully.
Difficulty:
- it is technically not such a difficult job, the main difficulty is to cut the bumper right. It is difficult to cut and drill precise, and not damage the paint.
General Info.
Tools needed:
- a ratchet (with extentions)
- + Screwdriver
- Torx size-30 bit for a ratchet
- Size 8 and 10 bits for a ratchet or a spanner
- A drill ( 4 to 5 mm)
- A Dremel (with cutting blade suitable for plastic, and a milling cutter)
- Soldering Iron/station
Parts needed:
- Tape or heat-shrinks
- Vaseline
- Glue/sealer
- 4 large screws (I prefer + screws)
- 4 heavy spiral-like Rings (so you can adjust the height)
- The DRL's (can be found HERE) (or use comparable ones)
- A LED dimmer (to make the DRL's dim with headlights on) (found HERE)
- Also you need to have the right type of bumper on your Sei.
- 2 LED Sidelights (this is optional, but recommended) (found HERE)
Time needed:
- You need like, the whole day, assuming you're not a pro, and you want to do things carefully.
Difficulty:
- it is technically not such a difficult job, the main difficulty is to cut the bumper right. It is difficult to cut and drill precise, and not damage the paint.
Getting the bumper off
Step 1: Getting the bumper off.
- Allright, let's get started. The first step is getting the bumper off so we can cut it properly. the bumper can be easily removed by unscrewing it at 8 places.

nr. 1&2 on top of the bumper in the middle
nr. 3&4 underneath the bumper
nr. 5,6,7,8 on the inside of the bumper, can only be reached when the wheel-arch lining is removed, both screws on the bumper are located near each other, approx. 15cm.
Note: all screws are Torx size 30, screws 5,6,7,8, can only be reached with an extended ratchet.

Now the bumper is off, the cutting can begin.
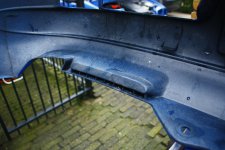
Cutting the bumper
Step 2: Cutting the bumper.
- Now that the bumper is off, you are able to cut out the 2 segments in the bumper. It almost looks like those spots were made for the job of holding DRL's.

on the backside you are able to place your cutter.

When you start cutting, remember that you should not cut out the whole piece, leaving the front of the bullet-shaped bit looks nicer.

What it looks like on the front if you did this correctly.

If this is done on both sides of the bumper, you're done with that, the rest is all about mounting the DRL's on the chassis.

I first tried to check if the holes in the bumper are large enough to hold the Lamp.
If they don't fit properly at first, put a small (milling) cutter on your dremel.
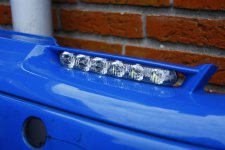
Mounting the DRL's on the chassis
Step 3: Mounting the DRL's on the chassis.
-Now that the bumper is cut, and the holes are large enough to fit the DRL's, we can mount them on the chassis.
Luckily the height of the cutouts is fully corresponding whith the height of the chassis.
To reach this place you will have to remove your headlamp units.

First of all, you have to posission the DRL's in the right place, so the will be beaming forward, it is all a matter of holding the bumper and see how things fit and if they are beaming the right way.
when you made sure this is all right, you can proceed drilling two holes in the chassis, which will hold the backet in which the DRL's will be fitted.
(note: on the right side of the chassis there is a little bump, make sure to put enough rings between the backet and the chassis.)

Always use sufficient vaseline on the drilled holes to avoid corrosion!

Make sure to Seal the DRL´s with glue. This avoids that your DRL becomes an aquarium, even if they are sealed, i suggest to do this again, just in case.
once done the lamps can be fitted in place.
(to fit the lamps right in this particular case, I had to cut away a litte bit of the aluminum housing. this was necessary to fit above the screws)

if everything has been done correctly, the bumper should fit over them, right in place!
Wiring and electronics
Step 4: Wiring and electronics.
- Now that all the cutting and drilling has been done, and the bumper has been fit into place again. the Wiring needs to be done.
- The LED dimmer I used (which is obligatory to pass the MOT, APK, TÜV) just has to be connected to the + of the car battery, and to the chassis for mass. Apparently, this little dimmer is smart enough to detect the voltage difference between the 12V (standard battery) and the Dynamo with a running engine ~14V. the DRL's will, when wired properly turn on when the engine starts.
I bolted the dimmer-unit on the bottom of the ECU-unit.

The LED dimmer is provided with an instruction manuals which explains the different colored wires.
there is a Battery +, a Mass, left, and right DRL +, and - And wires for the sidelights or low beam.
When you turn on your low beam, or sidelights the DRL's will dimm to a light level of approx. 40%.

To fix all the wiring, and connecting the DRL's to the unit, i cut the wires to the right length and soldered them. you can use heatshrinks on the patched cables, so isolate them, tape is also a good alternative.
All that should be done now is tidy up the engine compartment, and fit the LED sidelights.

When these are fitted, they match the colour temperature of the DRL's

Final results and other thoughts
Final results, and other thoughts
-After a long time working on this, and many setbacks, this is the final result:


This guide is made for a specific type of DRL's but should work with comparable ones.
I also came to notice that the DRL's I use don't have an 'E' marking, or european 'CE' marking
Also: Never forget to use sufficient vaseline after drilling holes in the chassis to avoid corrosion, and don´t forget to seal your DRL-units watertight.
Thanks for reading this guide, hope it helped you.
")
Cheers,
Allard :yeahthat:[/SIZE]