General That damn door handle hinge!

Currently reading:
General That damn door handle hinge!

Hi Mick

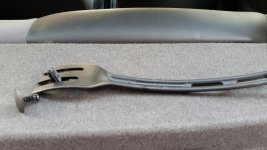
Let us know how easy it is to get the handles off once the door card is removed. I have to removed the door cards sometime this summer to replace the cloth insert with a leather one to match the seats I fitted a while back.
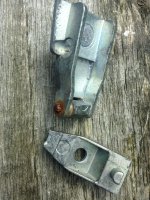
While in there it might be worth taking the handles off and inspecting them / replacing the hinges. The car's over nine years old now so I'm expecting this to happen some time soon.
Luckily its not been my daily run-around for a while, more of a toy these days so it doesn't matter if its in pieces in the garage for a couple of weeks while I get it sorted.
 
Hi Mick
Let us know how easy it is to get the handles off once the door card is removed.
Will do. :)
It could be tomorrow or Wednesday. I'll see how the fancy takes me. :)

Been cycling today in North Devon and I've done 75miles up and down the coast road hills - Crackington Haven and Millook to name just two - so I'm a bit knackered. :eek:

Regards,
Mick.
 
Same experienced at mine 2011 Twinair + in 2015.

Pin rusted solid in the handle part which broke after.

I only replaced the hinge part in the handle .
The hinge part at the door remained.

To do so I had to removed the pin and broken hinge part from hinge part fixed a the door with a micro flex (cutting disk) like Dremel or similar.

This is indeed a tricky operation, to not damage the remaining door part of the hing and paintwork of the door.
If I remember correctly, I cut the old handle part and pin of the hinge in parallel and right angle.

The hinge part in the handle I removed with Phillips screwdriver bit and a pliers.

After I fixed the new hinge part in the handle, without inserting the pin.

To insert the pin I drilled a hole from downside into the handle at the right position, to insert the pin after handle put in final position.

The hole in the hinge has been closed after with grey silicon glue.

This procedure avoids to replace the hinge door part, you need to open the door cover panel from inside door.

The drawback of this method is the small hole at handle downside.

LarsLarsen
 
Last edited:
Same experienced at mine 2011 Twinair + in 2015.

Pin rusted solid in the handle part which broke after.

I only replaced the hinge part in the handle .
The hinge part at the door remained.
What a brilliant idea!
This means, that if it seizes again, you can repeat the operation.

The best thing, would to have a brass or stainless steel pin. I wonder if the rusted pins are caused by galvanic corrosion between the hinge parts and the pin? From what I can see from mine, it's only the pin that is rusted. The rest of the assembly is clean and rust-free.

Measuring up the new hinge-pin, it's 16mm long and 2.5mm thick.
Anyone know of a source of 2.5mm brass rod?

TTFN
Mick.
 
PS:
Looking closely at the new pin, it seems very much like it's some sort of stainless steel. This, of course, is the improved hinge .............. though we don't yet know what this "improvement" is ............. but it could be the pin.

It's magnetic, so if it is SS, it must be ferritic or martensitic.
https://en.wikipedia.org/wiki/Stainless_steel#Electricity_and_magnetism

Hope that gives some sort of useful info.
Mick.
 
Job done. :)

From collecting the necessary tools, to putting them all away again, the job took 1hr and 10mins.

I followed the excellent guide on here https://www.fiatforum.com/500-guides/316198-broken-door-handle-articulator-hinge-repair.html with the exception of cutting a few corners.

Getting the inner door panel off was difficult, and instead of using a screwdriver, I used a wallpaper scraper - protecting the paintwork with an old credit card like in the guide.

Instead of removing the inner plastic covering completely, I cut away the top corner near the handle, and that way I could see the inner nut perfectly. This also precluded removing the inner panel completely, as I just let it rest to one side complete with the wires connected. After doing the hinge, I taped up the cut-off plastic piece back.

The guide shows an ingenious way of getting at the handle securing screw with a ring spanner and a bit, but I was able to get a normal Pozidrive screwdriver right through the slot in the door skin from inside the car to get at it. Much less fiddly in my opinion.

Before fitting the hinge, I greased the thing up with copper grease. This held the little hinge pin in place of course because it is a pesky little thing and could easily go astray whilst you fit the unit. You cannot fit the two halves of the hinge together after fitting, it MUST be assembled first.

Enclosed is a photo of the broken hinge in an effort to show the damage. The pin is seized rock solid and I don't believe it was a sudden seizure but one that took a while, so it could be that the hinge was operating for a little while by bending until it failed.

Good job the sun was shining!
Mick.
 

Attachments

  • IMG_0109.JPG
    IMG_0109.JPG
    265.9 KB · Views: 27
Last edited:
PS
Sorry, missed a bit of info.

When you fit the hinge to the handle using the self tapper Pozidrive, the hinge must be folded out. This then is in contact with the door paintwork, so I put a pad piece made from gaffa tape and stuck it onto the paintwork to protect it.

Also, I considered removing the outer door handle completely, but that looked a far more difficult job than performing delicate operations with a screwdriver through a slot in the door where you can't see very well.

Anyway, job done. :)
Mick.
 
Nice one Mick.

I'll be ordering some hinges so I have them ready for later in the year.
I'm glad now that I've been putting off the work on the door trims.
I'd have been really brassed off if I'd done it last year and then had a hinge failure.
 
Nice one Mick.
Thanks!

Getting the door trim off wasn't an easy thing to do. I tried using a screwdriver but it seemed to produce dents in the plastic so I stopped using it PDQ.

It struck me that it needed something wider than the shaft of a screwdriver, so I hit on the idea of a wallpaper scraper. Mine is about three inches wide, so it spread the load very well.

Good luck with the job! :)
Mick.
This works well
 

Attachments

  • 20160403_150527.jpg
    20160403_150527.jpg
    4.1 MB · Views: 55
I think you can get sets of trim removing tools on ebay quite cheaply. I've been tempted a few times but never gone ahead and bought, so I don't know how effective they are.
 
Was out in the 500TA yesterday and sort of forgot about the new hinge for a while.

When I did remember, I made a mental note of how it operated and felt, and I could swear it feels easier and smoother than it did before.
Checking the passenger side, if doesn't feel as nice as the drivers side. Not stiff, just not as nice.

I'm not so confident to say that I could really tell an old stiff one from a new free one, but I'm willing to bet that I can. I could lose the bet of course, but I reckon it's odds on that I can if I could feel a good one back-to-back with a bad one.

Next time I have the time and inclination, I'll spray up the other side with some spray grease and see if it changes anything.

Regards,
Mick.
 
.....I'm not so confident to say that I could really tell an old stiff one from a new free one, but I'm willing to bet that I can. I could lose the bet of course, but I reckon it's odds on that I can if I could feel a good one back-to-back with a bad one..........

Regards,
Mick.

I've read some statements in my time, but quite frankly, I have a whole theme running through my head here which probably doesn't fit in with what you are on about.........:devil:
 
Sorry, but it's a bet.
One ex-RN to another. :)

I bet I could tell if your door handle is on the way out or not.
I'm not saying that I can absolutely say one way or another ........... but if I compare my good one to someone else's bad one, I could tell ............ perhaps.

Had a CSB or two, so maybe I'm swinging the lamp a bit. (y)
Mick.
 
Those with hinges that haven't failed yet and want to try something to lengthen their life without dismantling anything might want to try a PTFE spray. :idea:

There are various brands available but LIDL were selling a spray can of the stuff with a built in straw for about £3 or so a couple of weeks back.

I've just had cause to use it for a different reason and the propellant is particularly powerful - if sprayed into the opened handle from the outside, this ought to deposit at least some of the contents in a place where it might do some good.
 
I might give that a go. I can then take one of the handles off when I replace the door trims later this year and see if its made a difference.
 
Those with hinges that haven't failed yet and want to try something to lengthen their life without dismantling anything might want to try a PTFE spray. :idea:

There are various brands available but LIDL were selling a spray can of the stuff with a built in straw for about £3 or so a couple of weeks back.

I've just had cause to use it for a different reason and the propellant is particularly powerful - if sprayed into the opened handle from the outside, this ought to deposit at least some of the contents in a place where it might do some good.
Hmmm, haven't tried PTFE spray. I've been using silicone lubricant sprayed annually into handle and still have the original handles on my 2008 car. Can't do any harm to try this alternative I guess.
 
Back
Top