Technical Steering Wheel Adjustment

Currently reading:
Technical Steering Wheel Adjustment

Pete145

Member
Joined
Jun 2, 2014
Messages
288
Points
85
Hi everyone,

I'm pretty sure this will be very easy, but before I start attacking the steering wheel I thought I'd better check.

Since I took delivery of my 1971 L, one of the things that has irritated me is the position of the steering wheel, as it's sitting about 30 degrees off centre (rotated to the left).

This is particularly irritating as it interferes with the indicator de-activation on the steering column.

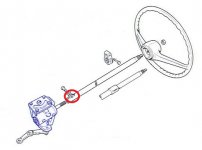
Is someone able to give me a step-by-step fix it guide, as this isn't covered in the Haynes manual? I assume it's just a case of taking off the horn button, loosening it and repositioning it, but I thought I'd check!

Pete
 
Ages since I did it but it's basically as you describe.

There's a relatively big, shallow nut as I remember and the wheel may not simply pull off the splines. You can get a tool to pull off the wheel or possibly adapt an ordinary puller. Otherwise I suggest very careful, gradual and even application of a rubber hammer in the appropriate spot using further padding round the plastic coating of the wheel. OBVIOUSLY TAP CLOSE TO THE CENTRE NOT AT THE EDGE OF THE WHEEL. Take care though; you could bend or even break it if you go mad.

Take some time getting the straight ahead position before refitting because you could easily end up a few annoying degrees out.
 
Last edited:
Ages since I did it but it's basically as you describe.

There's a relatively big, shallow nut as I remember and the wheel may not simply pull off the splines. You can get a tool to pull off the wheel or possibly adapt an ordinary puller. Otherwise I suggest very careful, gradual and even application of a rubber hammer in the appropriate spot using further padding round the plastic coating of the wheel. OBVIOUSLY TAP CLOSE TO THE CENTRE NOT AT THE EDGE OF THE WHEEL. Take care though; you could bend or even break it if you go mad.

Take some time getting the straight ahead position before refitting because you could easily end up a few annoying degrees out.

Thanks for the tips.

So, to recap:

1 - Off with the horn push.
2 - Undo the nut that sits behind it.
3 - Remove the wheel from the spine and reattach in the correct position.

The car has only just been restored, and the restorer sourced this wheel from Italy as part of the restoration (shame he didn't fit it properly). So I'm assuming it will come off pretty easily as it hasn't been in situ long!
 
I am having a problem with my steering wheel pulling out an inch or so. I always just puch it back down. I have tried tightening the nut at the bast of the steering shaft, but no luck.
 
I am having a problem with my steering wheel pulling out an inch or so. I always just puch it back down. I have tried tightening the nut at the bast of the steering shaft, but no luck.
That sounds very dangerous and would fail the MOT over here.
If the whole steering column is lifting up , as implied by you tightening the nut and bolt at the bottom, it may be that these are somehow not fitted correctly. The splined shaft that protrudes into the car on the steering box has a deep groove around it. the steering column goes onto the shaft until the hole for the bolt aligns with this groove. This gives a secure connection that prevents the column rising even before the nut is tightened. Have a good look at the threads on the bolt to see if it needs a new one.
 
I have cranked the **** put of the nut where the red circle is. It seems to hold tight, but after driving if I get a bit overzealous and yank the wheel, it will pop out a bit, but never off. I wonder if I need to look at the nut on the steering wheel itself??? The steering box was just replaced btw and it did it with the old box.
 

Attachments

  • Sterzo1.jpg
    Sterzo1.jpg
    34 KB · Views: 54
Last edited:
If the bolt is located as I described even if the nut came off the column wouldn't move until the bolt eventually fell out.
If the wheel is loose at the top of the column it would wobble rather than move upwards and tightening that bottom nut would make no difference.
 
I have cranked the **** put of the nut where the red circle is. It seems to hold tight, but after driving if I get a bit overzealous and yank the wheel, it will pop out a bit, but never off. I wonder if I need to look at the nut on the steering wheel itself??? The steering box was just replaced btw and it did it with the old box.

On the bottom of the shaft where it presses onto the spline on the steering box the bolt you are referring to has an alloy clamp the presses against the splines but also on the steering box spline there is a cutout that the bolt needs to pass through. It is not a hole but like half a hole, so a groove. If it is clamped correctly this should stop you being able to pull the column upwards.

I had exactly the same problem when putting my car back together, what I was doing was clamping just against the spline and it was allowing the movement up and down.
 
JMO but I'd check the front wheel 'tracking' first in case this is out of spec. If only one side was adjusted or both sides were unequally adjusted this can put the steering wheel out of position. If tracking is correct and correctly done then i'd reposition the wheel.(saves having to reposition the wheel twice).

A tip for removing the wheel is to loosen but not fully remove the retaining nut and then gripping the wheel each side at the spokes try to rock the wheel from side to side i.e. push in on one spoke while pulling hard on the other side then reverse sides, you're not trying to turn the wheel almost like trying to flex it, if you can follow what I'm saying.

When refitting the wheel (idk model/year you have) there may be a small pin on the underside of the wheel near the hub which cancels the indicators, it may help/avoid damage if you manually move the plastic disc above the indicator switch so the the matching hole for this pin is IIRC at the bottom so that on refitting the wheel this pin goes into the plastic ring, some people just rotate the wheel a 1/4 turn or so in each direction after refitting the wheel but before tightening the nut.

Al.
 
Sorry for hijacking this thread, but there is a pin to re-set the turn indicators? Man, I have been doing it manually. I might have to take a look at it and see if I can make one.

As far as the loose steering shaft issue, I will need to look at the bolt that slides through the cut-out on the steering box shaft. The bolt is probably worn and would explain why I can tighten it and it is snug for a bit then it re-seats and the shaft lifts up.

I will have to wait until the vehicle gets to the US as it is being shipped as I write.

Sorry for maybe confusing you, the pin I'm referring to is a spring loaded plastic pin on the underside of the steering wheel boss, I may be getting confused with the 126 however no doubt other members wil correct me if necessary ( going on memories of when I worked on all Fiats in the 1970's, 80's etc).
I'd suggest you also look closely at the clamp on the lower steering column where it attaches to the steering box input shaft, there needs to be a gap at the split, if it's closed up fully you can tighten the clamp bolt fully but it won't clamp the column to the shaft securely, you can widen the gap with a cutting disc and angle grinder if necessary, just a thought!

Al.
 
Sorry for hijacking this thread, but there is a pin to re-set the turn indicators? Man, I have been doing it manually. I might have to take a look at it and see if I can make one.

As far as the loose steering shaft issue, I will need to look at the bolt that slides through the cut-out on the steering box shaft. The bolt is probably worn and would explain why I can tighten it and it is snug for a bit then it re-seats and the shaft lifts up.

I will have to wait until the vehicle gets to the US as it is being shipped as I write.

If it's any help, here at the interior of my 500F wheel. There are two white nylon activators which contact the inner part of the wheel in order to self-cancel.
 

Attachments

  • BRA_7247.JPG
    BRA_7247.JPG
    1.3 MB · Views: 42
  • BRA_7248.JPG
    BRA_7248.JPG
    1.2 MB · Views: 48
Just to draw a line under the original question, yes, it really is that easy.

Once you've got a 24mm socket (not standard in most socket sets) you literally just take off the horn push, undo the bolt, ease the wheel off (which includes the indicator mechanism) and ease it back on again in the right position.

Simple, two minute job (as long as the wheel hasn't rusted into place).

Thanks for your input everyone!
 
Hi Pete, yes it should be a simple job, when I did mine the nut had been peaned in two places making it a lock nut. When it came to putting it back on, the first threads had been messed up, so with some needle file work, oil and thread cutting technique I managed to not cross the threads any further. However, I fitted a spring washer to maintain tension and reintroduced the pean marks as after the first tighten, the wheel started to move on the splines. I don't want to have to take the wheel off again so it's rock on now. Just one to watch.

Cheers
Hugh Jarce
 

Thanks for the link , one of the pics clearly shows what I was trying to explain about the slot at the splined end of the steering shaft in my post#11.

IIRC some steering boxes have a 'master spline' (i.e. one spline not cut) which means the shaft will only go into the coupling in one position, usually the master spline fits into the split in the clamp, something else to watch out for if having difficulty.

Al.
 
Last edited:
Back
Top