Technical Electric Windows

Currently reading:
Technical Electric Windows

Joined
Mar 3, 2004
Messages
1,101
Points
329
Location
staffordshire
My Mk1 UT has very very slow electric windows, the drivers side goes down and not up, it has to be helped to go back up. the passenger side goes down and back up but it goes faster when both the buttons are pressed for that window,

anyone know what it could be? i've tried changing the switch's but its the same..

mark
 
Try and spray some silicone spray in the runners and see if that helps, but to me it seams like your motors are shot...
I know where there is some if you need them...
rob
 
Do a search, I am pretty sure Alex has posted a comment on how to improve the performance of your electric windows. Basically there is too much resistance in the circuit, mainly because of the switches. And the motor also has a hard time forcing the cable through the old grease in the runner.

The solution is to clean out and replace the grease in the runner of the mechanism. Then clean out the switch units. Then finally put some relays into the circuit so that the motors are getting a solid 12V (straight from the battery). They work much better after that.
 
Hi Mark,

Oops, sorry I didn't reply earlier, but didn't have much to add to what jjhepburn said (the post was possibly https://www.fiatforum.com/showpost.php?p=321529&postcount=7 by the way)

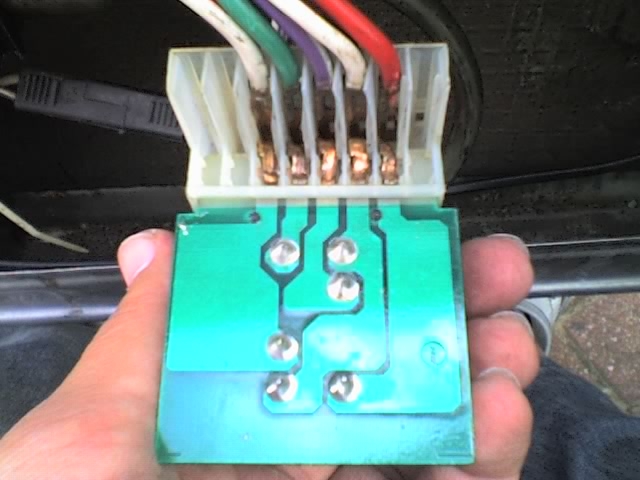
Usually it IS the switches that are faulty. They have solid-silver contacts, and should be fantastic, but somehow they are not.

What you can do is to install relays within the doors themselves, wired with a direct power feed to ensure full voltage to the window motors. Reliability is greatly improved this way, as the switch only has to supply the low current to turn the relay on.

The wiring is initially very confusing at the switches, but much simpler if you work from the motor backwards. The motor has just two wires, and obviously the polarity reverses, to reverse the direction of the window travel.

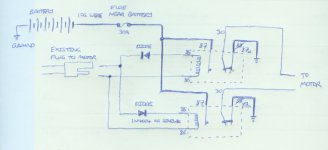
So, taking those two wires to the motor, you need to arrange two relays (for each motor). Each relay will have the coil connected across those two wires, BUT with a diode (1N4004, 1N4007, or similar) in series, so that the relay only works when the polarity is around one way. One relay will have the diode around the other way compared with the other relay. So, one relay 'clicks' for 'up', the other relay 'clicks' for 'down'.

With that part done, you need to provide a constant 12V to both relays. The output of each relay is connected to one motor wire. The relay that is 'on' will thus provide 12V to one side of the motor. The relay that is 'off' needs to ground the motor, i.e. provide a connection to earth. So, the normally-closed contact of both relays need to be connected to ground (the door frame). This causes the motor to run in either direction, when either relay turns on. If both relays are off, both sides of the motor are grounded. If both relays are on (for some reason, faulty switch?), then both sides of the motor would be 12V and the motor would not run.

I've drawn a quick diagram (pen and paper :eek:) to try and show this.

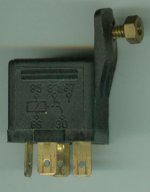
Note that you need two SPDT relays (single pole, double throw) for each door. 'Double throw' means that there is a normally-closed contact as well as a normally-open contact. The output is connected to the normally-closed contact when the relay is 'off', and to the normally-open contact when the relay is 'on'. This type is also called a 'changeover' relay. It has the terminals 30, 87, and 87a. The important thing is that it does NOT have two 87 terminals. Relays with two 87 terminals are SPST (single pole, single throw) relays: both 87 terminals become live at the same time, no contact is connected with the relay 'off'. These are useful for headlights but no use for this application, since we need to ground the motor with the relay that is 'off'. Hope this makes sense.

You could use two DPST (double-pole, single-throw) relays instead. Double pole means that each relay handles both of the motor wires (one pair being reversed) - which would complicate the wiring. Most double-pole relays are also double-throw, so there would be unused live contacts to accidentally short out, or confuse you. These DPDT relays are not common in the automotive world (and do not accept standard automotive terminals) but could be purchased from an electronics shop. Or, you could use four SPST (single-pole, single-throw) relays. Again, needless complexity.

So, try to get the right SPDT relays to make the job easy (note the picture attached showing the circuit on the side of the relay). Also consider buying some relay sockets with wires already attached - less connections to have to make!

Remember to use a fuse holder in your main 12V feed from the battery (usually at the connection block at the back of the engine bay, with the lid). It's important that this fuse is near the battery, before the wire passes through any metalwork (this prevents a risk of fire if the wire chafes anywhere, e.g. on the entry to the door). 30A blade fuse will be sufficient. 10 gauge wire is nice, but probably more than necessary. 10 gauge wire is the largest size that will fit in yellow crimp terminals! Otherwise, ensure the wire is at least as large as the two existing wires to the motor.

The quality of the power/ground connections is important: consider soldering, or buy a lever-action crimp tool (not the glorified pliers/wire strippers... ;)) The ground connection should be fitted with an eye terminal and clamped under a bolt against the door metalwork. Note that the ground wires can be quite short and tidy - only the 12V wire needs to enter the door through the existing grommet.

Before you fit relays, it would be wise to connect a source of 12V (e.g. a spare car battery) directly to the motor, to test it. You may also like to measure the voltage available at the motor's connector with the motor turned on. I have seen 8V or less available as standard, which is why the windows are so slow!

Taking the relay approach will certainly make an improvement to the electric windows - whatever else happens. You could just clean the switches and make do (like I have with my Turbo). You could also work back through the wiring, replacing the weakened sections near the door hinges that may have lost some of their strands. But it is actually easier to fit the relays and their beefed-up power supply; the only reason this would not have been done in the first place is a matter of cost :rolleyes:

For the motor lubrication, I find it easiest to pull out the white plastic tube from the door cavity, which provides a path for the rack when the window is down, and raise it above the level of the motor, then spray in copious quantities of lithium spray grease while operating the window up and down. You could also use another oily-greasy spray lubricant - but don't use WD40 by itself, since this will not provide enough lubrication over a prolonged period. Silicone spray may be sufficient. Silicone is definitely useful for the window rubbers (but is a pain to clean off glass).

I've only seen one faulty motor, and that was because of lubrication with WD40 that caused something internal to fall apart. Then I tried to take it apart and fix it, and this is something I definitely don't recommend - all the balls fell out and it never ran again :eek:

Hope this helps, please ask if you'd like something clarified?
-Alex
 

Attachments

  • ElectricWindowRelays.jpg
    ElectricWindowRelays.jpg
    62 KB · Views: 484
  • Relay.jpg
    Relay.jpg
    25.7 KB · Views: 177
Last edited:
Alex you're actually a legend and if i intended in keeping my glass fronts i would do this as mine aren't the quickest either!

Tom
 
i agree with mk1 kid, i don't post much just mostly read everyone elses comments on this forum and i am always impressed with alex's replies, a credit to this forum!
 
this info definetly sounds useful alex, my 70 originally came with power windows (which are now manual) and sunroof (now sealed with silicone) which i intend to try and restore. I think i stand a good chance with the windows dut the sunroof i know nothing about
 
kasedie - good luck, have fun! :)

The sunroof usually leaks when the panel loses its tension against the seal. One time I found this was because the aluminium brackets had worked loose from the baseplate. New pop rivets will sort this out (for a while). But another cause is when the winding handle becomes worn! It is supposed to have a certain amount of 'slack' so that the handle can return to the putting-away position. Unfortunately if this 'slack' becomes too much, the panel pops up. Amazingly, fitting another handle cured the problem with no other changes to the mechanism.

You can take the seal off the car and repair it with black silicone windscreen sealant. But in general, the sunroof is designed to leak a small amount, and the drainage should cope with this. If it doesn't, it may be that the pipes are blocked or fallen off, or that parts of the baseplate are leaking. It's quite easy to remove the whole assembly from the roof by undoing a large number of 10mm nuts, once you have taken the headlining out.

One thing we found (jjhepburn and I) was that gluing the panel shut with silicone sealant, which seems like a final solution, did not actually solve the problem... it still leaked as much as ever! :rolleyes:

-Alex
 
Hi all,

A friend of mine as a Uno and is front right window is not working. He thought it was a broken motor and so he bought a new one at a scrappyard. He asked me for help as he doesn't know much about electronics.

We unmounted the plastic, the buttons, all of it and then run a test to see if there was enough voltage to the motor. There was 11.7 V when the window gone down and -11.7 when the window gone up (or vice-versa, don't remember). So the electric motor was being fed with enough current. Anyway, we then removed the plug that connects to the elctric motor that was installed and then tried on the one that he bought and it didn't work! We then cleaned the new motor (the tubes) and then tried again. Nothing. We also tried to the fed the motor with the plug from the left window motor and it still didnt work.

What is wrong here? Is it the motors? Can anybody explain me how the motors work?

PS: Its a 1995 2nd edition Uno.
I told my friend to wait a day before returning the motor.

Any help is very aprecciated!
This is my first post!:)
 
Last edited:
Hi Sonic_Sky, and welcome to the forum (y)

Well it really does sound like the replacement motor is faulty, doesn't it?
The motor works by winding a spiral-shaped 'rack' (more technically a worm gear, I suppose) which bends as it runs around the fixed steel tube. The white plastic tube extension contains the flexible rack with the window 'down'. I usually spray some CRC/WD40 in there, followed by some white lithium grease spray, and work the window up and down, though obviously you can't do this if it's completely seized.

To un-seize it, you'll have to carefully take the end off the motor (bending back the tabs, if I remember correctly) and de-rust the bearings but DON'T, whatever you do, take the centre of the motor (armature) off the flexible rack... there are ball bearings spiral-wrapped in there, and you may never get them back in...

But if your friend has paid for the motor, the first thing to do is to go back and try to get a replacement. Consider testing the replacement motor before taking it away - a jump-start pack (the type with short jumper-leads attached) is excellent for this. Remember to take some small bits of wire to poke into the motor plug.

You should also test the original motor from the driver's door by plugging it in to the passenger's door, since you have the trim off. As I've said before, it's usually the switches that fail, but it does sound like you have two faulty driver's-door motors?

-Alex
 
Last edited:
Revival - so I don't create a lot of random posts.

window_switch.JPG


Can someone do me a huge favour and check out the order of wiring on their passenger window switch please. Mine came out and i'm not sure they are in the right order.

Really appreciate all your help

Thank you
 
REVIVAL AGAIN- I have read through all these posts.

I have 2 Unos with electric windows, only the left window on the 84 70s works.

The right side motor was seized, I unseized it and got the motor going BUT!:bang: The motor whirs beautifully, but it does not move the mechanism.

It appears that something inside is stripped, it is not even trying to move the mechanism.

I see alexGS says don't pull the motor apart or you will never get it back in.

So, is there any way to get the inside section gripping and moving the mechanism again.

AND, there is 14.3 volts at the motor on this car, (84 jan-70s.)

The second car (88-60s) has a different issue, no power to the switch. The electrics have had a few people cutting and joining wires, so some work to do here. The wires were also disconnected to the winder motor. Motor still didn't work when I applied 12v directly, it was well greased, recently I'd say, but a bit seized in the motor. I freed it up and got it going, but the bearings in there are absolutely had it, the motor works well now but makes a terrible noise.

Can I replace the bearings without making a major mess up.
 
Last edited:
I see alexGS says don't pull the motor apart or you will never get it back in.
...

Can I replace the bearings without making a major mess up.

:) I think the two points above answer each other...


I suggest you take the stripped, no-movement-when-motor-runs one apart to see what you're dealing with. Unscrew the metal cap from the motor. I think you'll find a spiral-shape device filled with small ball bearings (about 2mm diameter each). Maybe the spiral-shaped device has split. Maybe all the balls have gone so there's no drive. My guess is that your noisy one has a few balls missing or stuck. Perhaps, if you're really skilled, you'll be able to make one good one from two.

I think you'll need thick and sticky grease to hold the balls in place for reassembly. There used to be stuff called 'water pump grease', from an age where water pumps (of all kinds, agricultural/industrial) had no rubber seals. Perhaps try an industrial suppliers (e.g. Paykel Engineering) rather than an automotive supplier. CV joint grease might work OK but might also be a bit too light.

However, design of the motor did change over the years - start looking around for more spares ;)... There is a later type that has a grey-coloured motor mounted on an angle where the front door speaker would be. My Mum's Mk1 Uno 70SL had one fitted. That type is much quieter and smoother. Probably used in the Mk2 Uno.

The earlier type has the motor mounted horizontally and is a 'gold' (passivated-cadmium plated) colour. These are often a bit noisy but in the case of my Uno Turbo, seem to work well enough. They need to be kept greased, in the way I described above.

I appear to have two spare electric window regulators for my 164s... they are a good design, Bosch motor is rubber-mounted and rubber-coupled, turns pulleys that the cable runs around - much smoother than the flexible-rack design, much smaller and lighter than the 'scissors' design of old English cars and modern Japanese cars. VW/Audi uses the cable type as well. I wonder what your Saabs have. Maybe you can adapt something to fit the Uno door!

You might also be interested in an item that Mal Simmonds has - a 'repair kit' for the broken window clip - you know the plastic peg that goes through the glass? Mal has a metal thing that fastens onto the plastic slider and then has a metal pin & clip through the glass. Probably not worth much - could be posted to you - and would avoid the possibility of the glass ever falling off the slider again. I don't have a picture, unfortunately, but I thought it was a clever idea. He imported them from Italy by the dozen... probably hasn't sold one yet.

I'm impressed you have so much voltage - make sure it doesn't drop when the motor loads the circuit ;)

-Alex
 
Last edited:
You might also be interested in an item that Mal Simmonds has - a 'repair kit' for the broken window clip - you know the plastic peg that goes through the glass? Mal has a metal thing that fastens onto the plastic slider and then has a metal pin & clip through the glass. Probably not worth much - could be posted to you - and would avoid the possibility of the glass ever falling off the slider again. I don't have a picture, unfortunately, but I thought it was a clever idea. He imported them from Italy by the dozen... probably hasn't sold one yet.

I made a guide for fixing the broken electric window lugs for free but no-one seems to know it's there :rolleyes:

https://www.fiatforum.com/uno-guide...epair-how-secure-window-glass-broken-lug.html
 
Thanks guys

Yes I was going to pull apart the one that whirs beautifully but doesn't move the mechanism. But before I did that I thought I would ask here, you never know, since this thread was started someone may have come up with something that wasn't thought of. I have emailed Mal about the winder, and I will ask about the plastic/metal bit if he doesn't offer it.

To free my motor up I unscrewed the 2 screws and moved the fitting so I could turn the cable. After a few turns it freed up and went nicely, but I wonder if some ball bearings moved when I did that which could be causing it not to operate the mechanism. I can't believe it is worn out inside, this car has 88000km on it, the other one has 230000km and while it is noisy it still works.

Fun times coming up.
 
I made a guide for fixing the broken electric window lugs for free but no-one seems to know it's there :rolleyes:

https://www.fiatforum.com/uno-guide...epair-how-secure-window-glass-broken-lug.html

1986Uno45s, yes I read your post, and thank you. It is a very simple solution and probably a permanent fix. Initially I didn't realise I would need this fix. I thought I only had a motor issue, but then again I did wonder why there were blocks of wood lying in the bottom of the door panel!!! :bang:Now I see I had 2 issues, the clip had come adrift from the window, (n)someone had blocked the window up, and that I guess is whey the mechanism seized from not being used. I was going to urethane the plastic clip back on.
 
Last edited:
To free my motor up I unscrewed the 2 screws and moved the fitting so I could turn the cable. After a few turns it freed up and went nicely, but I wonder if some ball bearings moved when I did that which could be causing it not to operate the mechanism.

Yes, I think so ;)

Post some pics when you figure it out?

Good luck!
-Alex
 
Back
Top