

You are using an out of date browser. It may not display this or other websites correctly.
You should upgrade or use an alternative browser.
You should upgrade or use an alternative browser.
Technical digital clock
- Thread starter Mennywise
- Start date
Currently reading:
Technical digital clock
Mennywise said:is it possible to mount a mirror with digital clock of a turbo, in place of my "normal" mirror (mk1)?? roof is the same in that place? need to make some new holes?
thanks")
-mennywise
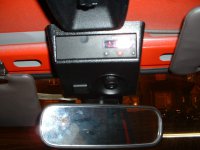
Yes, you can swap your original mirror for the turbo/ sx mirror/ clock and map reading light unit. It bolts in place of the original mirror.
BUT, you will need the ribbon cable (four wires) that runs from the clock, under the headlining, down the 'A' post, past the side of the dashboard and then connects to the fuse box. If you have an 'S' model or higher the connector will already be in the wiring loom. Base models need to have the under dash wiring loom upgraded to 'S' spec or higher, or you can splice/ solder in some wires to the existing loom.
Looks great, and very handy!
Chas
Attachments
OP
OP
Mennywise
New member
- Joined
- Feb 5, 2006
- Messages
- 20
- Points
- 4
thanks a lot, Chas!
i've watched in the wires loom, there is a ribbon cable of 4 wires (black, white, brown, brown/white) going high...could it be the one i need? I would like to detach the inside roof in the mirror zone, just to take a look, but i don't know where to make force..what do you suggest?
-Mennywise
i've watched in the wires loom, there is a ribbon cable of 4 wires (black, white, brown, brown/white) going high...could it be the one i need? I would like to detach the inside roof in the mirror zone, just to take a look, but i don't know where to make force..what do you suggest?
-Mennywise
To take out the roof lining, you just remove the sunvisors and their clips, the side handles, and the rear view mirror. Some types of basic-Uno mirror have two screws, others I think you pull the mirror firmly off the baseplate.
Not sure about the wires, but in no particular order, one is ground (black), one is 12V all the time, one is 12V when the key is turned on, and the last is the instrument illumination wire (so the clock dims at night). You could test the wires you found with a multimeter or test light. I'll take a look for the wiring diagram (with colours) which is in the Haynes manual. It will be easy for you, since you will know ALL the colour names
-Alex
Mennywise said:thanks a lot, Chas!
i've watched in the wires loom, there is a ribbon cable of 4 wires (black, white, brown, brown/white) going high...could it be the one i need? -Mennywise
Hi Mennywise,
Sorry for the delay, but I've been away for a few days.
Alex has covered the headlining removal in good detail (cheers Alex!), so I'll just cover the wiring.
I might not have made it too clear in my first post, but it's extremely unlikely you will have the 'ribbon' cable from the underdash to to the clock unit. What I meant was that you need to look for a spare CONNECTOR, one with four wires going into it that is not being used.
It's this connector that you need to connect the ribbon cable to. The cable from the underdash to the clock unit is plain silver wire covered in transparent sheathing, and as far as I'm aware was ONLY fitted to to very early 70S models, and SX and Turbos as these all had the clock/ map reading light fitted as standard.
You will need to try and find this ribbon cable from a scrap 70S/ SX or Turbo, but if not it IS possible to make up your own wiring instead. It's only four wires after all.
If you look at the picture of my clock/ light/ mirror unit (see post #2), just to the upper left of the mirror and between the mirror and the sunvisor you can see the ribbon cable I'm talking about. It might even be possible to order it new from Fiat - worth a try!
Anyway, good luck and hope you get it sorted soon
Chas
Oh dear, I just found yet another Haynes manual 'anomaly'...
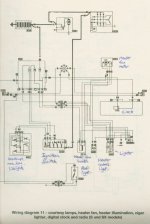
Wiring diagram 14 is the one you need - 'tachometer, digital clock, map reading lamp and vacuum gauge (Comfort, ES, S and SX models)'.
Sadly, it's exactly the same as diagram 11... showing a clock in the instrument panel (7460) - HOWEVER *newsflash* it looks like there is an unlabelled four-pin connector (exciting!) which has the following wires (and in this order):
N - black - this is earth (easy)
M - brown - this is +12v all the time. It's connected to the lighter socket and the supply for the radio.
GR - yellow/red - this is the instrument lighting. You can pick it up at the lighter socket or at the small bulb holder behind the heater controls.
L - light-blue - from the heater fan switch. This is +12v when the ignition is on (I usually tap into the same wire at the heater fan switch for installing a stereo with an 'ACC' wire).
This connector is shown on the right of the diagram, next to 'radio' (one wire found in the radio slot - what a joke - has anyone ever seen a one-wire radio?! Strictly a case of DIY with the Mk1 Uno, as they provided no speaker wiring, and not even an earth...)
So if you can't find the four-pin connector (near the fusebox I think), there's where to connect your own wires to. Again, don't be misled by the part 07460 labelled 'Clock', that's the one in the instrument panel which you don't have any more. Also, take a look inside the clock unit - the pin that goes to the 'common' part of the circuit and one pin of the bulb, is the earth. (An interesting project for you?)
I've attached a scan, complete with my writing to identify the parts. Sorry to anyone that thinks manuals shouldn't be written on, but trying to look up part number after part number drives you mad after a while...
Welcome to the joy of Italian Wiring. This is a relatively simple car, but for the Mk1 Uno there are 29 diagrams, and 22 for the Mk2, though various mysteries, such as the Automatic Temperature Control heater, are not covered.
I remember someone on the Alfa 164 forum asked for the wiring diagram for some of the hidden relays behind the instrument cluster. The answer from the resident expert was, "just what circuit do you want? The wiring diagrams for the 164 run to 600 pages".
600 pages! Just imagine what the Stilo Abarth wiring is like... Though I understand it uses CAN-bus (multiplexing) so that probably cuts it down a bit.
-Alex
PS. The interior roof light is shown as having BR (white/red) and BN (white/black) wires. I've seen at least two Unos where one of the wires was white, and the light itself is labelled 'Bianco'. Why? Well, perhaps they ran out of the striped wires and carried on making the looms anyway. You really CANNOT rely on wiring diagrams with Italian wiring...
Wiring diagram 14 is the one you need - 'tachometer, digital clock, map reading lamp and vacuum gauge (Comfort, ES, S and SX models)'.
Sadly, it's exactly the same as diagram 11... showing a clock in the instrument panel (7460) - HOWEVER *newsflash* it looks like there is an unlabelled four-pin connector (exciting!) which has the following wires (and in this order):
N - black - this is earth (easy)
M - brown - this is +12v all the time. It's connected to the lighter socket and the supply for the radio.
GR - yellow/red - this is the instrument lighting. You can pick it up at the lighter socket or at the small bulb holder behind the heater controls.
L - light-blue - from the heater fan switch. This is +12v when the ignition is on (I usually tap into the same wire at the heater fan switch for installing a stereo with an 'ACC' wire).
This connector is shown on the right of the diagram, next to 'radio' (one wire found in the radio slot - what a joke - has anyone ever seen a one-wire radio?! Strictly a case of DIY with the Mk1 Uno, as they provided no speaker wiring, and not even an earth...)
So if you can't find the four-pin connector (near the fusebox I think), there's where to connect your own wires to. Again, don't be misled by the part 07460 labelled 'Clock', that's the one in the instrument panel which you don't have any more. Also, take a look inside the clock unit - the pin that goes to the 'common' part of the circuit and one pin of the bulb, is the earth. (An interesting project for you?)
I've attached a scan, complete with my writing to identify the parts. Sorry to anyone that thinks manuals shouldn't be written on, but trying to look up part number after part number drives you mad after a while...
Welcome to the joy of Italian Wiring. This is a relatively simple car, but for the Mk1 Uno there are 29 diagrams, and 22 for the Mk2, though various mysteries, such as the Automatic Temperature Control heater, are not covered.
I remember someone on the Alfa 164 forum asked for the wiring diagram for some of the hidden relays behind the instrument cluster. The answer from the resident expert was, "just what circuit do you want? The wiring diagrams for the 164 run to 600 pages".
600 pages! Just imagine what the Stilo Abarth wiring is like... Though I understand it uses CAN-bus (multiplexing) so that probably cuts it down a bit.-Alex
PS. The interior roof light is shown as having BR (white/red) and BN (white/black) wires. I've seen at least two Unos where one of the wires was white, and the light itself is labelled 'Bianco'. Why? Well, perhaps they ran out of the striped wires and carried on making the looms anyway. You really CANNOT rely on wiring diagrams with Italian wiring...
Attachments
Last edited:

Similar threads
- Replies
- 4
- Views
- 3K