Mr Sheen
New member
I stumbled upon this solution when I had bumper off and headlight units out (methods of carrying this out well covered in other topics on Forum), to try to solve the dreaded erratic headlight problems. I will post my solution to those problems later.
Converting headlights is a good option for anybody who will be doing long term right hand side of road driving rather than buying new headlights (approx €900 plus labour) or using stick on beam benders.
I might add here that I carried out this work some months ago but my driver's side lamp has been wrecked since so I am using this unit in my attached photos which show things very clearly.
Tools needed when units are out:
• Long reach driver with T20 bit.
• Long reach thin flat bladed driver.
• Long thin nosed pliers.
• Telescopic pick up magnet (unless your above tools are magnetised).
• Thick felt tipped marker.
• Assistant to help with bumper removal and to hold headlight unit steady whilst you are working on it (doesn't need to be a tech wizard!).
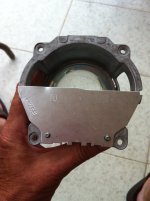
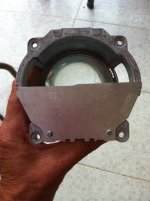
Take rubber dust cover off and remove bulb from dipped beam projector and peer into it. You will see a baffle inside as shown in 1st photo except mine is positioned for LHD, yours will be reversed. This is what you are getting at to reverse like mine. It's position on bottom of projector does not look logical but bear in mind that projectors turn beam upside down!
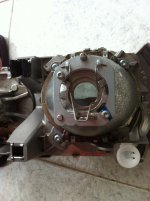
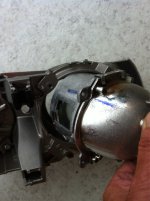
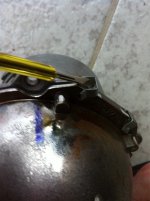
2nd photo shows 3 x T20 screws which have to be removed so that projector can be pulled outwards in headlight casing. It is not possible to take it out completely but it can be inclined within casing to work on it (3rd photo shows this except it is happening within casing). I used a felt tip pen to make an alignment mark on projector and lens unit, just in case! Unclip 4 x spring clips shown in 4th photo using a thin bladed driver and a thin nosed pliers. You will have to rotate projector to get at them all. This will seperate projector and lens. This joint houses the baffle. You will not see baffles as clearly as in my 5th and 6th photos as in confined space it will not fully pull apart. You now have space to pull out baffle, reverse it and slide back in. Re-assemble, making sure clips are properly seated in little holes. Squeeze beforehand with pliers if they have spread while removing. Re-seat projector and replace 3 x T20s. Replace bulb and dust cover. This work took me 30 minutes for first headlight and 10 minutes for 2nd! (Total including bumper and headlight unit removal about 2 hours).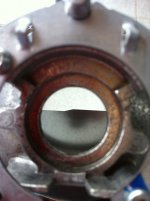
Remount on car, spray connectors with electrical cleaner while you are at it before you reconnect and refit bumper etc.
Get headlight alignment done at your destination as they will not be 100% accurate after this work.
PS hope my attachments work. Not good at this sort of thing!
Converting headlights is a good option for anybody who will be doing long term right hand side of road driving rather than buying new headlights (approx €900 plus labour) or using stick on beam benders.
I might add here that I carried out this work some months ago but my driver's side lamp has been wrecked since so I am using this unit in my attached photos which show things very clearly.
Tools needed when units are out:
• Long reach driver with T20 bit.
• Long reach thin flat bladed driver.
• Long thin nosed pliers.
• Telescopic pick up magnet (unless your above tools are magnetised).
• Thick felt tipped marker.
• Assistant to help with bumper removal and to hold headlight unit steady whilst you are working on it (doesn't need to be a tech wizard!).
Take rubber dust cover off and remove bulb from dipped beam projector and peer into it. You will see a baffle inside as shown in 1st photo except mine is positioned for LHD, yours will be reversed. This is what you are getting at to reverse like mine. It's position on bottom of projector does not look logical but bear in mind that projectors turn beam upside down!
2nd photo shows 3 x T20 screws which have to be removed so that projector can be pulled outwards in headlight casing. It is not possible to take it out completely but it can be inclined within casing to work on it (3rd photo shows this except it is happening within casing). I used a felt tip pen to make an alignment mark on projector and lens unit, just in case! Unclip 4 x spring clips shown in 4th photo using a thin bladed driver and a thin nosed pliers. You will have to rotate projector to get at them all. This will seperate projector and lens. This joint houses the baffle. You will not see baffles as clearly as in my 5th and 6th photos as in confined space it will not fully pull apart. You now have space to pull out baffle, reverse it and slide back in. Re-assemble, making sure clips are properly seated in little holes. Squeeze beforehand with pliers if they have spread while removing. Re-seat projector and replace 3 x T20s. Replace bulb and dust cover. This work took me 30 minutes for first headlight and 10 minutes for 2nd! (Total including bumper and headlight unit removal about 2 hours).


Remount on car, spray connectors with electrical cleaner while you are at it before you reconnect and refit bumper etc.
Get headlight alignment done at your destination as they will not be 100% accurate after this work.
PS hope my attachments work. Not good at this sort of thing!

