Lego 007.JPG

Tipo (Classic) New Tipo (old model!)

Introduction

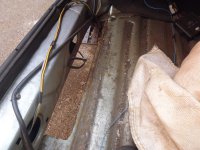
Following the demise of the red Tipo (see previous rust thread) I obtained a new one and this is work to date. This one had a fairly long MOT failure list including excessive corrosion on both front suspension mounts, 1 rear seat belt mounting point and an advisory on the other. However the 'Liberty' special edition with air-con in SX trim was tempting and the previous owner had fitted new springs and had some tidy welding done previously. So what needs doing...

Lego 007.JPG

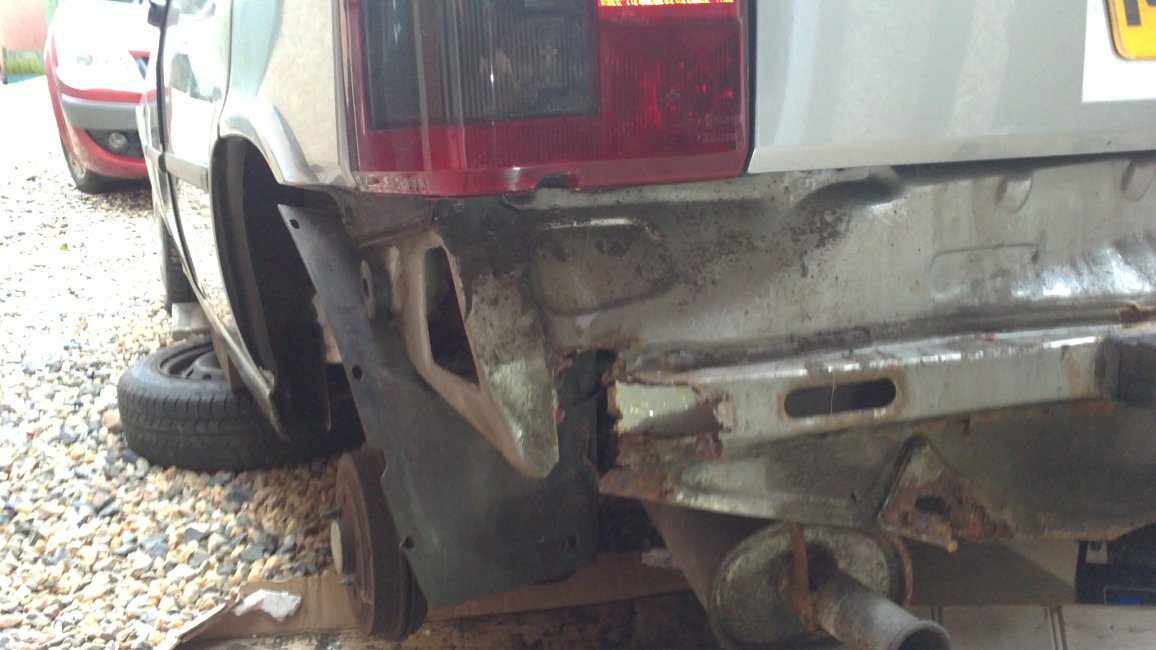
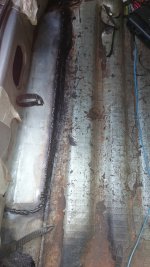
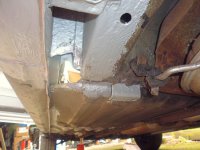
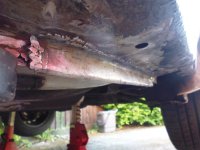
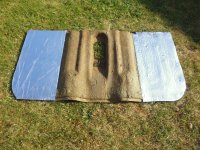
The rear valance is heading the same way as the red Tipo and cutting off and using the remade valance from the red one may be the way forward later on.

Lego 002.JPG

Lego 003.JPG

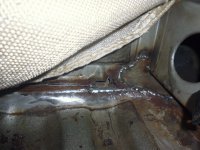
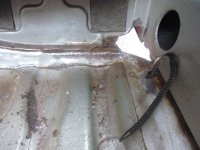
The inner arches are not too far gone but there was more rust at the top and the back to tackle later.

Lego 027.JPG

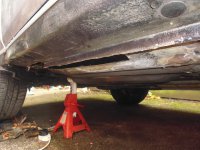
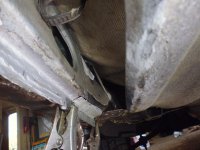
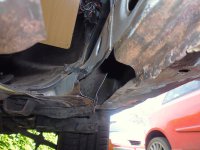
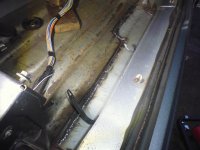
The holes behind the front struts will be the worst to fix, just above the sub-frame mounting bolts. Both my Mk11s suffer this.
Soon I must return to Scotland briefly as per post 28, with that in mind I resolved some poor connections affecting the lights. Actually the penchant for people in the 1990s and 2000s to have their bumper fog lights on (whilst conversely not using their indicators) used to really annoy me, :rolleyes: but that was then :eek:

DSC_1063[1].JPG

Finally I jacked the car up and pressure-washed the rear subframe at close quarters, on balance I'm thinking its better to try to blast off salt and rust rather than just leaving it to fester.
 
Tipo returned to Scotland and back, with no issues, last time it was heading north on the A7 was on the back of a low loader on delivery to me in 2016.

DSC_1099[1].JPG

Then it was time to deal with some remaining issues. Working the air-con seemed to precipitate the engine light coming on again. I purchased the Multiscan software and 3 pin cable adaptor and plugging in highlighted two errors - crankshaft sensor and Throttle Position Sensor.

DSC_1140[1].JPG

I'm grateful to Adrian Bravo on the Forum for his thread suggesting marking the TPS position (calibrated at the factory) with spray paint. It works! Here is the old one sprayed up before removing, an old-style anti-tamper torx (6 points) is needed to get it off. The new one (pictured) shows the largish holes to allow for alternative positioning on the injection unit.

DSC_1133[1].JPG
 
Last edited:
DSC_1138[1].JPG

The old TPS looks ok, but starting up the car the idle sounds to have stopped fluctuating all over the place. All the numbers, more on the other side, what do they mean!

Next on the list to do was to reach in the doors and fit new front door straps to stop the loud creaking.

DSC_1135[1].JPG

Had the trailing arm bearings replaced at my garage (horrendous bill at Cheshire prices) but he said it was 1.5 days removing the big rusted oiks. I was grateful he took the job on, as it was an unknown quantity.

Now awaiting a repaired air-con pipe (another horrendous bill) to refit and regas the system, hopefully this time it keeps charge.
 
Last edited:
Quiet on here, i'll attempt to step up ;)

Hadn't previously realised I should have a cabin air recirculation flap motor. On getting to it, no sign of life, but on breaking the case, suddenly it sprung to life. Unfortunately, it isn't re-sealable, so the search began. An Alfa 145 motor didn't stop on reaching the end of travel, that didn't seem right. An Alfa 155 motor looked the same but actually had no earth wire and a different connector.

DSC_1164[1].JPG

Finally paid extra for a RHD part. (only 2 listed, in Italy). Frustratingly it works the wrong way round so it must be the LHD part all along.

DSC_1190[1].JPG

It's the most awful place above the glove box requiring a refit in increments and physically impossible to get the 3rd mounting screw back in. Anyway it works and the mystery of the steamy windows is resolved now the flap can be held open by the motor. A small adaptor made up to reverse the operation to suit an RHD car.
 
Last edited:
The aircon has dwindled to nothing again. Acquired a UV light and the compressor looks to be a second leaking part, so I need to put a refurbished one on once I get the gas recovered. With a pipe repair already this is proving to be expensive. :eek: The parts seems to originate from a Dedra not a Tempra.

DSC_1200[1].JPG
 
Thank you, Jonti, for allowing us to follow your work. :)


May I ask you about the TPS. Where did you acquire that? I have been looking around and only find TPS on offer that look the same but are described by sellers as (only) fitting the 1.6 engine.


Another question, I was told that it was not possible to read the ECU of the 1.4 i.e. Where is the connection, is it near the ECU (above the right wheel) or somewhere on the bulkhead?

I like your ambition in returning this car to first class condition. Well done.
 
I like your ambition in returning this car to first class condition. Well done.

:) We wear rags and the house has no roof, but all understand full Fiat functionality comes first. The Porter manual (I recommend buying it for the later, electronic models) shows the 1.4 as Bosch Jetronic and the 1.6 as Bosch Monomotronic. The diagnostic port and TPS have the same icons and locations on the diagrams. So there should be a 3 pin plug emerging from the ECU. You would need to take the airbox off to see if your TPS is the same shape. If so they are readily available on Ebay.
 
One day (when not in a rush and liable to mess up) I reinstated the missing decal, another italian purchase.
 

Attachments

  • DSC_1207[1].JPG
    DSC_1207[1].JPG
    2.9 MB · Views: 60
  • DSC_1210[1].JPG
    DSC_1210[1].JPG
    2.9 MB · Views: 53
  • DSC_1209[1].JPG
    DSC_1209[1].JPG
    2.6 MB · Views: 55
One day (when not in a rush and liable to mess up) I reinstated the missing decal, another italian purchase.
With a new dryer, some pipes and a compressor, I had the system re-gassed only for it to dramatically go pop later in that day at the condenser/pipe high pressure connection. This was opportunity to get a new condenser and fit a new radiator whilst I was there. The latter seems to result better temperature control in heavy traffic, a welcome unexpected bonus. The high pressure connection to the new condenser refused to screw on 'square' after numerous attempts and began to suspect this was the cause of it going pop previously on the old one. I tried cleaning up the aluminium thread on the new condenser with a small file and this solved the problem. The OEM condenser is a solid item but steel fittings on aluminium threads require care.
P1000435.JPG
P1000436.JPG
P1000437.JPG
 
Last edited:
The front repairs require repairs to 3 pressings, the floor, inner sill and outer sill, then all spot welded together at the seam
 

Attachments

  • P1000737.JPG
    P1000737.JPG
    7.1 MB · Views: 37
  • P1000723.JPG
    P1000723.JPG
    6.9 MB · Views: 46
  • P1000765.JPG
    P1000765.JPG
    6.9 MB · Views: 38
  • DSC_1667.JPG
    DSC_1667.JPG
    1.6 MB · Views: 35
Hello,

Do you have any other error codes? The crankshaft sensor error always pops up when scanning the ECU with the engine not running and does not indicate a problem with the sensor.
 
Hello,

Do you have any other error codes? The crankshaft sensor error always pops up when scanning the ECU with the engine not running and does not indicate a problem with the sensor.
Ah that's helpful. There were a couple of others. It's only just back on the road but the engine light has appeared from time to time. When I get back I will scan it and if you have any thoughts I will appreciate it.
 
then moved from front left to front right. Removed old plating and rusted remains. These holes are a bit smaller than they look perhaps but restoring integrity was required by rebuilding the panels and the spot welded seam where the 3 panels join.
 

Attachments

  • DSC_1689.JPG
    DSC_1689.JPG
    1.2 MB · Views: 41
  • P1000795.JPG
    P1000795.JPG
    7 MB · Views: 40
  • P1000796.JPG
    P1000796.JPG
    7.5 MB · Views: 42
  • P1000799.JPG
    P1000799.JPG
    6.8 MB · Views: 39
  • Like
Reactions: ben
This is great work, well done!

There are relatively few variables on these engines so interpreting the error codes goes a long way usually in solving issues.

I also follow engine parameters to understand what is happening, but the fact that MES always disconnects after a few seconds makes that challenging. Do you have a stable connection to the ECU?
 
'Touchwood' this 'should' draw the body repairs to a close, finishing with epoxy mastic, galvanising spray and noxudol as required.
 

Attachments

  • P1000777.JPG
    P1000777.JPG
    6.8 MB · Views: 40
  • P1000775.JPG
    P1000775.JPG
    7 MB · Views: 39
  • P1000774.JPG
    P1000774.JPG
    7.1 MB · Views: 39
  • P1000809.JPG
    P1000809.JPG
    6.6 MB · Views: 44
  • P1000803.JPG
    P1000803.JPG
    6.8 MB · Views: 39
  • P1000773.JPG
    P1000773.JPG
    6.9 MB · Views: 40
Last edited:
Glad to see this rust-trap plating gone. The underlay toward the sides of the car may cause some of this by being a wet sponge, so I glued replacement deadening to the underneath of the original old rubber mats. I hadn't noticed until now the black seals between the side doors were broken and perished, likely letting water in to collect on the floor. The seal strip parts seem to be extinct, but there are some great products from Ebay (China) which fit really well. Finally, I replaced the shaft seal that had leaked on the refurbished AC compressor, with a seal kit, Youtube videos on how to repair the Harrison V5 compressor were essential. The AC seems to be holding up, at last.
 

Attachments

  • P1000848.JPG
    P1000848.JPG
    7.2 MB · Views: 38
  • P1000845.JPG
    P1000845.JPG
    7.3 MB · Views: 34
  • PXL_20230705_181435308[1].jpg
    PXL_20230705_181435308[1].jpg
    3.2 MB · Views: 37
Last edited:
Back
Top