Technical Rust and more rust

Currently reading:
Technical Rust and more rust

jonti

We're getting there
Joined
Nov 27, 2005
Messages
656
Points
226
Location
formerly Scotland
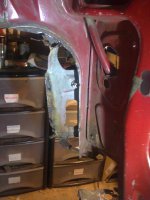
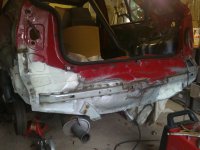
I have a rusty Tipo. This will be about starting to fix it. Tipos rust like any old car, but due to lavish carpeting and galvanised outer panels, it goes unnoticed. After 200,000 miles mine was terminal. If you are the only person still running a Tipo, I doubt it's as bad as mine, but watch out :eek: 
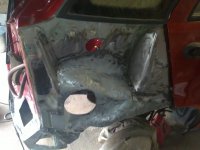
These are the rear arches once the carpet was out and the wing panels were off. I can't see any trace of plastic liners in the rear arches, a bit tight of Fiat seeing as they put a panel join that was bound rust to right through there. Below is behind the rear bumper

osr wheelarch.JPG

car 005.JPG

jhjhj 002.JPG

boot floor.JPG
 
Last edited:
So here we go. First I got the replacement inner arches. The offside unit wasn't available so I guessed an Alfa 146 unit would fit. As it was a non returnable order, it was a nervous wait. There is also an outer section to meet the wing, which doesn't exist anywhere and would have to be made.

2013 October 008.JPG

2013 October 026.JPG

Now I needed to chop out the old inner arches, making a hole for the new ones and make good all edges and seams. I cut the unwanted panels out along the seams, trying to drill out spot welds on one sheet only.

2013 October 013.JPG

2013 October 027.JPG

2013 October 028.JPG

2013 October 012.JPG

2013 October 010.JPG

Next, the fuel tank was taken off and put in the garden out of the way

2013 October 018.JPG
 
Last edited:
The floor edges around the inner arch unit that I had removed had to be rebuilt, there is a lip on the edge which is spot welded to the bottom of the inner arch unit. The floor is 1.2mm sheet and the rest 0.9mm. This seemed to be the Fiat standard, they must have given it much thought lol

Watherston 006.JPG

Gaggenau 022.JPG

Late 2014 036.JPG

xmas 010.JPG

This apron under the bumper looks ready for fixing but much more shaping and trimming was required
 
Last edited:
Next job was fabricate the second half of the inner arch between the new unit and the rear wing - on both sides. I used ford transit wheel arch for the front part however it required reshaping.

nsr wheelarch (2).JPG

Prague  2015 004.JPG

CX75 001.JPG

For the offside I wasn't sure what it had looked like before it dissolved lol but after much searching I found a pic on the internet and started with a clean sheet of 0.9mm and a hammer.

osr wheelarch (2).JPG

2013 October 032.JPG
 

Attachments

  • xmas 017.JPG
    xmas 017.JPG
    1.2 MB · Views: 112
  • xmas 016.JPG
    xmas 016.JPG
    636.6 KB · Views: 81
  • xmas 014.JPG
    xmas 014.JPG
    1.1 MB · Views: 80
Last edited:
I got another transit arch and with much hammering and some welding the piece begins to fit the hole :slayer:

Prague  2015 024.JPG

xmas 023.JPG

Autumn  15 033.JPG

The front part of each arch, also the inner arch units are welded into the chassis underneath the rear sills. I had to remove the remains of the old arches and renew the rear of the sills.

It was a right ordeal to get the edges of the inner wings to fit exactly up against the outer bolt-on panels, which they have to make a seal. Later I'll use silkaflex to seal the gap.
 
Last edited:
Autumn  15 020.JPG

Autumn  15 027.JPG

Autumn  15 037.JPG

CX75 002.JPG

By now I was getting a little tired of being in the garage. I was glad to get a fresh pair of salvaged rear wings on the car and the bumper back on. It was starting to look like a Fiat Tipo again, which is a good thing.

CX75 003.JPG

End of the back 016.JPG

End of the back 017.JPG
 

Attachments

  • Autumn  15 031.JPG
    Autumn 15 031.JPG
    1.1 MB · Views: 78
  • Autumn  15 033.JPG
    Autumn 15 033.JPG
    1 MB · Views: 114
  • End of the back 017.JPG
    End of the back 017.JPG
    1.3 MB · Views: 79
cheers bluejohn: thumb:

It's a TD SX, and like every Tipo, is a hoot to drive, and if velour and extra gauges are your thing, I was lucky to have in store a brand new engine which I dropped in 40k miles ago.

Plan lol, well the back was bad, but I've found more issues than I thought, the floor has holes, there's rot behind the front springs - it's a double skin, where I've found factory-fitted cavity foam :cry:. Finally the front corner of the sills - which is complex to do right on a Mk2 due to the crash reinforcement. It's less work than to date, but it's alot. Unfortunately if the scrappy had offered any cash the other day it would have gone, but he refused lol :( I'll now post the rest of the work done to bring the story up to date.

old phone archive 046.jpg
 
Last edited:
The GRP tailgate was knackered, so I got one sent which arrived with a large chunk detached :bang: Sorted that with glue, but I couldn't see a way of getting the wiring loom down to the reg plate. Until I noticed the connectors were staggered where they connect with the main loom inside the car. Fiat must be short for...genius...

End of the back 010.JPG

End of the back 007.JPG


If Fiat thought they saved weight using GRP, well this hatch weighed a blooming tonne. But at least it won't rust. :D


End of the back 025ws.jpg
 
Finally I retrieved the fuel tank, sluiced it out, got two stainless steel fuel tanks straps made up, reattached it and fitted the filler neck through the new aperture and popped some fuel in.

Checking that the neighbours were inside for their own safety and air quality reasons, a sprinkle of oil over the cams and the Fiat diesel was started up for the first time in 2 or 3 years, and the car moved onto the drive! :D

Outer 007.JPG

Outer 010.JPG

Outer 009.JPG
 
Last edited:
Plan lol, well the back was bad, but I've found more issues than I thought, the floor has holes, there's rot behind the front springs - it's a double skin, where I've found factory-fitted cavity foam :cry:. Finally the front corner of the sills - which is complex to do right on a Mk2 due to the crash reinforcement. It's less work than to date, but it's alot. Unfortunately if the scrappy had offered any cash the other day it would have gone, but he refused lol :( I'll now post the rest of the work done to bring the story up to date.

What's the structure difference between a mk1 and mk2?

And surely it's a good thing that the scrapyard wouldn't take it, otherwise there'd be 1 less Tipo in the UK! :(
 
Great work. Well done! You must be handy with the welder! Great to see a tipo being revived. I gave up on my 1.7.. Just too rusty sadly then I lost my workspace so that was that! I have a sound sedicivalvole shell so might do something with that someday.
 
What's the structure difference between a mk1 and mk2?

The Mk1 was independently crash tested, it wasn’t great. For the Mk11 the catalogue showed several reinforcements forward of the cabin. Also the doors got beams and the sills are reinforced. The new structure was carried forward unchanged into the Bravo/a which had to brave NCAP :eek: I'm guessing maybe the Alfa 147 too as it appears to use a Tipo floorpan.

And surely it's a good thing that the scrapyard wouldn't take it, otherwise there'd be 1 less Tipo in the UK!

It was cheeky as there's at least £50 of steel sheet gone in lol!
 
Last edited:
The Mk1 was independently crash tested, it wasn’t great. For the Mk11 the catalogue showed several reinforcements forward of the cabin. Also the doors got beams and the sills are reinforced. The new structure was carried forward unchanged into the Bravo/a which had to brave NCAP :eek: I'm guessing maybe the Alfa 147 too as it appears to use a Tipo floorpan.


It was cheeky as there's at least £50 of steel sheet gone in lol!

I see! If the 147 was based on an 80s structure design, that would explain the poor ncap result, lol! :eek:

And fair enough, lol!
 
Last edited:
I see you're using the roofrack to brace the structure while you're cutting the underneath apart!

Great progress, we need more clattery sooty old-school diesels back on the road, just to remind people how good classic Fiat petrol engines were...
 
How many headgaskets so far on the FIREs? :D

Back to the Tipo... I suppose all the hidden rust is from being stood for years in a seaside environment? Even the wheels are terrible, they'll need stripping and repairing around the rims if the tyres are going to seal (I know!!).

Also I can't believe how RED the car still is... those Tipos all went an orangey colour, as opposed to the 90s Unos and Puntos who went pink instead...
 
I gave up on my 1.7.. Just too rusty sadly then I lost my workspace so that was that! I have a sound sedicivalvole shell so might do something with that someday.

Cheers Stephen - I saw pictures of your Tipo diesel on here, again with that car you wouldn't have guessed the level of corrosion within.

BlueJohn - As you say this car did turn orange and it was resprayed some years ago with a lacquer top coat. It's not been near the seaside, but I never bothered to wash the rear arches out, only the front ones for some reason :nutter: maybe that's why the front turrets are intact ! I had a 1.4 once, my brother a 1.6. They are all great, the TD engine (once warmed up) is fabulous, just a little weighty for the front suspension though.
 
Back
Top