General Well, it's that time again! Rear trailing bearings

Currently reading:
General Well, it's that time again! Rear trailing bearings

Joined
Dec 16, 2008
Messages
540
Points
184
Location
Wolverhampton
It comes to us all eventually, yep, it's trailing arm bearing time again.
If they are as nice as the last ones I did three years ago, it won't be much of a job. I hope that's not put the mockers on it before I even start.
I'll see if I can do a picture guide as I go, it may be of use to anyone contemplating a similar job.
more later.
George
 
Well, after a delay I finally got started. (I'm having to fit this job in between the bog roll full of jobs H-i-D has lined up for me) :rolleyes:

... seem to having a game uploading pictures into me thread, anybody wanna instruct an ole git as to how it's done?

Old dogz un noo tricks springs to mind :eek:

Well, now thats a surprise, I asked for help uploadin an it had done it itself, geez, I'll never get the hang of theez noo fanguld fings...

Only thing is, I don't seem to beable to put a comment in each picture the way I wanted to...

Going from left then right then down etc...

1, You can see why it needs sorting...

2, Work started...

3, It looks ok in there, shoes need changing, otherwise ok...

4, WOW!, there's a first, no new brake adjusters required...

5, That looks nice and dry...

6, That 32mm was bloody tight, but I have a mate to help with awkward nuts ...

7, That's better, now we're making progress...

8, I think I deserve one of these now...

More later, George
 

Attachments

  • 20180819_150429.jpg
    20180819_150429.jpg
    5.3 MB · Views: 77
  • 20180819_151122.jpg
    20180819_151122.jpg
    5.5 MB · Views: 49
  • 20180819_151756.jpg
    20180819_151756.jpg
    4.1 MB · Views: 78
  • 20180819_152152.jpg
    20180819_152152.jpg
    4.9 MB · Views: 62
  • 20180819_160454.jpg
    20180819_160454.jpg
    5 MB · Views: 50
  • 20180819_160423.jpg
    20180819_160423.jpg
    4.7 MB · Views: 55
  • 20180819_160436.jpg
    20180819_160436.jpg
    7.2 MB · Views: 56
  • 20180819_152639.jpg
    20180819_152639.jpg
    4.9 MB · Views: 55
Last edited:
Pics all work fine here. Since Photobucket decided to be a bunch of c**ts, unfortunately it's not possible to mix text with photos. As you've seen, the Fiat Forum provision for uploading pictures makes "How To's" like this 'ere one a bit of a trial.

At least the weather is with you. Looks like you're giving the brakes an overhaul, as well as doing the trailing arms?

Best of luck. That hex head on the trailing arm bolt is laughing at you, waiting to join battle - I can see it :D . Lots of penetrating oil the night before you attack it will help, especially on the exposed bit of bolt thread.
 
What a day.

There was me thinking I'm edgeing toward the downhill bit,
haha, no you're bloody well not mush. :mad:

Allow me to enlighten you - you who already know what a c**t of a job this can be. :eek:

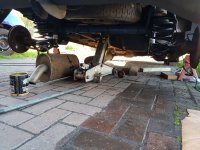
First the brake unions in front of the axle beam, 3 days of WD, nice n hot with me gas gun, yep, smashing - (y)

SNAP :eek:

ok, try the other one, see if it'll come apart - :confused:

SNAP :yuck:

Oh well, I wanted to fit new brake pipes any way... :rolleyes:

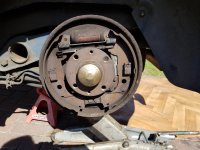
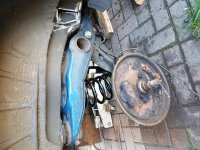
OK, so they're out the way, what's next? Brake cables, ok, even I can't mess this up...

Now I know why the offside rear didn't feel very effective, the cables siezed up. One more job on the list.

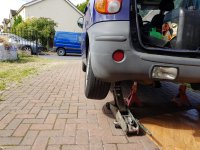
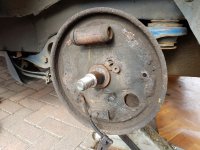
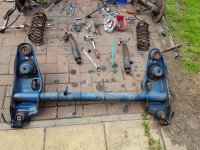
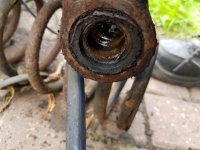
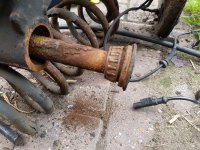
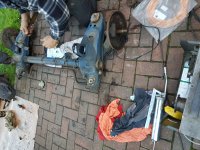
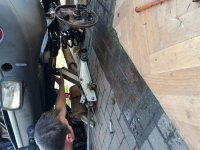
Now for the subframe...

Bloody big socket bar - check
18mm socket - check
Nice big hammer - check
Determined frame of mind - check

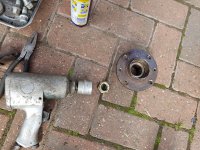
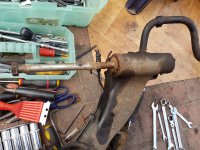
Bloody hell they're tight... ok, fire up the Hydrovane, out with the rattler,
18mm hammer socket...
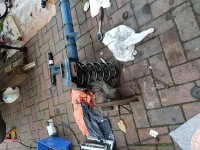
That's better, first ones done, and the second, and the third ...
should done this first, only one to do and I can start on the trailing arms, tight ain't the right word for the last one, it was solid, it couldn't be more solid if were welded.
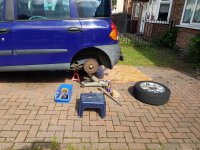
OK, more WD, another brew - very important part of the toolkit...

Right, let's get back to it, it ain't gonna fix itself.

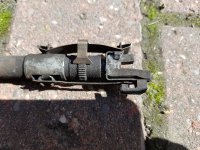
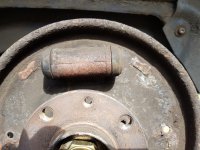
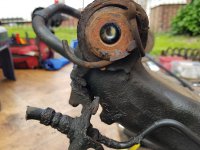
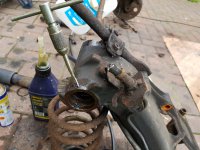
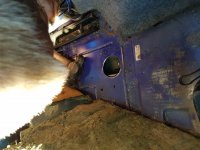
Rattle, bang, rattle, oh, crap! The contained nut inside the chassis has come adrift and is spinning. Now I'm in the doo doo. :bang:

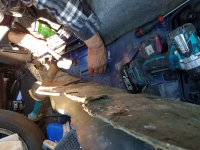
Where's me disc cutter...(y)

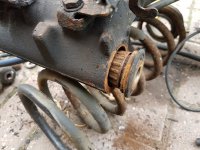
Plan for tomorrow: zip the bolt off, do the rest of the trailing arm renewal - (bearings, road springs, shocks and brake rebuild) Then find a way of fixing the nut inside the chassis to hold the subframe together.

Any ideas people? :confused:

George
 
How about:
Slice/grind the head off of the stuck bolt so that you can drop the subframe and get it out of the way.

Weld a short length of studding or a sawn-off bolt onto the end of the headless bolt.

Drill a 5 or 6mm hole in the subframe on either side of the hole where the bolt goes into the subframe, close enough to the bolt so that you'll see the captive nut directly.

Slide a length of 15mm copper tube, cut square at both ends, over the bolt shank, long enough to reach up to the bit of studding you've welded to the bolt shank.

Washer and nut onto the studding and pull them up to clamp the broken bolt tight to the subframe.

Plug weld the captive nut through the two drilled holes.

If it were me, I'd probably then saw the bolt shank off and drill the seized threaded portion out of the captive nut, just to avoid putting too much load on the plug welds. Run a tap through the nut thread with some copper grease to make sure it's clear.
 
Cheers Gav, that sounds like a good way to go.

Talking to 'ourkid' about it, (he doe's a lot on trannies) he told me trannies have this all the time. They slit the chassis to 'open the box' so they can relocate it and stick weld it back in place, then mig the 'box' closed.

Sounds like a fairly easy process

I had thought about slitting the bolt off, 'r-kid' said if you open the box, weld the bolt capivater back in place, get some jungle juice on from the inside you'll get it apart easier, before miggin the box closed.

Whichever way I go it ain't getting done today. I'll photo it as I ferkit up and you can have a giggle at my expense haha.

Later.
George
 
Last time I did trailing bearings I didn’t disconnect the break lines ... and it was a nightmare getting the long bolt out. Still very doable though without having to strip too much. I’m sure you know this though!!
Marty.

Marty.
 
Well, things haven't gone according to plan...

and that's putting it mildly.

Got the first 3 subframe bolts out a breeze, the 4th was er... not quite so indulging.

Tight? Nah! welded together would better describe it. After a lot of messing about I went for the 1mm disc option (see pic #1 ).

OK, frame down but not free, brake pipes and handbrake cables were rusted to buggery.

A bit more 1mm disking and they were on the deck.

You can see the attempt to open the box, it only allowed me to see another frame within the frame, which is why I went for the slice the bolt method.

Going to start on the rip down tomorrow, if what I've found so far is any guide, it's gonna be a beech.

One thing did surprise me though, that's a new looking frame under there but everything else was like old iron. It looks like they've renewed the frame and left everything else - don't make sense to me.

Anyway, here's a few pictures...

20180831_130223.jpg

20180831_130258.jpg

20180831_130654.jpg

20180831_130238.jpg

20180831_131041.jpg

20180831_131115.jpg

20180831_131121.jpg

20180831_131057.jpg

20180831_131207.jpg

20180831_131212.jpg
 
Are you doing all this just to replace trailing arm bearings??!... there’s no need to remove subframe at all... but it’s fun!
 
Personally, I think it's a lot easier doing work on the back end with the subframe dropped. But that's just me, and I didn't have the ordeal of seized subframe bolts to deal with.

Someone has certainly been there before you George. The OE finish on the subframe is black and there should be some plastic plugs that look like the end caps from a poster tube in the ends of the main round tube of the subframe. However, it looks as though that blue paint has done a pretty good job of preserving the subframe.

Those slices in the side of the chassis rail are scary :eek::eek::eek:


Don't buy KYB springs if you are thinking of renewing. I had real quality problems with the pair I fitted and a replacement one thereafter. Bilstein are firmer but seem to be good (as are their dampers). Suplex are cheaper & might be worth a look - apparently they supply springs as OEM for some Jaguars. Monroe do Reflex dampers which are dual-valved and have a nice ride quality. They're hard to find for the Multipla, but do exist. Part number is E1258.
 
Last edited:
Ah it’s easier for sure with it down... and it’s a good opportunity to clean up/ inspect. The first thing that seems to rot in them are the bump stop holders.. wonder how they are. The paint in fairness seems to have saved it, if I had it down I’d be replacing the 4 mounting bushes aswell as they really need it down.
Best of luck with that bolt removal!... brave... your obviously handy on the mig
Marty.
 
Today's effort brought up a few surprises...

I couldn't get the torsion bar off because the socket head bolts are seized solid, no surprise there then... (pic)

The 15mm hex's on the end of the torsion bar were just as bad, so they're staying put... (pic)

The shock bolts, whilst not exactly falling out, didn't give me too much grief... amazing what can be achieved with a yard of strong arm...

Now, left till last cuz I'm a coward... the actual radius arm bolts, I was dreading these... they came out so easy I was dumbfounded, I mean they really did come out easy. Simply leaned a bit heavy on me strong arm, nut creaked a bit and off it came, tap, tap, tap, and the bolt was out.

OK, that was the easy side I thought, nope, the other one was just as easy.
5 mins and they were both apart and the bolts on the deck.
The nearside one does look past it but that's only the outter bearing, the inside looks ok. The offside look good on both inner and outter. (pic)

So there it rests until tomorrow, when I'll be attending to the removal of the bearings.
I would've started knocking em out today but I wasted a lot of time on the poxy bolts that didn't fancy being messed with...

20180902_164924.jpg

20180902_164936.jpg

20180902_164957.jpg

20180902_165005.jpg

20180902_165118.jpg

Lost my internet (thanks Virgin) so the other pic's will be posted in the next post, sorry.
George
 
Let's see if I can get the other pic's uploaded...
 

Attachments

  • 20180902_170602.jpg
    20180902_170602.jpg
    7.4 MB · Views: 70
  • 20180902_170656.jpg
    20180902_170656.jpg
    3.8 MB · Views: 52
  • 20180902_170641.jpg
    20180902_170641.jpg
    3.4 MB · Views: 54
  • 20180902_170619.jpg
    20180902_170619.jpg
    4.7 MB · Views: 59
Well, after lazing in Portugal for a few weeks I return to the bug and bless me, it ain't fixed itself...:rolleyes:
The last thing I said before racing off to the sun was - you'd better be done when I get back... it obviously wasn't listening, so it looks like I've gotta do it meself, (you just can't rely on anythin these days can ya?)
I'll post some more pic's as I battle on. I've got me hands full just now so I'll just have to give it some time as I find it.

Question:
Did any of you that has done this job find that the bearings didn't go on to the shaft very easily?
I know they're supposed to be an interference fit, but these are way to tight, maybe that's why the other bearing inner race's were broken in half when I got them out?
OK, more later
George
 
Well, I managed to get a bit of spannerin' done today. It's maybe not moving at record pace, but I'm doing what I can, when I can.

I got the remaining bearings out - they really didn't want to go but my trusty THOR didn't mess for long. Once all the race's were out (those awkward inner race's too) I got round to drilling and tapping for the grease nipples. Cleaned up the internal crud and WD'd it. Tomorrow I'll have the bearings in and start getting the frame together with new springs and shocks.
Here's some catch up pic's:
 

Attachments

  • 20180930_171954.jpg
    20180930_171954.jpg
    3.7 MB · Views: 71
  • 20180930_162607.jpg
    20180930_162607.jpg
    3.5 MB · Views: 46
  • 20180930_162439.jpg
    20180930_162439.jpg
    5.1 MB · Views: 69
  • 20180930_162418.jpg
    20180930_162418.jpg
    4 MB · Views: 51
Great photos Oletimer. Thanks for taking the time to take and then post them. I know what it's like trying to take half-decent pictures when your hands are covered in **** :)

Water ingress into those arms is a killer. I reckon if you could stop it, the bearings would last forever. As far as I can see, there are 3 ways that water can get inside the arm casting:

  1. Past the outer edge of the rubber seal that goes on the very outer ends of the bearing bore
  2. Between the main spindle bolt and the same rubber seal
  3. Through the hole in the bottom of the arm casting
On an old arm that's had some abuse in getting old bearings out, I reckon (1) is easily breached. If the end face of the casting isn't perfectly clean and flat, the seal doesn't stand a chance. Perhaps a thin bead of silicone sealant applied on assembly might help out?

(2) is a tricky one. A new spindle bolt will help a lot as it guarantees a smooth surface for the seal. A smear of red rubber grease might prolong the life of the lip seal? Not much can get in that way anyway as the arm ends are (or should be :) ) a very snug fit into the subframe.

(3) For better or worse, I put a tube-end bung in the holes in my arm castings. It could be argued that they act as a drain point, but I'd say if you've got so much water inside them that you need a drain point in the first place, then you're already a long way towards losing the battle. I think that hole is there purely to facilitate manufacture of the arms and nothing to do with drainage.
 
Last edited:
Well, it's been a week since I did anything on't bug. The older I get, the less time I seem to have - who retiring is a time to back off and get fat? OK, I got the last bit bang on... :rolleyes:
what happened to the time off to take it easy? I'm actually working longer now than I did at work! Summat ay right ere.
Anyway, got a bell this morning, our kid said his job in Manchester wasn't progressing as planned so his boss said go home for the week (apparently they're being held up by some other group who are working slowly) on his way back to Northampton he said he would call in and help out with my rebuild.
So Dave and his son arrived and in no time got on with the job - after a brew of course...They left at 6pm to go home, the bug is looking like it should - minus the brakes and pipes, I'll see to them tomorrow but it's great to have the boys kick some life into the job. I was getting a bit listless because of the lack of daylight time to do anything constructive.
Here's a few pic's of progress so far...
 

Attachments

  • 20181009_150458.jpg
    20181009_150458.jpg
    6.1 MB · Views: 50
  • 20181009_135026.jpg
    20181009_135026.jpg
    4.4 MB · Views: 57
  • 20181009_135037.jpg
    20181009_135037.jpg
    4 MB · Views: 53
  • 20181009_144539.jpg
    20181009_144539.jpg
    5.4 MB · Views: 63
  • 20181009_144544.jpg
    20181009_144544.jpg
    5.8 MB · Views: 67
  • 20181009_150453.jpg
    20181009_150453.jpg
    6 MB · Views: 48
  • 20181009_153754.jpg
    20181009_153754.jpg
    4.3 MB · Views: 48
  • 20181009_153917.jpg
    20181009_153917.jpg
    5.5 MB · Views: 49
  • 20181009_153930.jpg
    20181009_153930.jpg
    5 MB · Views: 50
  • 20181009_153940.jpg
    20181009_153940.jpg
    4.8 MB · Views: 47
A few words regarding the build...

The pic with the hole in the floor was to put a new bolt in from the top after getting the old seized one out. I couldn't get any pic's of that bit.

The new bearings and tubes didn't pose much of a problem - I did measure them to see what had been left when they were made, interference is supposed to mean you can freeze one side, warm the other and they should slide together, when back to ambient they should all but welded together. Mine were so far out they wouldn't go together at all. Out with the emery and I took about 3 to 5 thou off each end diameter of the tubes. When time came for fitting together they were perfect.
I thought I'd put the grease nipples in the wrong place, they looked like they might foul the torsion so not allowing the grease gun to get onto the nipples.
Luck was on my side, with the weight of the car on the wheels and suspension, the grease nipples are then swung down and face downward enough to just clear the greaser.
Next is rebuilding the brake pipes, fit new cables, hubs, bearings, shoes etc and bleed it all - oh, yeah, I'll pop the wheels back on as well :cool:
Later
George
 
Good to see a hammer prominent in most of the photos :D
What's the hole in the boot floor for? EDIT: You beat me to it! I'm still not quite sure why the hole is THERE though....
 
Last edited:
Back
Top