General Planning a rebuilt 650 engine and gearbox swap

Currently reading:
General Planning a rebuilt 650 engine and gearbox swap

Uaglio

New member
Joined
Oct 13, 2017
Messages
153
Points
43
Location
New York
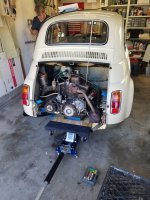
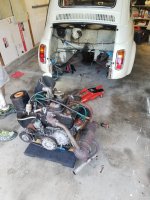
I really admire all you guys that can tear down and rebuild our engines, but for me, I have neither the skill or the best workshop for that. I’m confident though that I can bang my way thru a swap of my original 500 engine and gearbox for a rebuilt 650 and matching synchronized gearbox from a 126. I’m close to pulling the trigger on a fairly expensive engine/gearbox package from one of the larger vendors mentioned regularly here. (Brutal shipping and lost core charges to the US, but overall a bargain compared to many other collector cars. Plus, Cinquecentos are pretty rare and hold good value here). Package includes new alternator to replace the dynamo, 123 electronic ignition to replace the distributor and points, new carb, etc.

Anyway, just wondering if anyone who’s done this has any key “do” or “don’t” advice. I’ve been reading a lot about little snags that come up with the 126 swap (different heater pipe, longer starter cable, different starter, etc) and I’m trying to make sure those issues are covered. I also have some experience with the vendor selling the engine and gearbox and they seem to be a reputable supplier of good quality parts. (I hope that holds true with a rebuilt engine!) Any other words of wisdom or key things to do or avoid for those who’ve gone the same route? Thanks!
 
Here's a guide to the wiring differences that helped me when I swapped mine over. Basically the regulator (black box at the back) becomes surplus to requirements as it's not needed with an alternator. To keep it looking original and to simplify it most people take out all the internals of the regulator and use it as a junction box. There's a thread in the stickies from Bambino (Chris) about his 650 engine build which also covers all the topics about fitting the engine. If in doubt ask on here and help is never far away

View attachment CONVERTING FROM DYNAMO TO ALTERNATORWIRING ON A FIAT 650 ENGINE.pdf

Damian
 
Check with your seller---make sure that they have fitted 500 drive-shafts----the 126 shafts are too long.
 
If your starter is a solenoid type you will have to replace the ignition barrel and run a wire from it to the starter. One from a Fiat 850 does the job nicely
 
Thanks for the additional top tips! I've inquired about driveshaft length to confirm it's going to fit my 500L and I'm staying with the original lever and cable actuated starter (got a new longer cable to reach the new starter position on the 126 motor).
 
Oh boy, I think you saved me a headache for sure. Doesn’t look like I got that part but I still have time to get it in my shipment!
 

Attachments

  • 75D7476B-DD86-490C-B40D-C0F628D79EAB.jpeg
    75D7476B-DD86-490C-B40D-C0F628D79EAB.jpeg
    30.6 KB · Views: 21
Work began today. Followed the Haynes manual steps to remove the engine and gearbox and it came out without complaint. Going to spend a bit of time cleaning the engine compartment and will respray it. New engine and gearbox are coming this week.
 

Attachments

  • FF8B3138-48C5-4CAA-8DA4-6E8050050FBB.jpeg
    FF8B3138-48C5-4CAA-8DA4-6E8050050FBB.jpeg
    256.6 KB · Views: 32
  • 706E8701-3403-4F9B-B0D5-45BFCEF4F7C4.jpeg
    706E8701-3403-4F9B-B0D5-45BFCEF4F7C4.jpeg
    259.2 KB · Views: 34
Well done 'Uaglio'---you seem to be coping very well. Take it steady, ask us when you need to---we are here to help. You might find it easier to fit the new gearbox and engine separately. Check the 'lollipop'- connector for the gear linkage--if in any doubt, renew it. My 126 engine (tuned 652cc) uses the original 500 rear engine mount, so you should be OK there, but you may have to swap the 2 studs on the timing-chain cover from the 500 engine onto the 126 engine, but, do NOT swap the timing-chain covers. The 500 and the 126 oil-pumps are slightly different depth-wise, so you MUST keep the oil-pump and timing-chain cover as a matching (same-engine) pair.
 
Just had another thought--where do you live in America? Is it one of the 'hot in the summer' states? If it is,it might be a wise move to fit one of the aluminium 3-1/2 litre sumps to your new engine. They are available 'blank' (i.e. with no car make on it)--the extra oil capacity really helps keep the engine cooler. With the sump off, it might also be wise to carry out the Abarth exhaust-mount stud modification--it does make for a much more secure mounting.
 
All the tips are greatly appreciated! I’ll be spending some quality time with that engine by first. I’ll never have better access so now is the time to get it as clean as possible. I know the supplier knew about the engine mount studs, so I’m covered. I’m a little leery about reconnecting the starter linkage - the lack of access was annoying. I used a mirror to undo the split pin to get it out. My gear linkage lollipop is new- looking, no sign of rubber perish, but the metal appears slightly twisted. I may take it out to tap it straight again.
 
Any specific maintenance required for these? (Flanges where axles bolt) I just planned on re-greasing and bolting the new ones up.
 
Oops - forgot pic
 

Attachments

  • 31862948-6696-4586-BFF8-1579FDD78E0B.jpeg
    31862948-6696-4586-BFF8-1579FDD78E0B.jpeg
    3.3 MB · Views: 28
I have on one occasion (and I concede, only one) had a situation where the 4 bolts that go through the flange and into the coupling would not stay tight---which could have been quite embarrassing if I hadn't noticed it! My 'cure'when I fitted the new coupling was, prior to fitting the coupling, to run a tap ALL the way though the tapped holes in the coupling and secure the flange to the coupling with 4 60mm bolts on which I had extended the length of thread. I left the section that sits in the flange untapped (about 3/4in, but measure your flanges to check). The 'flange bolt' holes in the coupling are tapped all the way through as standard, so it might be worth while getting say 50mm bolts and extending the thread length, as required and if required---it doesn't matter if the bolts you use are 'cap-head' (allen key) or normal 'hex' head.
The only other things to suggest are, clean all the old grease off the couplings before bolting up the new flanges, make sure that the splines on the drive shafts are well lubricated (I use 'copperslip') and don't forget to fit the little springs that go between the outer end of the drive shaft and the inner end of the stub-axle---it is there to stop the axle damaging the end of the stub-axle.
 
Thanks again! I’ve got a new tub of Timken wheel bearing grease that should work fine for those axles. And yes, I noticed the little springs so I will be sure to reinstall those.

I’ll probably just stick with the existing sump and oil pan. I’m in NY metro area and although we have hot spells, usually it’s temperate here. I don’t think I need the extra cooling capacity of the larger sump.

I’m still debating what to do with all the undercoating in the engine bay. I believe it’s original factory applied, and is functional as a heat barrier and sound deadener. I may just clean it up a little and spray base color back over it, just to give it uniformity.

Also can’t resist changing the bushings on the rear control arms (2 on each side). They will never be more accessible than they are now and they’re only about 5 euros a piece.
 
I realise that New York is not a 'hot' state (except occasionally), but I would still recommend the fitment of the 3.5 litre sump---they definately help keep the engine stay cooler.
When you change the rear suspension arm bushes, make a careful note as too where the washers go either side of the bushes--THIS IS IMPORTANT. The washer/shims adjust and control the rear suspension angles. It can be a real pain-in-the-bum trying to set it up if you get the shimming wrong, (0.5 deg of TOE-IN total), and it must be the same (i.e. identical) each side.
 
Back
Top