Technical New Panda owner

Currently reading:
Technical New Panda owner

kentplums

Member
Joined
Feb 10, 2021
Messages
22
Points
55
Hi
I will soon be the proud owner of an old Panda 900 (141), not sure of exact year yet.
To pass CT (French MOT) I will need to change suspension ball joints and sort emissions.
Emissions hopefully can be cured with a good service. What's the deal on the ball joints? Difficulty 1-10? I'm quite handy at old motors so I'm hoping this will be a breeze.
Thanks to all in advance
RRRR
 
Hello. Are you doing both the suspension bottom swivel ball joints and track rod ends? We had a 1992 Panda Parade and I had no difficulty with doing the track rod ends - although you will need to reset the toe in/out when you've finished.

The ball joints on the bottom of the hub assemblies are much more of a challenge. I never had to renew ours although I did once fit new rubber boots to them which I got on the internet. The bottom bolt is easy enough to undo and I separated the pin from the suspension arm by holding a club hammer on one side and clouting it with a 1lb ball pein on the other 'till it came loose - I did it this way because my splitter was too "fat" to get into the available space.

The ball joint itself is fixed into the hub assembly and I believe it's recommended to change the whole hub/ball joint assembly as a unit? On mine the rubbers on the front of the brake reaction rod - right at the front - were badly perished and that was a "fun" job because the bolts on both sides holding the brake reaction rods to the suspension arm (if it was an old Ford this would be called a Track Control Arm) were rusted solidly into the arms. These bolts go right through the arms and are quite long. In the end I got the bushes out by removing the bolts from the inner ends of the track control arms and pulling them clear of the chassis then removed the big nuts on the front end of the brake reaction rods and then moving the whole lot backwards until the threaded ends of the rods cleared the chassis mounts at the front. So I ended up with the suspension arm and brake reaction rod still bolted together but off the vehicle. Not actually too bad once I realized that was the way to go. In fact I realized after I'd got the arms and reaction rods off the vehicle that the inner track control arm bushes were U/S too so I fitted new ones of those before putting it back together.

Hope that helps? I'm sure the lads in the Panda (classic) section could tell you more. I'm not sure if you can buy that bottom ball joint, press the old one out and press a new one in? They'll know I'm sure.

All best wishes
Jock
 
You can replace the ball joint, or you can replace the whole hub assembly. It needs to come off to fit the new ball joint anyway. I've tackled it from both ways - if you can get a hub assembly cheap enough, you may as well replace the whole assembly, I think a ball joint is roughly £10 and a carrier roughly £20 here, or at least when I did mine. The ball joint can be smacked out with a hammer, I didn't need a press for mine! Once you've removed the clip you just smack it basically. But up to you, if you want ease, change the carrier, if you want even cheaper, do the joint!

As for emissions, give it a good service, air and oil filter and new oil, get some fresh petrol and some fuel cleaner in there and make sure the car is nice and warm before the emissions test. Let us know how you get on!
 
Cheers!
16€ per side complete on oscaro if I've read it right. I can cope with that. I tried to post a link but I'm too young on this forum...so far!
RR
 
Well, I now have the beauty in my drive. As far as I can make out it's a 0.9l 1995 carb model. Excuse my ignorance but there will surely be none of that silly catalyser stuff to worry about will there?
Rear brakes need sorting too - prices are cheaper than bicycle parts!
It's a joy to have a go on this. Any input or warnings most welcome.
Cheers
R
 
1991 is usually the base point for catalytic converters, in the UK at least.

Wouldn't surprise me if is fuel injected.

Will possibly have OBD, but not OBDII which is the norm now.
 
Well I'm struggling.....to get the front calipers off. I've taken out the little pins and knocked the securing plates out. Now what??
cheers
 
So you've pulled out the little "bent wire" clips from the wedges and then tapped the wedges sideways until they fell out? Probably the caliper pistons will still be gripping the pads and preventing you from moving them (the calipers) If the pistons aren't seized you should be able to now get the pistons to move back into the calipers a little bit - doesn't need to be all the way (as in when you fit new pads). I was always able to get them to withdraw enough by just rocking the caliper but you may need to use a screwdriver or "C" clamp or whatever your favourite tool is. Then move the caliper either up or down - I think I always went up - until you've tucked the edge under the edge of the caliper carrier then you can pull the other side (bottom in my case) out of the caliper carrier and then pull the whole caliper free.

These brakes are well known for seizing on the sliders so a goodly application of antiseize here and where the pads fit in the carrier will keep you happily rolling along.

PS our "Felicity" - the purple one in my avatar picture - was a '92 plate and she had monopoint injection. Looks like a carb at first glance though doesn't it.
 
Last edited:
God it sounds so simple now you explain! I ended up getting impatient and took the caliper bracket off as well having discovered the "secret"nut holding the brake plate. Will have another go tomorrow.
Yes definitely monopoint. Is there any sort of OBD to your knowledge?
Thanks so much for your help and a fine result in the fitba' last night!
Cheers
R
 
Yes definitely monopoint. Is there any sort of OBD to your knowledge?
Thanks so much for your help and a fine result in the fitba' last night!
Cheers
R

OBD? Now a days I'm very interested in diagnostics and have bought a fully licensed MES (from Gendan, who I can thoroughly recommend) However back when we owned Felicity - and we owned her for around 20 years approx - I had little knowledge of diagnostics. Felicity developed a number of faults over the years but all were sorted without resorting to a scanner or any other dedicated diagnostic gear. For instance she started suffering from hesitancy when large throttle openings were applied. I noticed one day that when idling the revs were going up and down very slightly - you had to really listen to notice it but it was a regular slight increase followed by a slight decrease every couple of seconds or so. By now I'd learned about how oxygen sensors work and that one of the faults they can develop is that they go "lazy" and switch slowly. I guessed that the idle speed fluctuation might be due to this and took a chance on renewing the O2 sensor (it was an absolute sod to get out of the manifold). The idle stabilized and the hesitancy vanished. In fact she did this again just before I sold her but the manifold downpipe was so rusted I didn't try to change it as I think the fitting would have torn out of the downpipes before the sensor came loose! So, although On Board Diagnostics are probably present I believe you can get by with most faults by intelligently using conventional fault finding procedures.

Although not a "football" person I was pleased to see we weren't beaten in the football last night. I think possibly because I was forced into team games when young, I'm afraid I'm not a "physical type team games" person - Football, Rugby, etc, etc. That's not to say I'm not a "team player" but I much prefer being part of a technical endeavour.
 
Planning ahead I think I may need a new O2 sensor to get through emissions. Does anyone know the part number or will any old 4 wire sensor work? I'm all for buying the cheapest and making it fit. The usual sites, Oscaro and Autodoc etc have a huge selection allegedly compatible ranging from 30€ to way over 100€.Please tell me to buy cheap and adapt!
Cheers
RR
You're not going to like this, but my advice would be to buy the proper, big name (ie NGK or whatever) item complete with wire and plug connector. I've tried twice to use cheap universal sensors where you have to swap the plug connectors and both ended up a disaster.

Try giving the guys at Shop4parts a ring, they may be able to help.
 
Last edited:
Ha ha! Thanks for your warnings...I'll keep'em peeled for a bargain.
RR
 
Just done the ball joints - hammered the old ones out and pressed in the new. Next time I, personally, would buy the whole assembly. Saves alot of messing around. Now for the brakes...
 
Put new rear shoes in and bled all round. Is there a secret way of adjusting the handbrke to get it to function.....? I've adjusted the cable but it now binds and still not very effective...
cheers
RRR
 
Put new rear shoes in and bled all round. Is there a secret way of adjusting the handbrke to get it to function.....? I've adjusted the cable but it now binds and still not very effective...
cheers
RRR
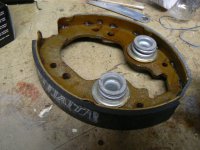
I guess your shoes looked like these ones?
P1090220.JPG

If they don't then I've just wasted my time on ever thing I'm about to write here!

Those are spares left over from my 1992 Panda Parade. The spring "thingies" on the shoes are the self adjusters. As you'll know they fit over pegs on the backplates with a small amount of clearance. When you press down on the brake pedal the cylinder pistons force the shoes out until they contact the drum. The self adjuster moves with the shoe until the clearance on the peg is taken up (there's not much clearance to take up) once the clearance is taken up the shoe slides through the friction washers whilst the adjuster is restrained by the peg. when you let your foot off the pedal the return springs pull the linings away from the drum. But because of the springs on the friction washers which make the friction washers grip the lining, the shoe can only retract until the clearance between the peg and adjuster is used up thus maintaining a close running clearance between the shoes/linings and the drum. As the lining wears the shoe slides further out through the friction washers and so the close clearance between lining and drum is maintained as the lining wears.

That's how it's meant to work anyway. I found that it didn't work very well and the friction washers were quite poor at gripping the shoe thus failing to compensate properly for lining wear. Genuine Fiat shoes and adjusters, as above, tended to work best. There's more on this in a minute so read on.

If you've understood this you'll notice the hand brake levers on the shoes, unlike most other designs, have nothing at all to do with the self adjusters? The lever on the trailing shoe is pivoted at the top of the trailing shoe and there is a fixed length bar which fits between this lever on the trailing shoe and the leading shoe. When you pull up the handbrake in the vehicle, the cable pulls on the bottom of the lever on the trailing shoe which pivots on the top of that trailing shoe whilst also pushing the fixed length bar forward against the leading shoe so forcing the shoes apart and gripping the drum.

Interestingly this is one of the very few designs where the hand brake travel will increase as the shoes wear because the reaction bar between the shoe is not the self adjuster and is fixed length.

As the linings wear down and you have to tighten the hand brake cables to compensate so the lever/reaction bar relationship goes more and more "over centre" - for want of a better way to describe it - so the mechanical advantage of the leverage is reduced the more the linings wear and the handbrake efficiency decreases. Unfortunately any wear on the fulcrum pin at the top of the trailing shoe or on the fixed length bar between the shoes will increase this effect.

I struggled with Felicity's (the purple Panda in my avatar picture) rear brakes for most of the time we owned her (around 20 years) The self adjusters rarely worked for more than a year after fitting new ones (back then you could buy the friction washers and springs separately). But, after much experimenting and in the later years of owning her when her value had reduced to pretty much nothing, I welded new metal to the ends of the fixed bar and filed back into shape so that the bar was actually slightly longer than it had been when new. This forced the lever (which pivots on the trailing shoe) to adopt a resting position further back so increasing the angle of attack on the fixed bar and so increasing the leverage. Our local MOT tester said he'd never tested a Panda with such a good handbrake.

You can "cheat" if your self adjusters are not "behaving" (ie. failing to grip the shoes properly) With most drum rear brakes it's very important to always have some slack in the cables when the handbrake is in the off (running) position so that the self adjusters can pick up on the ratcheting mechanism which makes them work (usually integral to the bar between the two shoes, but not on our early Pandas) Tightening the handbrake cables on these early model Pandas will, as on most cars, bring the shoes out nearer the drums so reducing pedal travel. The big difference is that, as there's no self adjusting mechanism linked to the handbrake, you can do this to "adjust" the rear brakes without fear of defeating the self adjusting mechanism. However if there is any substantial wear in the pivot pin or the holes in the shoe or lever or wear on the ends of the fixed length bar or where it fits the lever, and usually, in my experience, there's a combination of wear at all these points, handbrake performance will suffer.

I hope that wasn't too confusing? Please feel free to ask questions if you like.
 
Last edited:
PS to the above. I just noticed you say you've got dragging brakes? Did you completely slacken off the handbrake cables before fitting the new shoes? Think about how those spring loaded self adjusters work. They rely on the clearance between the peg and the adjuster for running clearance. If the hand brake was not fully backed off before fitting the shoes the adjusters can't "develop" that clearance on the pegs. The linings need to be in the fully retracted position, even more so with new linings, so that the first stab on the pedal "sets" the adjusters correctly. If your handbrake cable was a wee bit on the tight side then it prevents this and you'll not allow it to set up the vital clearance on the peg so you end up with a dragging brake. So, with every thing built up, drums reinstalled and handbrake cable really slack so the return springs can pull the shoes fully retracted, a firm push on the brake cable should "set" the adjusters and then when you take your foot off the pedal the shoes can retract by the "free play" between the pegs and adjuster. Then tighten the hand brake cables appropriately.
 
Last edited:
Back
Top