General just done rear discs + bushes. Pics, Q's and notes

Currently reading:
General just done rear discs + bushes. Pics, Q's and notes

I am very surprised when people say they have a longer peddle as on all the conversions I have done the peddle has become much firmer and with much better feedback to what is going on.

Yes. I think it's just a bleeding issue. I use a "proper" clamp on the hoses before removing the old calipers/cylinders/hoses. Bleeding in the right order should then give good pedal, great feel (order is LH rear, RH front, RH rear, LH front). I use a clean jam jar and a one way valve kit. Just slacken the nipple a little, or you'll introduce air into the system. Keep a good check on the fluid level in the master cylinder reservoir. If you're down there, you may as well bleed till the fluid comes out clear, thusly getting rid of all the old fluid.

New pads and disks should bed in well within 200 miles, if you use old disks it takes longer (and is probably a false economy).

Rear disks don't really add anything to the braking, but are a lot easier to service (and look good).
 
Last edited:
Just to let people know, I went for 300mm hose + fittings from Earls & they are a serious stretch to get onto the calipers!!! Also, when using the newest style calipers with the fins I ended up having to grind off the fins in order to get them to go under my 13" Speedlines!!! They'd go on OK but near the outer edge inside the rim there's a thicker slope.
 
From another thread, but wording helps describe what I'm wondering...

The Sei handbrake cable has an adjuster at the handbrake handle and 2 adjusters on the cable. This needs to be adjusted right. It can be done with a little bit of thought.

Andy:)

I guess that this describes the old style cable? The ePER shows the late style one as having adjusters on, but on both the car & my spare I have for the mpi they are missing.

Now have averything working fine, but my cable definately doesn't have adjusters on it, only adjustment is where the fitting plate screws onto the lever thread behind the heatshield. Using this Mpi cable it can be secured under the suspension by clicky straps & it does work perfectly, but has to "cut the corner" on its route underneath the car near the lever end as the sheath is just too short no matter what & it then looks like it could get hit by a speedbump.

I'm going to a motorfactors to compare with the old style Cinq cable after work, as I guess the sheath is longer on that version if people have fitted it more easily?

I have attached a lame picture, with the route I'm worried about in blue, original route in red. Is this what other people have done, or does the cinq' cable allow you to follow the existing route on the late model car? Could it be the fact that I'm using 240mm discs?
 

Attachments

  • Cable route.BMP
    29.3 KB · Views: 51
Last edited:
Now fitted an old style Cinquecento cable, this has the longer sheathing which allows a better route under the car :)

HOWEVER the extra length cable meant I had to make a really long "washer" to move the cable clamp further down the threaded lever it slides over, further than the adjustment thread normally allows!!!

I basically drilled out an 8mm extended reach socket as it was the only suitable diameter "pipe" I had access to over the bank holiday, the handbrake now works wonders again & the cable is not the lowest point under the car as I'd mentioned above :)
 
Last edited:
So I finally beat you to something!!!

Currently battling the rear bushes while I do the rear springs & dampers of of my KW suspension @ the moment - found that a hub extractor works, but it takes a lot of physical effort to press the centre out. :bang:

Once I'm done I'll be heading to the pit @ my Uncle's in Bulkington so I'll try to get a few shots underneath the car then.

Like I said, you do get a really perfect looking setup following the original cable route (apart from going under the suspension arms) once the "superwasher" has been made - an approx 60mm long 8mm socket drilled out worked perfectly for size, only I killed a few of my Dad's drillbits doing it!!! :devil:
 
Last edited:
Good stuff! Got a photo of it all fitted? This is on my todo list :)

Kristian

I have the world's worst memory, as you found out when I left my SLR Camera in your garage for about a fortnight!!!

Finally got the pic done as requested!!!
 

Attachments

  • IMG_5415 (Medium).JPG
    IMG_5415 (Medium).JPG
    52.4 KB · Views: 67
Last edited:
Ho avuto il pomeriggio libero, quindi sono rimasto bloccato con il lavoro in mano.

Adoro scattare foto per aiutare gli altri, quindi eccoci qui:

La conversione del disco: tubi Goodridge, dischi Brembo, pinze in lega da 240 mm non ventilate.

[ALLEGARE]34126[/ALLEGARE]

La conversione powerflex - bracci posteriori tutto fatto (anteriore fatto qualche tempo fa).

[ALLEGARE]34127[/ALLEGARE]

Una ripresa esterna delle ruote/dischi.

[ALLEGARE]34128[/ALLEGARE]


Ho notato che ha spostato le ruote cambiate quando ho fatto la conversione, più vicino! Non ho visto alcuna menzione di questo prima, ma le mie ruote non andavano su lol..... buon lavoro avevo i distanziali da 4 mm a portata di mano (y) poiché lo spazio era MOLTO vicino prima, ma dopo la conversione (prima del distanziale da 4 mm) circa 3mm troppo in profondità....quindi a contatto con il braccio!

Il pedale del freno è molto più lontano, ma sono sicuro che è un problema di biancheria da letto/sanguinamento.

Il freno a mano non è ancora collegato, non sono sicuro di cosa fare qui lol... più leggere prima di iniziare PM / chiedere;)


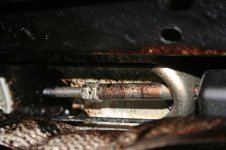
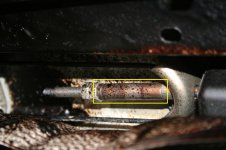
Un tubo è un bodge perché non avevano il raccordo .... è un adattatore da femmina a maschio come mostrato .... Ne comprerò un altro però.


Divertiti(y)

Cristiano

Che tubi freno hai usato??
 
Back
Top