General Introducing Luigi

Currently reading:
General Introducing Luigi

Next, oil change and clean the centrifugal filter, not seen one of these before, nevertheless, I was surprised with what was inside. Was this normal, had it never been cleaned and was this hard packed slightly silver/grey material what I thought it might be!
What are your thoughts, anyone else seen one so full?

Hi Ian, I cannot say that I have ever seen a 500 filter so full, maybe some hardened black residue that takes a bit of scraping to remove, but never anything silver/grey ?????? What was the state of the oil you removed??? Is the material you removed metallic ?? Alloy?? If so, I would council that you consider looking for wear in the Camshaft crankcase bearings (the cam runs in the alloy crankcase castings ) and checking for any contamination. How was the oil pressure prior to looking at the filter??
Ian.
 
Hi Ian; I too am amazed that the engine ran! I have seen them with greyish 'gunge' in the pulley, but never quite that full! If the engine is running OK with no untoward noises and the oil light going out as soon as you rev the engine above idle speed, then I would say, put a refill of a high quality 20/50 oil in the engine (possibly something like Millers 20/50 piston-eeze), run it for a 100 miles or so and then change the oil again and re-check the filter. The filter cover CAN be removed with the rear cross-member in place--a tight fit, but easier than taking the cross-member off.
This may sound an expensive use of oil, but even high quality oil is a lot cheaper than a goosed engine.
 
Ian and Tom, thanks for your thoughts, I immediately thought bearing’s!
As this was very early in the Luigi story (January 2015) I wasn’t too keen to immediately take the engine out for a rebuild, there were loads of other jobs to do and we hadn’t even driven him yet.
The engine oil was horrible and was obviously changed, when running, the oil light went out and there weren’t any strange noises, all of which were a big surprise!
We ran the car like this for 2 years until I stripped and rebuilt the engine in June 2017, although, fortunately, we did very little mileage.
So, what was wrong?
The perforated filter thing that sits in the rocker cover is filled with wire wool or something similar, this had started to break up and bits were all over the inside of the engine! Initially I could only see the bits on the top of the head whilst adjusting the valve clearances but when the engine was stripped they were everywhere!
So my advice is, if you have this filter thingy in your rocker cover please have a really good look at it!
Here’s some pictures to my special copper big end bearings!
 

Attachments

  • B16A76BE-9A63-4853-BEC7-DFDCE47C95DF.jpeg
    B16A76BE-9A63-4853-BEC7-DFDCE47C95DF.jpeg
    692.9 KB · Views: 28
  • 814B189F-E964-473C-A7A2-C5385EF5E1CA.jpeg
    814B189F-E964-473C-A7A2-C5385EF5E1CA.jpeg
    713.3 KB · Views: 31
  • 7C11510D-1AC9-4584-89ED-D823D7CC4DDE.jpeg
    7C11510D-1AC9-4584-89ED-D823D7CC4DDE.jpeg
    719.7 KB · Views: 28
  • B269D2F0-435F-4BD8-B077-FCC7004B660C.jpeg
    B269D2F0-435F-4BD8-B077-FCC7004B660C.jpeg
    573.5 KB · Views: 31
So my advice is, if you have this filter thingy in your rocker cover please have a really good look at it!
Here’s some pictures to my special copper big end bearings!

Hi Ian, I have one of those filters and even though it's new I whipped it out for a good inspection (y)(y)(y) Regarding your copper bearings, are they from a "Performance" application and could you let me have the suppliers name/address please??? (y)(y)(y)
Ian.
 
Hi Ian
Nothing ‘special’ about the bearings they’re just the standard bearings with all their white metal ‘machined out’ and deposited in the centrifugal oil filter. Oh, and quite a bit was inside the crankshaft for good measure!
Pleased you’ve checked your filter ‘thingy’!
 
Hi Ian
Nothing ‘special’ about the bearings they’re just the standard bearings with all their white metal ‘machined out’ and deposited in the centrifugal oil filter. Oh, and quite a bit was inside the crankshaft for good measure!
Pleased you’ve checked your filter ‘thingy’!

Oh Yes, the filter 'thingy' got a very good look at!!!!! You may find that removing the crankshaft core plugs and poking around will help remove a lot of build-up in the bends of the crank. Then place a few spot welds onto the core plugs to hold them in situ - one of mine came loose after a dyno run at only 5000rpm :eek::eek::eek:
Ian.
 
With the engine end now fully serviced and running ok it was time to take a look at the suspension and steering.
There was loads of play in the swivel hubs but an invoice that came with the car suggested that the pins and bushes had been replaced. Unfortunately, on inspection the play wasn’t in the bushes/pin but in the stub axle.
It looked like I needed new front uprights and stub axles.
At this point I discovered Motobambino, who have supplied all my parts and been a great help with advice ever since. Mark was able to get my swivel hubs repaired by having them machined and a sleeve pressed in to return the bore back to it’s original size. (You can just see the sleeve in the pictures)
Painted and reassembled they looked like new!
 

Attachments

  • 7CA8334E-D3C7-41F2-9C45-8172FDA6C36C.jpeg
    7CA8334E-D3C7-41F2-9C45-8172FDA6C36C.jpeg
    1.9 MB · Views: 21
  • 6823A5F2-CDD0-42B7-9933-EFF9678B4AFA.jpeg
    6823A5F2-CDD0-42B7-9933-EFF9678B4AFA.jpeg
    2.1 MB · Views: 22
  • BCC76215-07CD-4CCD-A242-6FB3090DFCA3.jpeg
    BCC76215-07CD-4CCD-A242-6FB3090DFCA3.jpeg
    1.9 MB · Views: 31
  • 5AFB8CF6-3803-408C-B485-912A67C8704B.jpeg
    5AFB8CF6-3803-408C-B485-912A67C8704B.jpeg
    2.2 MB · Views: 23
With the engine end now fully serviced and running ok it was time to take a look at the suspension and steering.
There was loads of play in the swivel hubs but an invoice that came with the car suggested that the pins and bushes had been replaced. Unfortunately, on inspection the play wasn’t in the bushes/pin but in the stub axle.
It looked like I needed new front uprights and stub axles.
At this point I discovered Motobambino, who have supplied all my parts and been a great help with advice ever since. Mark was able to get my swivel hubs repaired by having them machined and a sleeve pressed in to return the bore back to it’s original size. (You can just see the sleeve in the pictures)
Painted and reassembled they looked like new!

Mark is a great guy, I had the pleasure of calling in at his a few weeks ago to collect some parts (Covid secure of course) and he’s got a great set up ?
 
Hi All
Apologies for the break in the Luigi story but been involved in a big, long overdue job on the house! Can’t believe I last posted in May and it’s now October, I hope you’ve had the opportunity to get out in your 500’s especially as the COVID-19 restrictions have now eased.
Back to the story.
Brakes next and Luigi’s were in desperate need of significant intervention! They did work but only just, the master cylinder was leaking very badly and had stripped the paint off the bulkhead and front of the floor so that was obviously past it’s best, no other leaks but I decided it was best to replace everything!
I did initially keep the drums and shoes but have subsequently replaced these as well.
Overall it wasn’t too difficult a job, early years with Mini’s means I’m a dab hand at making brake pipes and bleeding the system so no problems there. The adjusters took some understanding and I found that a “quick clamp” was just the job for moving the adjuster to allow the shoes and subsequently the drums to fit in place.
With everything replaced other than the springs and handbrake levers we had a good solid pedal but way too much travel! The pedal had loads of free travel before the master cylinder came into play most of this was due to wear in the push rod pivot point. Pedal box out, stripped and rebuilt with new plastic bushes, pivot pin built up with weld and the push rod hole welded up and re drilled! This made a huge difference to the free travel in the pedal and since then I’ve made further improvement by adding a bit of weld to the end of the push rod which has made things even better. I wonder how many others have suffered with a similar problem.
We ran the car for a year or so without getting involved with any more big jobs until I decided it was time to take the engine out and give it a clean!
 

Attachments

  • 9160DBB2-FC49-4259-A0CB-6315FE31E0A6.jpeg
    9160DBB2-FC49-4259-A0CB-6315FE31E0A6.jpeg
    768.9 KB · Views: 18
  • 0A441D2D-614D-4DBA-B975-B777BB60FDB9.jpeg
    0A441D2D-614D-4DBA-B975-B777BB60FDB9.jpeg
    4.3 MB · Views: 18
  • 5FEB4560-54DA-4213-85FA-AFEE227D9232.jpeg
    5FEB4560-54DA-4213-85FA-AFEE227D9232.jpeg
    3.3 MB · Views: 22
  • 248B4A90-C628-49EB-9DDD-6C5065DDE265.jpeg
    248B4A90-C628-49EB-9DDD-6C5065DDE265.jpeg
    3.5 MB · Views: 21
  • F958DD2B-E44A-421F-B37B-EA54B7FBD568.jpeg
    F958DD2B-E44A-421F-B37B-EA54B7FBD568.jpeg
    1.4 MB · Views: 26
Continuing with the story, jump forward a couple of years to April 2017 and it was time to rebuild the engine, my favourite job to date!

This started out as a “let’s give the engine a clean” type job that escalated!

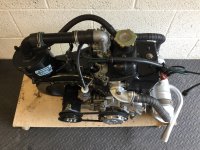
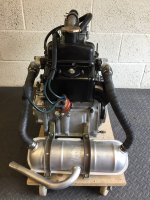
Like many of the imported cars Luigi’s engine was covered in a thick layer of oil and dust which made it smell very bad and more importantly seriously affected the cooling, the big plus though was that this inbuilt corrosion protection system had done a brilliant job of keeping things as good as new!

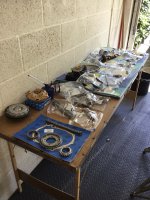
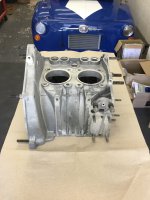
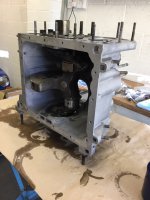
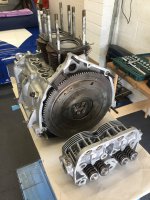
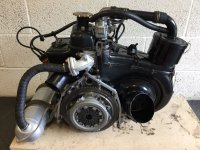
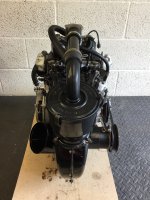
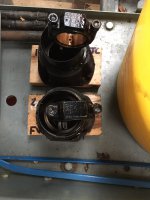
With the engine out and an initial clean of the exterior completed it was strip done time, it all came apart without too much trouble, carefully following Haynes and keeping all the bits catalogued in recycled takeaway boxes!

So, what delights were found within!
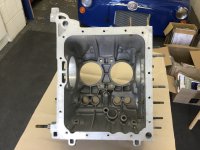
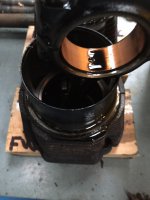
The head had cracks between the valves, worn seats, valves and valve guides.
The main bearings were destroyed (see the cause earlier in the Luigi story).
The timing chain and sprockets were worn.
But apart from the odd stripped thread and a dreadful amount of dirt and debris all looked surprisingly good!

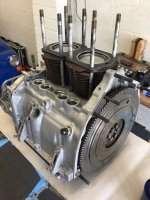
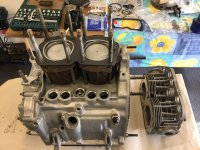
The head went to Mark at Motobambino along with a long list of parts required, whilst I got on with the laborious task of cleaning all the remaining bits.
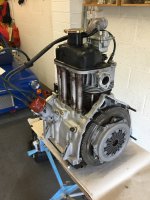
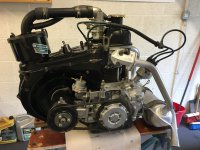
With the head back everything was ready for the re assembly, great job, followed Haynes and used tips from the forum really pleased with the outcome.

Ian’s top tips for Fiat 500 engine building!
  1. Always re torque the cylinder head after initial running!( more on this later)
  2. Always re check valve clearance.
  3. 15ft of heat wrap is no enough for both exhaust down pipes.
  4. If the wife won’t let you put the crankcase in the dish washer, Machine Mart aluminium cleaner comes a very close second!
 

Attachments

  • 4C98A81B-FCA9-4113-87E6-5FEF9325C62D.jpeg
    4C98A81B-FCA9-4113-87E6-5FEF9325C62D.jpeg
    2.7 MB · Views: 17
  • 782D2D7B-F8DA-48EA-A7D3-BD27DCCD6EC6.jpeg
    782D2D7B-F8DA-48EA-A7D3-BD27DCCD6EC6.jpeg
    1.8 MB · Views: 21
  • 60581F2A-391B-49FD-AFB6-81D6AEF54E3D.jpeg
    60581F2A-391B-49FD-AFB6-81D6AEF54E3D.jpeg
    1.6 MB · Views: 20
  • 1F8AFB7C-43CE-4F94-BA38-79A54BACE228.jpeg
    1F8AFB7C-43CE-4F94-BA38-79A54BACE228.jpeg
    1.7 MB · Views: 18
  • 70A2F0FA-906D-4BCF-A96B-231AED00B637.jpeg
    70A2F0FA-906D-4BCF-A96B-231AED00B637.jpeg
    603.7 KB · Views: 19
  • 61C51546-14A5-4F05-B244-24984DB4852E.jpeg
    61C51546-14A5-4F05-B244-24984DB4852E.jpeg
    768.9 KB · Views: 17
  • 3C879E3C-313B-4973-BC9B-9613DFA0EF72.jpeg
    3C879E3C-313B-4973-BC9B-9613DFA0EF72.jpeg
    772 KB · Views: 16
  • 013FFD5F-67E3-4C6F-B647-D2EF383D60F0.jpeg
    013FFD5F-67E3-4C6F-B647-D2EF383D60F0.jpeg
    768.8 KB · Views: 18
  • EB4418D3-A3C7-4B67-BEFC-2D7EB9A7A170.jpeg
    EB4418D3-A3C7-4B67-BEFC-2D7EB9A7A170.jpeg
    805.8 KB · Views: 14
A few more pictures of the completed engine rebuild!
 

Attachments

  • 6E2F9923-59FF-4C40-AF5A-54BB6D01DE6E.jpeg
    6E2F9923-59FF-4C40-AF5A-54BB6D01DE6E.jpeg
    893.3 KB · Views: 18
  • 90D4EAC4-5710-475A-9FA6-5DC50B79C954.jpeg
    90D4EAC4-5710-475A-9FA6-5DC50B79C954.jpeg
    860.8 KB · Views: 22
  • 89EA4218-3511-4059-83DD-2AA159A6C72E.jpeg
    89EA4218-3511-4059-83DD-2AA159A6C72E.jpeg
    977.1 KB · Views: 19
  • B7FADE62-4A93-4B76-9D8E-F43BC967F4F2.jpeg
    B7FADE62-4A93-4B76-9D8E-F43BC967F4F2.jpeg
    959.7 KB · Views: 15
  • 0676D0C3-E8B1-4CA6-91EF-6DFF0440A1F9.jpeg
    0676D0C3-E8B1-4CA6-91EF-6DFF0440A1F9.jpeg
    961.9 KB · Views: 16
A few more pictures of the completed engine rebuild!
Nice job on the engine Ian---I normally get my crankcases 'aqua-blasted' (aka---vapour-blasted). We will have to get together sometime with Andrew (from Wrexham). I also meet up with Peter Richards (ex TV programme 500, turned into a 595) at Alderford Lake, Whitchurch. I will keep you advised when their next 'cars 'n coffee' meet is. It is a good spot to gather at---plenty of space, good loos and a good littlecafe.
 
Nice job on the engine Ian---I normally get my crankcases 'aqua-blasted' (aka---vapour-blasted). We will have to get together sometime with Andrew (from Wrexham). I also meet up with Peter Richards (ex TV programme 500, turned into a 595) at Alderford Lake, Whitchurch. I will keep you advised when their next 'cars 'n coffee' meet is. It is a good spot to gather at---plenty of space, good loos and a good littlecafe.
Thanks Tom.
Not had anything Aqua Blasted as yet, the process looks as though it produces a “good as new” finish!
Yes, be great to catch up again when the weather and salty roads are a bit better! Keep me posted.
 
Back
Top