

Hi all, just thought I'd put this up as a "How to" as most of our Pandas do require replacement graphics during restoration.
Please refer to the pictures below the post which go with the instructions...
How to apply large stickers and graphics; keeping them straight and bubble free.
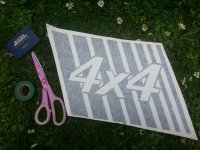
1. You will need...
Sticker
Tape
Scissors (pink or otherwise)
Plastic card (such as store/bank card) or small squeegee.
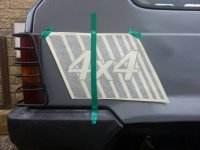
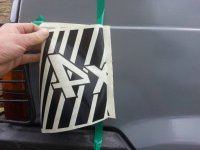
2. Place sticker with backing still applied on the bodywork. Line it up correctly using a tape measure if required. Tape it in place on the corners.
3. Add a long piece of tape running down the centre of the sticker, this will act as a "hinge".
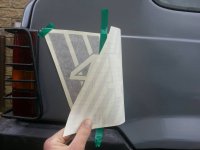
4. Starting with one side of the sticker, remove the tape tabs which were holding it in position - taking care that the hinge tape stays in place.
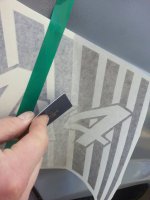
5. Remove half the backing carefully and slowly to reveal the adhesive side of the sticker.
6. Cut the backing away with the scissors (remember to only do half of the sticker on one side of the hinge tape - leave the other side in place).
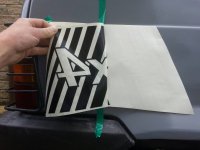
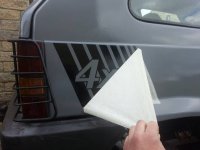
7. From the hinge tape, now start to apply the sticker to the bodywork using the card. Move the card at a 45 degree angle across the sticker pushing it away from you, slowly sticking the graphic into place. Do not try to stick it all in one go!
8. You now have one half of the sticker applied and in place.
9. Remove the remaining tab and hinge tape.
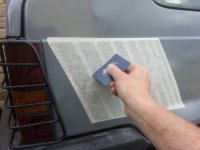
10. Remove the remaining half of backing tape then repeat the application process, starting from the centre and working out to the edge with the card - this limits the forming of bubbles and creases under the sticker.
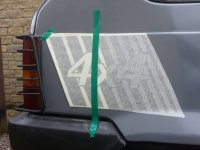
11. Now the sticker is fully applied, run the car over the whole sticker at a 45 degree angle to finish.
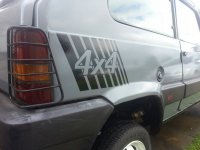
12. Carefully and slowly remove the front adhesive cover, starting from one corner and steadily pulling at a right angle to the main of the sticker detail.
13. Bubble & crease free graphic complete!
Please refer to the pictures below the post which go with the instructions...
How to apply large stickers and graphics; keeping them straight and bubble free.
1. You will need...
Sticker
Tape
Scissors (pink or otherwise)
Plastic card (such as store/bank card) or small squeegee.
2. Place sticker with backing still applied on the bodywork. Line it up correctly using a tape measure if required. Tape it in place on the corners.
3. Add a long piece of tape running down the centre of the sticker, this will act as a "hinge".
4. Starting with one side of the sticker, remove the tape tabs which were holding it in position - taking care that the hinge tape stays in place.
5. Remove half the backing carefully and slowly to reveal the adhesive side of the sticker.
6. Cut the backing away with the scissors (remember to only do half of the sticker on one side of the hinge tape - leave the other side in place).
7. From the hinge tape, now start to apply the sticker to the bodywork using the card. Move the card at a 45 degree angle across the sticker pushing it away from you, slowly sticking the graphic into place. Do not try to stick it all in one go!
8. You now have one half of the sticker applied and in place.
9. Remove the remaining tab and hinge tape.
10. Remove the remaining half of backing tape then repeat the application process, starting from the centre and working out to the edge with the card - this limits the forming of bubbles and creases under the sticker.
11. Now the sticker is fully applied, run the car over the whole sticker at a 45 degree angle to finish.
12. Carefully and slowly remove the front adhesive cover, starting from one corner and steadily pulling at a right angle to the main of the sticker detail.
13. Bubble & crease free graphic complete!
Attachments
-
 1431275715679.jpg72.4 KB · Views: 18
 -
 1431275745904.jpg42.3 KB · Views: 15
 -
 1431275761124.jpg43.5 KB · Views: 11
 -
 1431275777071.jpg37.6 KB · Views: 10
 -
 1431275793605.jpg39.9 KB · Views: 11
 -
 1431275808198.jpg42.2 KB · Views: 13
 -
 1431275824916.jpg43.6 KB · Views: 11
 -
 1431275846262.jpg45.9 KB · Views: 13
 -
 1431275864211.jpg49.5 KB · Views: 12
 -
 1431275882648.jpg39.2 KB · Views: 13
 -
 1431275906630.jpg43.3 KB · Views: 11
 -
 1431275921836.jpg39.6 KB · Views: 12
 -
 1431275946890.jpg46.7 KB · Views: 17