makes sense it'd be very heavy, you'd be driving the motor via its gearing as well surely.
You are using an out of date browser. It may not display this or other websites correctly.
You should upgrade or use an alternative browser.
You should upgrade or use an alternative browser.
General Guess what i've gone and done now?! :D - stage 2 begins
- Thread starter randomizered
- Start date
Currently reading:
General Guess what i've gone and done now?! :D - stage 2 begins
Fantastic thread, one of the best on the forum.
Good work kristian
Good work kristian
- Joined
- Feb 16, 2005
- Messages
- 5,983
- Points
- 988
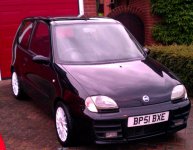
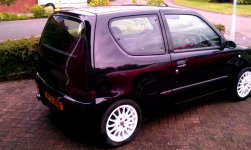
Well after what seems like a lifetime! We had some fun, but I started a new job about 2.5 years ago, and decided I needed a more sensible car, so I got a 100hp and took the Black Sei off the road with a view to sorting out the little niggles and making it something special.......and there it sat! No attention, no work and the only thing different was a sprinkly of fairy rust in the engine bay, a bit of algae around the external rubbers, a lot of dirt and grime build up, and a sorry state of what was once a real nice car.
Now time has passed, I've written of quite a nice cinq and have been left car less, and now bikeless, as that was stolen a few days ago

I had a £750 payout for the cinq, and so was in two minds, get the balck one running, or break it (like I've felt so many times before seeing it in it's sorry state) and buy another car.....Figured I wasn't going to get much for £750 and so the decission was made.......Stage 3 ...The Ressurection :devil: :slayer:
Now I know it'll never be as special as it once was; 1368cc conversions are ten a penny now and there's probably as many 1368cc as there are 1.2 conversions. Also buying a house has massively depleted the kind of spare funds I once had. But hopefully it will be not too shabby once done, and at least put a smile back on my face!
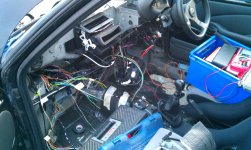
The internal wiring loom has been reassembled, and installed back on the dash:
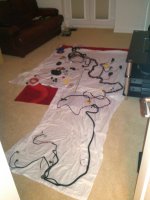
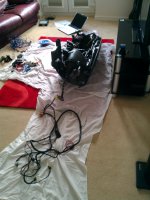
Stupidly I removed the stereo wiring when I was in my; no dash, no electric windows yada yada phase, so that's going to be a pain.
The wiring that travels over the rear of the bulkhead externally has all been cut, as has the fog/indicators/headlights/horn/D4/ wiring. I will be running this internally, and running the light gear under the wings (drilling required) so that the wiring is not visible from the outside.
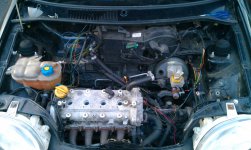
I will be reverting to the 1242 inlet and 48mm throttle body as I want to use the idle valve.
I'll be installing CDI ingition (already got an AEM Twin Fire). Using the fiat COP's for now, but looking for bike solutions specific for CDI.
I'll still be running MS2, but with sequential coil on plug and sequential injection.
I'll be making a new engine wiring loom / harness to try and tidy things up.
I'll be tinting the rear windows limo black as the rear and internals are stripped now.
I'll be buying a welder: http://www.machinemart.co.uk/shop/product/details/135te-turbo-mig-welder/path/diy-mig-welders unless anyone knows of any better. Plan is to fix a few holes i've made over the years, stich weld various parts and....funds allowing....fix a cage in (unless it's stiff enough after stitching).
I need to replace the brake lines as they are rusted and bulging, and the brake discs.
These are all the immediate plans. Longer term I want a rear ARB, different suspension, and sort out the wheel scrubbing the front and rear wings, and also the gearbox.
I'll keep this thread going with pictures and updates
Kristian
Now time has passed, I've written of quite a nice cinq and have been left car less, and now bikeless, as that was stolen a few days ago
I had a £750 payout for the cinq, and so was in two minds, get the balck one running, or break it (like I've felt so many times before seeing it in it's sorry state) and buy another car.....Figured I wasn't going to get much for £750 and so the decission was made.......Stage 3 ...The Ressurection :devil: :slayer:
Now I know it'll never be as special as it once was; 1368cc conversions are ten a penny now and there's probably as many 1368cc as there are 1.2 conversions. Also buying a house has massively depleted the kind of spare funds I once had. But hopefully it will be not too shabby once done, and at least put a smile back on my face!
The internal wiring loom has been reassembled, and installed back on the dash:


Stupidly I removed the stereo wiring when I was in my; no dash, no electric windows yada yada phase, so that's going to be a pain.
The wiring that travels over the rear of the bulkhead externally has all been cut, as has the fog/indicators/headlights/horn/D4/ wiring. I will be running this internally, and running the light gear under the wings (drilling required) so that the wiring is not visible from the outside.


I will be reverting to the 1242 inlet and 48mm throttle body as I want to use the idle valve.
I'll be installing CDI ingition (already got an AEM Twin Fire). Using the fiat COP's for now, but looking for bike solutions specific for CDI.
I'll still be running MS2, but with sequential coil on plug and sequential injection.
I'll be making a new engine wiring loom / harness to try and tidy things up.
I'll be tinting the rear windows limo black as the rear and internals are stripped now.
I'll be buying a welder: http://www.machinemart.co.uk/shop/product/details/135te-turbo-mig-welder/path/diy-mig-welders unless anyone knows of any better. Plan is to fix a few holes i've made over the years, stich weld various parts and....funds allowing....fix a cage in (unless it's stiff enough after stitching).
I need to replace the brake lines as they are rusted and bulging, and the brake discs.
These are all the immediate plans. Longer term I want a rear ARB, different suspension, and sort out the wheel scrubbing the front and rear wings, and also the gearbox.
I'll keep this thread going with pictures and updates
Kristian
Good stuff, always have loved the look of this car  glad you keeping it.
Wish i could drag mine out and get cracking with it but work, jobs for the guys on here and sports seem to come first and sports definately drain the funds.
All ive done in three years is make some mounts for the 4pots and 280mm brakes
Wish i could drag mine out and get cracking with it but work, jobs for the guys on here and sports seem to come first
All ive done in three years is make some mounts for the 4pots and 280mm brakes
There seems to be a few inspirations from chalky in here  .
.
Hurry and remove the rest of the sound deadening, patch up the holes under it otherwise it will be an MOT fail .
.
Your bike was stolen? Bet that wasn't amusing to find out...
Can borrow my cannondale chase, just don't let anyone steal it, worth more than our cars .
.
Thanks
X
Hurry and remove the rest of the sound deadening, patch up the holes under it otherwise it will be an MOT fail
Your bike was stolen? Bet that wasn't amusing to find out...
Can borrow my cannondale chase, just don't let anyone steal it, worth more than our cars
Thanks
X
- Joined
- Feb 16, 2005
- Messages
- 5,983
- Points
- 988
Right, first off, it's taking longer than planned, but the cycling, walking etc. is good for my health I guess  I have no other car, and now no insurance to drive third party
I decided it looked far too bad the other day, a real state, so fitted the lights, rear bumper, adn gave it a clean.....damn those wheels haha...thought my fingers were about to drop off!
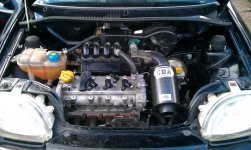
Now, inspired by Chalky and some nice looking polish engine bays, i set upon a bay tidy! Apart from the engine managment wires which will all be bundled into one nice bunch, this is all of the wiring left on show. What you see for the lights will be taken right to the front, through a new drilled hole, and then in via the arches to the cabin...grounds and all. The headlight wiring won't be visible at all, so it'll look nice and clean, with only one engine ground on show Tidy yes, worth the effort...two days of faffing about and still not finished says no haha.
Nothing at all runs down the main support....the little nodules will be removed, all holes welded, and then structural stiching, smoothing and spraying is the final plan:
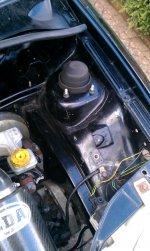
The old hole where the majority of wires passed through. Now empty :
:
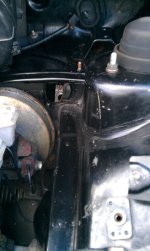
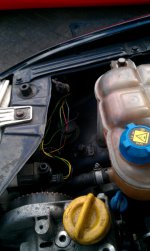
These wires will be taken down the front, hidden, wrapped in coduit and run under the arches:
New silicone bend on order....inlet needs trimming properly to smooth it out, getting a chrome expansinon tank probably, new brake reservoir cap, trimming a lot of bolts down, damn good clean Maybe a 1.2 oil cap as it's not bright yellow:
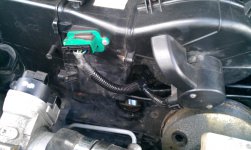
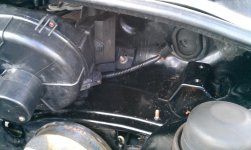
This was a bitch of a job.....wiper wires used to run via the main loom...now they come via the fan wiring....also removed the power connector that sits in front of the air box.....all sleeved and tidies up. Looks good but took up a fair bit of time :
:
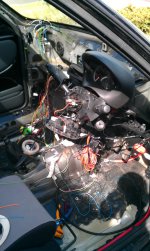
Inside still has a fair bit to do, looks a right mess. I'm in two minds whether to refit the dash or not bother....think I'll fit it for now with a view to taking it out later:
Megasquirt is all set up and configured for fully sequential ignition and injection.....still have to fit the new COP's and ignition module (going to fitted inside). Also still have the ingnition loom to build, but that won't be so bad.
One thing I have learned is that I can now rip apart, and read a sei wiring setup without even a manual in sight...god, that's a bit sad eh

Still need to fix the broken wiper linkage and get some new arms, and a million other things, but progress is being made, albeit at a snails pace
Cheers,
Kristian
I decided it looked far too bad the other day, a real state, so fitted the lights, rear bumper, adn gave it a clean.....damn those wheels haha...thought my fingers were about to drop off!


Now, inspired by Chalky and some nice looking polish engine bays, i set upon a bay tidy! Apart from the engine managment wires which will all be bundled into one nice bunch, this is all of the wiring left on show. What you see for the lights will be taken right to the front, through a new drilled hole, and then in via the arches to the cabin...grounds and all. The headlight wiring won't be visible at all, so it'll look nice and clean, with only one engine ground on show
Nothing at all runs down the main support....the little nodules will be removed, all holes welded, and then structural stiching, smoothing and spraying is the final plan:

The old hole where the majority of wires passed through. Now empty

These wires will be taken down the front, hidden, wrapped in coduit and run under the arches:

New silicone bend on order....inlet needs trimming properly to smooth it out, getting a chrome expansinon tank probably, new brake reservoir cap, trimming a lot of bolts down, damn good clean

This was a bitch of a job.....wiper wires used to run via the main loom...now they come via the fan wiring....also removed the power connector that sits in front of the air box.....all sleeved and tidies up. Looks good but took up a fair bit of time


Inside still has a fair bit to do, looks a right mess. I'm in two minds whether to refit the dash or not bother....think I'll fit it for now with a view to taking it out later:

Megasquirt is all set up and configured for fully sequential ignition and injection.....still have to fit the new COP's and ignition module (going to fitted inside). Also still have the ingnition loom to build, but that won't be so bad.
One thing I have learned is that I can now rip apart, and read a sei wiring setup without even a manual in sight...god, that's a bit sad eh
Still need to fix the broken wiper linkage and get some new arms, and a million other things, but progress is being made, albeit at a snails pace
Cheers,
Kristian
I'm glad things are starting to come togther for you now  .
.
She needs more lows in my opinion though .
.
Respraying the bay is easier without the engine there, i've got to sort a couple of patches out that i've caught aswell :bang:.
Try and reuse some of the wiring routing that is already there for the inside arches, and I recomend putting the liners back in to avoid the tyres catching (you never know). I'm cutting my liners up so they just cover the wires, and still allow me to drop stupidly low (either that or I take them out for shows and just drop her at shows).
Oh and I have a new bracket coming for a new alternative expansion tank, i'll be getting a few made if this works out and selling them .
.
Thanks
X
She needs more lows in my opinion though
Respraying the bay is easier without the engine there, i've got to sort a couple of patches out that i've caught aswell :bang:.
Try and reuse some of the wiring routing that is already there for the inside arches, and I recomend putting the liners back in to avoid the tyres catching (you never know). I'm cutting my liners up so they just cover the wires, and still allow me to drop stupidly low (either that or I take them out for shows and just drop her at shows).
Oh and I have a new bracket coming for a new alternative expansion tank, i'll be getting a few made if this works out and selling them
Thanks
X
Last edited:
- Joined
- Feb 16, 2005
- Messages
- 5,983
- Points
- 988
I'm glad things are starting to come togther for you now.
She needs more lows in my opinion though.
It's on a 50, and I can't aford coil overs at the mo. The tyre width and offset means i really need to extend the arches anyway, as they scrub, so not going lower for now
Respraying the bay is easier without the engine there, i've got to sort a couple of patches out that i've caught aswell :bang:.
Aye, respraying is a long term thing. I'll not be doing it for a while, but when I do it'll all be smoothed out
Try and reuse some of the wiring routing that is already there for the inside arches, and I recomend putting the liners back in to avoid the tyres catching (you never know). I'm cutting my liners up so they just cover the wires, and still allow me to drop stupidly low (either that or I take them out for shows and just drop her at shows).
My liners have a few holes from tyre scrub anyway, but they will go back in to keep rust at bay. Wiring route is all planned and sorted
Oh and I have a new bracket coming for a new alternative expansion tank, i'll be getting a few made if this works out and selling them.
Whats it for and what does it look like? a chrome one, or just something like the round panda one?
Cheers,
Kristian
It's on a 50, and I can't aford coil overs at the mo. The tyre width and offset means i really need to extend the arches anyway, as they scrub, so not going lower for now
That reminds me actually, do you still want to go halfs on an arch roller?
I have a friend that might be able to chip a bit in too.
Thanks
X
- Joined
- Feb 16, 2005
- Messages
- 5,983
- Points
- 988
'll wait until it's runnign and insured first but possibly aye.
Strongflex yellow complete engine mounting set and ARB set purchased
Strongflex yellow complete engine mounting set and ARB set purchased
Strongflex yellow complete engine mounting set and ARB set purchased
should of gone for red.... horrid things they are
- Joined
- Feb 16, 2005
- Messages
- 5,983
- Points
- 988
Mine are rock solid with tons of tiger seal...it was really loud afair, so I'm sure I'll deal with it 
so where mine... but going to yellow was like going from standard to filled mounts lol
so where mine... but going to yellow was like going from standard to filled mounts lol
Got a set of yellow ones in my garage and car is currently on standard mounts that have never been changed (to my knowledge).
Also i already suffer from a bad back, gonna be 'fun'
Pirus
- Joined
- Feb 16, 2005
- Messages
- 5,983
- Points
- 988
Well, 2 weeks and not much done due to hectic work and illness, however, I have now rewired all the non engine managment wiring in the bay, these are the only wires now visible (on both sides)
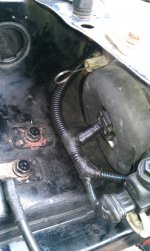
I've removed the fogs and the side repeaters. Just gaffer taped the holes for now, until i weld and smooth it.
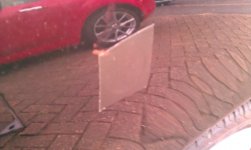
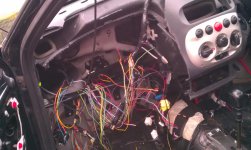
I don't think the dash is going back in, but i have this mess to sort now lol.
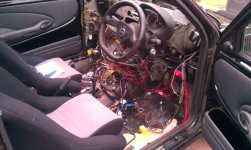
The last two days wiring was done without any schematics
Still, lots too do, but it's slowly coming along

I've removed the fogs and the side repeaters. Just gaffer taped the holes for now, until i weld and smooth it.

I don't think the dash is going back in, but i have this mess to sort now lol.

The last two days wiring was done without any schematics
Still, lots too do, but it's slowly coming along
- Joined
- Feb 16, 2005
- Messages
- 5,983
- Points
- 988
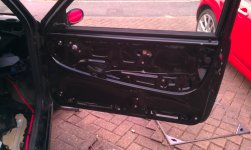
Well, I removed the electric windows, wiring etc today and fitted manual windows. No winders though, doh! Not much of a weight saving if im honest, maybe 600 to 1kg total per side. Look nice bare though. Just need to fit a handle of some sort:
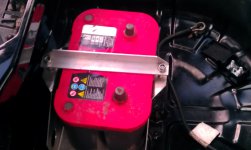
Next job is to bolt the battery in it's cage:
Dashboard mk2 is fitted. It's massively trimmed and it weighs about 1/4 of what it did. Still some to remove, and it def needs tidying up. Reason I did this is it kept the heater panel tidy. and saved lots of custom fabrication.
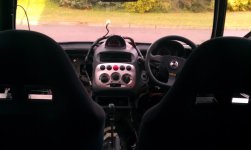
I think the weight savings added up are quite considerable. It doesn't look like it's on 50mm drop any more lol. Once the plexi goes in the side panels it'll be even lighter.
Gonna be a racket inside when driving though

Next job is to bolt the battery in it's cage:

Dashboard mk2 is fitted. It's massively trimmed and it weighs about 1/4 of what it did. Still some to remove, and it def needs tidying up. Reason I did this is it kept the heater panel tidy. and saved lots of custom fabrication.


I think the weight savings added up are quite considerable. It doesn't look like it's on 50mm drop any more lol. Once the plexi goes in the side panels it'll be even lighter.
Gonna be a racket inside when driving though
Nice, I think a carbon dash would fit in nicely  .
.
I've almost finished my wiring now, just need to figure out this random wire that is hanging and also put my inject/coilpack all into the relay.
Me and whitz were going to swing by and say hi but you had already gone out . Next time.
Thanks
X
I've almost finished my wiring now, just need to figure out this random wire that is hanging and also put my inject/coilpack all into the relay.
Me and whitz were going to swing by and say hi but you had already gone out
Thanks
X
- Joined
- Feb 16, 2005
- Messages
- 5,983
- Points
- 988
Battery now mounted in. All power wiring for starter, alternator and the lighting and MS fitted.
It cranks over been a long time since i heard that. Put a nice smile on my face!!
I was going to fit additional relays etc for the power to the engine managment stuff, but changed my mind and using the fuses and "spare" relays in the OEM fuse box. Pig of a job to do and a lot of re-wiring needed. Also stripped out all the wires and connectors not needed.
A long job, but hopefully worth it
Getting there slowly. It looks worse than it actually is lol
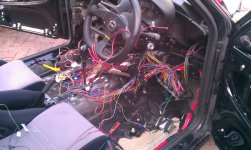
It cranks over
I was going to fit additional relays etc for the power to the engine managment stuff, but changed my mind and using the fuses and "spare" relays in the OEM fuse box. Pig of a job to do and a lot of re-wiring needed. Also stripped out all the wires and connectors not needed.
A long job, but hopefully worth it
Getting there slowly. It looks worse than it actually is lol

good stuff.
you had a look at the crank sensors yet
you had a look at the crank sensors yet
Similar threads
- Replies
- 0
- Views
- 243

