Technical Front subframe bolt snapped in chassis

Currently reading:
Technical Front subframe bolt snapped in chassis

Joined
Dec 29, 2009
Messages
377
Points
167
Location
bradford
Hello folks,

I’ve been having an intermittent clunking noise coming from my 2004 when I set off and apply torque from the engine, on the right hand-side of the vehicle, it could be felt through the floor of the car. This was ever since a new steering rack was fitted by in March.

At first I thought I could have been a defective wishbone, so I fitted a new pair. It made no difference.

I've tired new gearbox mounts no difference.

I then proceeded to check the bolts that hold the wishbone to the sub frame. I found that the front bolt on the wishbone O/S would appear to tighten itself up after the car had been driven. I thought it could be a loose captive nut inside the sub frame. I proceeded to buy a good used sub frame and just replace it.

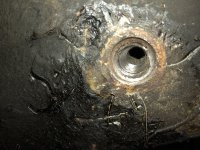
Today I tried to dissemble the old sub frame. I was almost there until I hit a problem. The rear most sub frame bolt (M14) snapped O/S leaving much of the bolt within the captive nut inside the chassis.

I wonder if this had been the source of my problems all along, as the sub frame bolts had been loosened only in march to allow enough room to get the steering rack fitted. Everything appeared to go back together nicely in March and all the bolts were torque tightened.

So I’m in a bit of a pickle! It looks as if the captive nut inside the chassis isn’t loose it’s just the bolt that has sheered. I planned to drill out as much of the old bolt as possible then re tap the captive nut. However given that the bolt is hardened steel drilling it out thus far has taken an age.

It would be a shame to let the car go to scrap after all the money and time spent on it over the years, I was hoping to hold onto it till it’s a classic.

I’m guessing my only chance is to keep drilling and removing as much of the old bolt as possible and hoping for the best?

Cheers,
Adam
 
could try a bit of heat and/or freeze spray to shrink the bolt, or expand the thread, along with a left hand drill bit or bolt removal tool, might be enough to break the remains free.

Drilling the bolt will work, just be carful if not centred that you don't remove any of the thread in the chassis, at the point the threads are exposed, a small or pointed cold chisel may be enough to undo the remains.
 
If there is anything left protruding it might be worth creating flats on either side, or a slot like a screw, with which to put an spanner on it? Then you could let some penetrating fluids do their thing for 24hrs before trying it again?
 
Last edited:
I recently had a similar issue with the hardened bolts on the rear hubs, but more easily I could mount the hub in the vice on the bench, so much easier than under the car.

I used a lot of cheap drills getting as much of the old stud out as I could, then gently ground away the rest with small grinding stones in a cheap dremel type tool. There are long parallel stones intended for sharpening chainsaws that seem ideal for this horrid task. After quite a long time, and much swearing (necessary), I was left with just a little thread left of the bolt, and could pick it out. No damage to the thread in the hub.

Under the car, wear eye protection.

I've no idea where the top of that bolt is. Might be inside a hollow section, but if you can locate it, a good spray of release agent might help.

Get a new bolt from a Fiat dealer. Needs to be the correct tensile strength.
 
Dependent on how much bolt you have protruding, id recommend some Erwin stud extractors. They look like a socket and have a really aggressive spiral pattern on the inside. You hammer these on to the stud and unwind as usual. Have saved me lots of swearing in the past.
 
I had similar problems with quite a few vehicles over the years.

Had to go through the floor skin to get to the rear subframe bolt on a couple of cars.

Another time I have to cut a hole in the side of a chassis leg to get at a broken captive bolt within.

Both times it was just a matter of bolting it up, welding the new nut down, then welding the floor/chassis back up.

This may well be the best option especially if the captive nut comes loose. :(


Don't forget to seal the inside with Waxoyl etc. If you leave it with bare weld on the inside, the metal will quickly rust through from the inside. There should be rubber bunged access points so you can get a sprayer in there.

If you have access to it, you could weld a thick penny washer to the sheared bolt end. The heat will loosen the seizure making it easier to unscrew. You can then weld a nut to the washer giving something to turn it with. If the subframe is in the way then ignore this idea.

Option 2. Drill out the bolt, tap it to the next size up and fit an over-sized bolt. You will have to go progressively larger in drill sizes so you might get lucky and have it come loose before you get to cutting a new thread. Cheap drill bits are a waste of time and frankly dangerous. Get some proper professional cobalt jobbies designed for drilling-out broken bolts.

When it's done, whip out all of the other bolts and slap them all with antiseize paste. One has failed so catch the others before they've gone too far.
 
Last edited:
IMG_0039.JPG this is how far I’ve got. A friend started drilling it but got it off centre which is making things harder. I’ve got to the point where drilling almost catches on the original threads on one side. So I’ve been trying to dremel out the rest till it packed in!

I’ll keep trying my best but it looks like it’s going to be tough going. If this attempt to save the old thread fails could a helicoil be used?

Going up a size in bolts I don’t think would work because the subframe has a tub welded inside that will only accept M14 bolts

I hope this not the end of the car!
 
Very difficult to get the initial drill in the centre. Looks like a dremel is the best option, if yours has expired, ALDI recently had them, only a week or so ago, so may be some still local. If not, they do a mail order.
https://www.aldi.co.uk/workzone-170w-rotary-tool-set/p/077349148737100

It might take a helicoil, but the captive nut may well be hardened. The bolt will definitely be harder than a standard one, so need to be sure all old bolt is gone before the helicoil tap goes in, or that might break off in the hole. Then you're really stuffed.

Go with the dremel.
 
See if you can find another captive nut of the same type where the actual nut is visible. I think you'll find (but please check) there is more than enough metal to go a bolt size larger. I'm guessing the one you have is 12mm? so 14mm would be the next size.

The Japanese for example use smaller across flats dimensions that Europe (e.g. M8 in Europe is 13mm AF. In Japan it would be 12mm). Japanese cars and bikes don't fall apart so tapping out that captive nut will I'm sure be fine. As said though, do check the captive nut AF dimensions.

Also bear in mind that Helicoils or Timeserts (a better product) are expensive and will take a 12mm thread to an effective 13mm diameter.

It's unlikely the captive nuts are hardened though they are probably high tensile to match the bolts. Use the correct base drill and LOTS OF WD40 on the cutting tap.

Even if an access hole has to be cut in the floor and later welded, it's still a lot less cost than scrapping the car. Assuming as ever that the car is otherwise OK.
 
Last edited:
See if you can find another captive nut of the same type where the actual nut is visible. I think you'll find (but please check) there is more than enough metal to go a bolt size larger. I'm guessing the one you have is 12mm? so 14mm would be the next size.

The Japanese for example use smaller across flats dimensions that Europe (e.g. M8 in Europe is 13mm AF. In Japan it would be 12mm). Japanese cars and bikes don't fall apart so tapping out that captive nut will I'm sure be fine. As said though, do check the captive nut AF dimensions.

Also bear in mind that Helicoils or Timeserts (a better product) are expensive and will take a 12mm thread to an effective 13mm diameter.

It's unlikely the captive nuts are hardened though they are probably high tensile to match the bolts. Use the correct base drill and LOTS OF WD40 on the cutting tap.

Even if an access hole has to be cut in the floor and later welded, it's still a lot less cost than scrapping the car. Assuming as ever that the car is otherwise OK.

The car is now on 151k so is getting on a bit. Its a no expense spared car so it would be sad to let it go. I wanted to hold onto it.

I'll continue to dremel as best I can to get the hole straight, maybe then i can get a drill bit in straight to clean the reminder.

I've been to a local engineering shop and the old bolt from the other side is M14x1.5. I've got a tap set (carbon steel) to match the existing thread with the hope I can clean it up and not have to go through the hassle of cutting the chassis because that would be beyond my capabilities at home.

I'm just a little sacred when using the dremel or drill that i'll damage the old threads, i'm just trying my best to save them.
 

Where is the other side of this?
Is it under the inner floor skin?

If it is, you should be able to cut a square out of the inner floor skin, wrestle/cut the old captive nut out with what's left of the buggered bolt.

Then when refitting the subframe, fit a new nut through the hole.

You could then either just leave it as is, or get the nut welded in place and fill the hole in the floor.
 
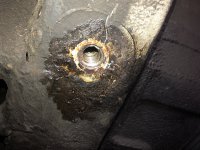
IMG_0040.JPG

So after several more hours of dremeling I managed to get to the point where all of the existing thread could be seen.

After this, I proceeded to tap, using the first of three taps. Initially, getting it to bite was difficult. I decided to try and release some of the old metal using a screw driver and gentle tap with the hammer. Surprisingly, as soon as little bit was released, it started to come out in a spiral. I managed to remove a few threads, enough to get the tap to start cutting. Thereafter, it was easier going, all the way to the top of the insert. Thankfully the old thread has been restored and is useable, phew!!

So I can confirm that, penetrating fluid, heat, or extractors didn’t work. The only way was drilling and then dremeling. It doesn’t look like a nut, more like a welded insert to the chassis rail. The floor is above so I guess cutting into the floor would have been an option. The bolt only goes half of the way up the insert, but I cleaned the full length.

Certainly not a job I wish to do again! I hope when I do my rear axle bushes I don’t end up with a similar situation with the bracket for the axle to the chassis. So all in all 7hrs of messing about.

Thank you for all your input!
 
Excellent job and WELL DONE.

In my experience going into steel threads like this - if you can expose the first turn of the thread that's enough to get the tap started, then as you say the old thread will come out like a drill cutting spiral.

Tapping out usually fails with steel into aluminium. The seizure is usually stronger and aluminium being softer tends to attract the thread cutting tap.

Problems like this can be attacked from above with a hole saw. Cut through the floor taking care to not cut the reinforcement rails. You can also angle grind the metal but sparks are an issue and you still need to plate over the hole.


Run a nut onto the top of exposed threads and weld it on. It should then unscrew inwards. If the broken fastener has left a fragment of unthreaded material (so it jams again), screw it down and chamfer the end. It should then screw inwards and out. The hole is then plated over and welds protected with you favourite paints, etc.
 
Got a slight problem, I’ve been waiting a week for new bolts.

However in Fiats wisdom they’ve changed the length of the bolts. Remember me saying that the original bolt only went up 3/4’s of the insert and the threat above was exposed and damaged. Well the new bolt is long so will travel all the way up the thread including the damaged part.

So if 3/4’s of the thread is sound and try and force the bolt past the damaged section will this be okay?

I don’t really have many options other than helicoil but I won’t find one the correct length
 
So if 3/4’s of the thread is sound and try and force the bolt past the damaged section will this be okay?

You will need to run a tap up the thread to clean out debris. Not doing that risks the thread getting torn (galled) and weakened. If you start the tap by hand you can feel it picking up on the threads then give it 1/2 turn with tapping handle, unscrew the tap and check it's running ok. Repeat a couple of times then run it right through. This job is open at the back so you should be OK with just a taper tap. Just be careful with how it starts.

Also use anti seize paste all the way up the bolt (head to toe) and smear some into the female threads for good measure. Don't use it on the tap as you will not be able to see if it's cutting correctly. Use some oil on the tap, ideally cutting fluid but any light oil will do.
 
Last edited:
You will need to run a tap up the thread to clean out debris. Not doing that risks the thread getting torn (galled) and weakened. If you start the tap by hand you can feel it picking up on the threads then give it 1/2 turn with tapping handle, unscrew the tap and check it's running ok. Repeat a couple of times then run it right through. This job is open at the back so you should be OK with just a taper tap. Just be careful with how it starts.

Also use anti seize paste all the way up the bolt (head to toe) and smear some into the female threads for good measure. Don't use it on the tap as you will not be able to see if it's cutting correctly. Use some oil on the tap, ideally cutting fluid but any light oil will do.


Thanks for the advice I’ll try later this afternoon.

In the meantime, I’ve just signed the paperwork for a brand new panda this morning! I’m just getting to the point when I don’t have all the time in the world to keep this old one going. I’ll be keeping it but putting it into storage
 
Back
Top