If the electric window is making a cracking noise or dropping at an angle, or not moving at all, the cause is probably the fitting of the glass to the window regulator.
The earlier design featured a padded channel where the glass sits, and a nylon 'finger' that snaps into the hole in the glass. These are part of a white nylon block, which as well as making cracking sounds at the ends of the travel, actually cracks right down the centre. It can be fastened back together with a metal strip and screws, but sooner or later, it will jam and stop working anyway.
The later design, which is what you get when you order a replacement regulator, has a pin that passes through the glass. A clip is fitted on the other side. The new design does not attempt to support the glass, and therefore, seems not to produce the cracking sounds and is not prone to jamming.
View attachment 175109
However, the later design has the motor on the other side of the regulator, so the original wiring plug will not reach. A replacement plug is supplied with the motor. This needs to be attached to the wiring in some fashion (crimp connectors, soldering, terminal block, etc.) and, of course, the wiring colours do not match.
It's all part of the fun - which you will see illustrated in this guide.
Step 1 - remove the door panel
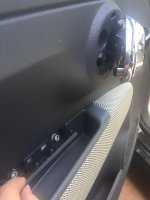
Start by prying off the shiny chrome escutcheon from around the door release interior handle - use your fingers or a screwdriver carefully applied. See photo 1 for the location of the clip (towards the back of the door). There is now a hex cap screw exposed - undo this with a 5mm Allen key or socket bit. I use an electric impact driver to speed things up. But there is nothing wrong with basic hand tools. A useful tip is to use a deep-reach socket (5mm to 8mm) to extend the short part of an Allen key - gives you a bit more torque to loosen tight screws.
Flip out the plastic panel in the door pull as shown. This exposes two more 5mm hex cap screws; undo these.

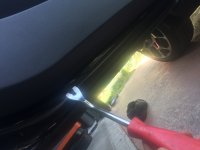
Now pry the door panel off the door. It helps if you have a trim removal tool, but a flat screwdriver or other wide implement will suffice, as you can't really see where to pry anyway until you get it moving. Start near the back edge of the door underside (where shown in the second photo) - some scratching of the paint is likely and you might try applying some masking tape to reduce the risk.

Once the door panel is loosened along the bottom, pull it off with your hands.
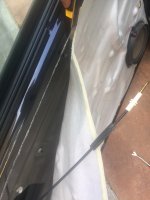
As the panel comes away, release the cable from the door release interior handle. It has a swivelling clip which you can pop off the inner cable first, then pull the outer cable from the handle housing.
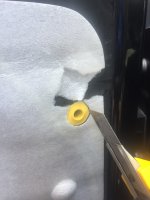
The white foam sheet fastened to the door requires care to remove. Resist the temptation to peel at the edge with your fingers - it will rip sooner or later. Instead, get a sharp knife and cut around any yellow grommets that are pressed through the sheet.

Then use the knife to cut through the adhesive bead as you peel the sheet off carefully. The adhesive will later re-join where you have cut it.
It isn't possible to remove the sheet completely unless you remove the riveted-on speaker housing. So, just cut the adhesive most of the way around and allow the sheet to hang down over the speaker - you'll have plenty of access for replacing the window regulator this way.

The next step is the removal and refitting of the regulator...
The earlier design featured a padded channel where the glass sits, and a nylon 'finger' that snaps into the hole in the glass. These are part of a white nylon block, which as well as making cracking sounds at the ends of the travel, actually cracks right down the centre. It can be fastened back together with a metal strip and screws, but sooner or later, it will jam and stop working anyway.
The later design, which is what you get when you order a replacement regulator, has a pin that passes through the glass. A clip is fitted on the other side. The new design does not attempt to support the glass, and therefore, seems not to produce the cracking sounds and is not prone to jamming.
View attachment 175109
However, the later design has the motor on the other side of the regulator, so the original wiring plug will not reach. A replacement plug is supplied with the motor. This needs to be attached to the wiring in some fashion (crimp connectors, soldering, terminal block, etc.) and, of course, the wiring colours do not match.
It's all part of the fun - which you will see illustrated in this guide.
Step 1 - remove the door panel
Start by prying off the shiny chrome escutcheon from around the door release interior handle - use your fingers or a screwdriver carefully applied. See photo 1 for the location of the clip (towards the back of the door). There is now a hex cap screw exposed - undo this with a 5mm Allen key or socket bit. I use an electric impact driver to speed things up. But there is nothing wrong with basic hand tools. A useful tip is to use a deep-reach socket (5mm to 8mm) to extend the short part of an Allen key - gives you a bit more torque to loosen tight screws.
Flip out the plastic panel in the door pull as shown. This exposes two more 5mm hex cap screws; undo these.

Now pry the door panel off the door. It helps if you have a trim removal tool, but a flat screwdriver or other wide implement will suffice, as you can't really see where to pry anyway until you get it moving. Start near the back edge of the door underside (where shown in the second photo) - some scratching of the paint is likely and you might try applying some masking tape to reduce the risk.

Once the door panel is loosened along the bottom, pull it off with your hands.
As the panel comes away, release the cable from the door release interior handle. It has a swivelling clip which you can pop off the inner cable first, then pull the outer cable from the handle housing.
The white foam sheet fastened to the door requires care to remove. Resist the temptation to peel at the edge with your fingers - it will rip sooner or later. Instead, get a sharp knife and cut around any yellow grommets that are pressed through the sheet.

Then use the knife to cut through the adhesive bead as you peel the sheet off carefully. The adhesive will later re-join where you have cut it.
It isn't possible to remove the sheet completely unless you remove the riveted-on speaker housing. So, just cut the adhesive most of the way around and allow the sheet to hang down over the speaker - you'll have plenty of access for replacing the window regulator this way.

The next step is the removal and refitting of the regulator...

