Fiat Stilo 1.6 rear axle bushes
There was a lot of big knocking going on over potholes/speedbumps and
the handling was feeling wavery and sluggish so I decided to have a bash
Removing Axle
As they were completely corroded and the brake line unions were corroded I decided to take the axle of the car to make the work easier.
First of all jack the car up and put on axle stands. I put them under the axle just forward and in of the rear jacking points under the sill. Disconnect brake lines, handbrake and abs sensors.
ABS sensors-
Follow up to the clip under the felt near the wheel arch and disconnect.
Brake Lines-
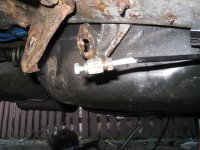
Mine were corroded so I just snipped the inner flexible hose but if you take them of make sure sure to give a good soak in WD40 a day advance so it can penetrate. Remove the brake resevoir cap, put a plastic bag over it and tighten the cap again. This will help slow the drain of fluid. Get a proper flare nut spanner set (6 point with the notch to go over the pipe. You'l want a 11m for the brake union and a bigger size for the flexible joint nut. A link for the tool here ----
[ame="http://www.amazon.co.uk/Yato-professional-flare-wrench-YT-0143/dp/B009JECDUI/ref=pd_sim_sbs_diy_3?ie=UTF8&refRID=18AZGD8AZXMMAABCDM0G"]Yato professional flare nut wrench set 4 pcs, 8 sizes (YT-0143): Amazon.co.uk: DIY & Tools@@AMEPARAM@@http://ecx.images-amazon.com/images/I/51eL1nfRTgL.@@AMEPARAM@@51eL1nfRTgL[/ame]
Knock out the retaining clip with a screwdriver beforehand and give a good wirebrush down so you see whats going on Make sure to clamp the flexible lines or pipe end unions whichever way you choose. I made a tool with a female union and a thread tapped for a small bolt with a filed tapered end to block the flare when I was resembling the lines.
Handbrake cable-
To make life easier on the back of the handbrake cover in the car below the rear vent undo the four screws and pull the small cover of. This will give access to the tensioner and back this of so the cables are easy to remove from the caliper. Tap the handbrake cable out of the metal mounting plate with a drift.
Axle-
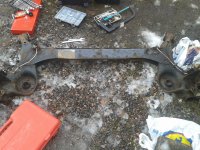
Undo the mounting bolts going through each bush and pull/tap them out with a drift. One of mine were completly seized aswell as the mounting plate bolts being knackered so I had to hacksaw it out under the car through the bush (good fun) it took ages

Support the axle under each spring mounting with a jack or some blocks of wood and undo the damper bolts.
The axle should drop to the floor and put the springs aside.
Removing Old Bushes
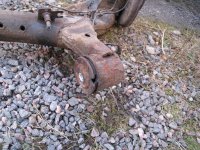
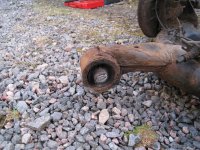
Now you've got the axle on the floor in front of you with good access the job will be a lot easier.
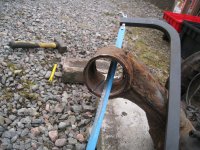
To get the old bushes out you'l need to cut out the rubber, the inner lip and the steel casing.
Perseverance and improvisation is the key with this bit.
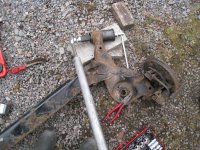
Get a 12 inch hacksaw and put the blade through the bushing and reattach. Poke a screwdriver or something through to make a hole for the blade to go through For the second one I had a screw puller frame I used for another job, I used a socket with this to drive out the inner rubber, it was a piece of **** compared to sawing
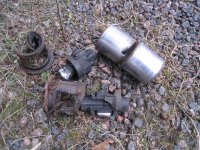
Chisel and pull any reamaining bits out.
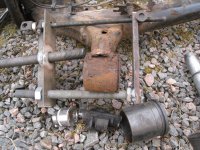
You'l be left with the inner casing and outer steel casing. Hacksaw through to weaken the metal, be carefull not to go too far to hacksaw through the bush housing!
You can now get a cold chisel and hammer on the inside and outside lip and it will come loose and eventually pop out! You'l be left with the steel casing.
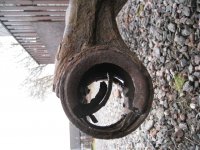
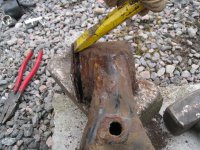
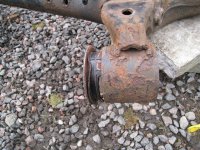
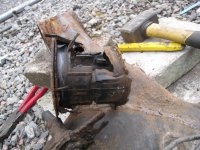
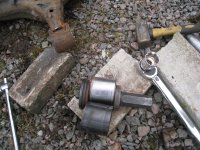
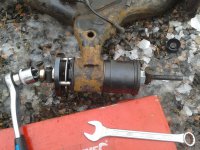
You can choose to chisel this out or pull it out. I had a bushing/bearing removal kit about which I used to pull it out to save damaging the bushing housing with the chisel hammering.
This could cause a pain with the tightness of the bushing when putting it back in. The slightest bit of metal sticking out from damage could cause a nightmare. With leverage with scaffold tube on the ratchet driving the tool, the bushing came out!!! Just the same process again!!!
Installing New Bushes
In my opinion these stilo bushes come machined at ridiculously high tolerances making them stupidly tight! As other forum members have done I grinded them down to
a fit where they can actually go in! Place the bushing in a vice with a bolt and some washers etc to hold it in. I got an 80 grit flapper disc for my angle grinder and
polished up the bushing in strokes. Be carefull not to nick the rubber too much! Chamfer the end ever so slightly so its easier to get started in the housing. Do this a wee bit at a time but dont be too shy, these come way oversized. I think roughly 0.15 or 0.2 mm of is sufficient.
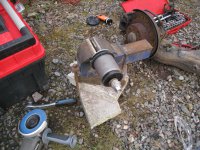
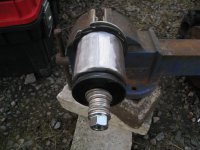
Now the key after this that made my success is to get a flapper wheel for a DRILL!! This is round and will finish it off evenly and round! Check with calipers at a few points on the bush that its evenly shaped, if its wider at one end it will get tight and could possibly get stuck half way in. I made this mistake and the second one got stuck 3/4 the way in and I had to get a friend to heat it up and hammer it out, a nightmare!
Prepare the inside of the bush by giving it a clean and eliminating any high spots damaged by chiseling etc. Use the drill flapper wheel for this, it really does a great job. Line it with anti seize copper grease to make life easier in the future!
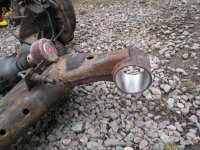
The new bushes have a lip which you need a special 3 prong pressing drift for to not damage it getting it in. I got mine from my local fiat dealer for £15.
Part number- 2000000400 This is designed to be used in a hydrualic press so you will have to modify it. Drill an M12 hole in the centre of it.
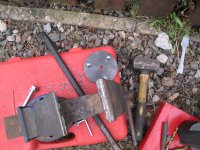
You'l need a length of high strength M12 threaded rod for pulling the bushing in. I got an old scissor jack and dissembled it and used this. They have an ultra strong, heat treated, square threaded thread which is great for this job and others!! You may want to modify it and weld a socket onto it which will make life easier for turning it
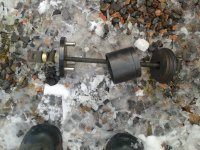
The end of the bushing needs to protrude a couple of inches out of the other end so you'l need something it can be pulled through. My bushing/bearing removal kit had a perfectly fitted cup which really was a god send and it was only about £35 but I think is well worth it for the hassle it saves and future jobs. Iv put the link for this kit here ---
[ame="http://www.amazon.co.uk/Merry-Tools-HK-Bearing-Installation/dp/B00BKXVRG2/ref=sr_1_3?ie=UTF8&qid=1425596354&sr=8-3&keywords=front+wheel+drive+bearing+removal+kit"]Merry Tools HK 21 PC Front Wheel Hub Drive Bearing Removal And Installation Tool Kit Set 450756: Amazon.co.uk: DIY & Tools@@AMEPARAM@@http://ecx.images-amazon.com/images/I/51w1s3w-UEL.@@AMEPARAM@@51w1s3w-UEL[/ame]
When you've got the tool made up double check everything and go for it winding the new bushing in. If it starts getting hugely tight stop because it could possibly make it worse and the bushing could get stuck in the housing which is a headache! Good Luck!!!
The bushings also need to be orientated the right way in the housing. If you look at the bushing on its end there is a small slot indented into the side of the hole the bolt goes through. This is supposed to face backwards towards the front of the car. This is seemingly important as it can cause premature failure to the bushing!
If all goes well you have the new bushes in and are ready to reassemble. Repair any brake lines if they or the unions are stuck or corroded, to be honest its quicker doing this than messing about with half stuck unions and rusty bolts!
Bolt the dampers back on and assemble all bolts with copper grease, coat the whole length of the bushing bolts with copper grease so they hopefully don't get stuck in next time!!
I jacked the axle up to ride height pretty much were the springs took over the weight of the car and then tightened the bushing bolts. Seemingly this can damage them if not done correctly at ride height, if ever dropping the axle to change springs or dampers undo the bushing bolts as Iv been told the extra axle droop can damage the bushings aswell.
Assemble connectors, flexible hoses and handbrake cable and then retake in the slack at the adjuster. Bleed the brakes and take the car for a run!! I noticed a huge difference in the noise going over rough surfaces and speed bumps, much quieter and smooth! Also the handling was much tighter!
I hope this guide helps anyone trying to tackle this job! Im sure Im not perfect and I just do this for myself, Im not a mechanic ! But I hope this can help people save some headache and get through the job a bit easier!
There was a lot of big knocking going on over potholes/speedbumps and
the handling was feeling wavery and sluggish so I decided to have a bash
Removing Axle
As they were completely corroded and the brake line unions were corroded I decided to take the axle of the car to make the work easier.
First of all jack the car up and put on axle stands. I put them under the axle just forward and in of the rear jacking points under the sill. Disconnect brake lines, handbrake and abs sensors.
ABS sensors-
Follow up to the clip under the felt near the wheel arch and disconnect.
Brake Lines-
Mine were corroded so I just snipped the inner flexible hose but if you take them of make sure sure to give a good soak in WD40 a day advance so it can penetrate. Remove the brake resevoir cap, put a plastic bag over it and tighten the cap again. This will help slow the drain of fluid. Get a proper flare nut spanner set (6 point with the notch to go over the pipe. You'l want a 11m for the brake union and a bigger size for the flexible joint nut. A link for the tool here ----
[ame="http://www.amazon.co.uk/Yato-professional-flare-wrench-YT-0143/dp/B009JECDUI/ref=pd_sim_sbs_diy_3?ie=UTF8&refRID=18AZGD8AZXMMAABCDM0G"]Yato professional flare nut wrench set 4 pcs, 8 sizes (YT-0143): Amazon.co.uk: DIY & Tools@@AMEPARAM@@http://ecx.images-amazon.com/images/I/51eL1nfRTgL.@@AMEPARAM@@51eL1nfRTgL[/ame]
Knock out the retaining clip with a screwdriver beforehand and give a good wirebrush down so you see whats going on

Handbrake cable-
To make life easier on the back of the handbrake cover in the car below the rear vent undo the four screws and pull the small cover of. This will give access to the tensioner and back this of so the cables are easy to remove from the caliper. Tap the handbrake cable out of the metal mounting plate with a drift.
Axle-
Undo the mounting bolts going through each bush and pull/tap them out with a drift. One of mine were completly seized aswell as the mounting plate bolts being knackered so I had to hacksaw it out under the car through the bush (good fun) it took ages
Support the axle under each spring mounting with a jack or some blocks of wood and undo the damper bolts.
The axle should drop to the floor and put the springs aside.
Removing Old Bushes


Now you've got the axle on the floor in front of you with good access the job will be a lot easier.
To get the old bushes out you'l need to cut out the rubber, the inner lip and the steel casing.
Perseverance and improvisation is the key with this bit.
Get a 12 inch hacksaw and put the blade through the bushing and reattach. Poke a screwdriver or something through to make a hole for the blade to go through
Chisel and pull any reamaining bits out.

You'l be left with the inner casing and outer steel casing. Hacksaw through to weaken the metal, be carefull not to go too far to hacksaw through the bush housing!
You can now get a cold chisel and hammer on the inside and outside lip and it will come loose and eventually pop out! You'l be left with the steel casing.


You can choose to chisel this out or pull it out. I had a bushing/bearing removal kit about which I used to pull it out to save damaging the bushing housing with the chisel hammering.
This could cause a pain with the tightness of the bushing when putting it back in. The slightest bit of metal sticking out from damage could cause a nightmare. With leverage with scaffold tube on the ratchet driving the tool, the bushing came out!!! Just the same process again!!!


Installing New Bushes
In my opinion these stilo bushes come machined at ridiculously high tolerances making them stupidly tight! As other forum members have done I grinded them down to
a fit where they can actually go in!
polished up the bushing in strokes. Be carefull not to nick the rubber too much! Chamfer the end ever so slightly so its easier to get started in the housing. Do this a wee bit at a time but dont be too shy, these come way oversized. I think roughly 0.15 or 0.2 mm of is sufficient.


Now the key after this that made my success is to get a flapper wheel for a DRILL!! This is round and will finish it off evenly and round! Check with calipers at a few points on the bush that its evenly shaped, if its wider at one end it will get tight and could possibly get stuck half way in. I made this mistake and the second one got stuck 3/4 the way in and I had to get a friend to heat it up and hammer it out, a nightmare!
Prepare the inside of the bush by giving it a clean and eliminating any high spots damaged by chiseling etc. Use the drill flapper wheel for this, it really does a great job. Line it with anti seize copper grease to make life easier in the future!

The new bushes have a lip which you need a special 3 prong pressing drift for to not damage it getting it in. I got mine from my local fiat dealer for £15.
Part number- 2000000400 This is designed to be used in a hydrualic press so you will have to modify it. Drill an M12 hole in the centre of it.

You'l need a length of high strength M12 threaded rod for pulling the bushing in. I got an old scissor jack and dissembled it and used this. They have an ultra strong, heat treated, square threaded thread which is great for this job and others!! You may want to modify it and weld a socket onto it which will make life easier for turning it

The end of the bushing needs to protrude a couple of inches out of the other end so you'l need something it can be pulled through. My bushing/bearing removal kit had a perfectly fitted cup which really was a god send and it was only about £35 but I think is well worth it for the hassle it saves and future jobs. Iv put the link for this kit here ---
[ame="http://www.amazon.co.uk/Merry-Tools-HK-Bearing-Installation/dp/B00BKXVRG2/ref=sr_1_3?ie=UTF8&qid=1425596354&sr=8-3&keywords=front+wheel+drive+bearing+removal+kit"]Merry Tools HK 21 PC Front Wheel Hub Drive Bearing Removal And Installation Tool Kit Set 450756: Amazon.co.uk: DIY & Tools@@AMEPARAM@@http://ecx.images-amazon.com/images/I/51w1s3w-UEL.@@AMEPARAM@@51w1s3w-UEL[/ame]
When you've got the tool made up double check everything and go for it winding the new bushing in. If it starts getting hugely tight stop because it could possibly make it worse and the bushing could get stuck in the housing which is a headache! Good Luck!!!


The bushings also need to be orientated the right way in the housing. If you look at the bushing on its end there is a small slot indented into the side of the hole the bolt goes through. This is supposed to face backwards towards the front of the car. This is seemingly important as it can cause premature failure to the bushing!
If all goes well you have the new bushes in and are ready to reassemble. Repair any brake lines if they or the unions are stuck or corroded, to be honest its quicker doing this than messing about with half stuck unions and rusty bolts!
Bolt the dampers back on and assemble all bolts with copper grease, coat the whole length of the bushing bolts with copper grease so they hopefully don't get stuck in next time!!
I jacked the axle up to ride height pretty much were the springs took over the weight of the car and then tightened the bushing bolts. Seemingly this can damage them if not done correctly at ride height, if ever dropping the axle to change springs or dampers undo the bushing bolts as Iv been told the extra axle droop can damage the bushings aswell.
Assemble connectors, flexible hoses and handbrake cable and then retake in the slack at the adjuster. Bleed the brakes and take the car for a run!! I noticed a huge difference in the noise going over rough surfaces and speed bumps, much quieter and smooth! Also the handling was much tighter!
I hope this guide helps anyone trying to tackle this job! Im sure Im not perfect and I just do this for myself, Im not a mechanic

