51796340307_75b39bce30_o.jpg

Panda Fiat Panda 100HP - Electroclash grey

Introduction

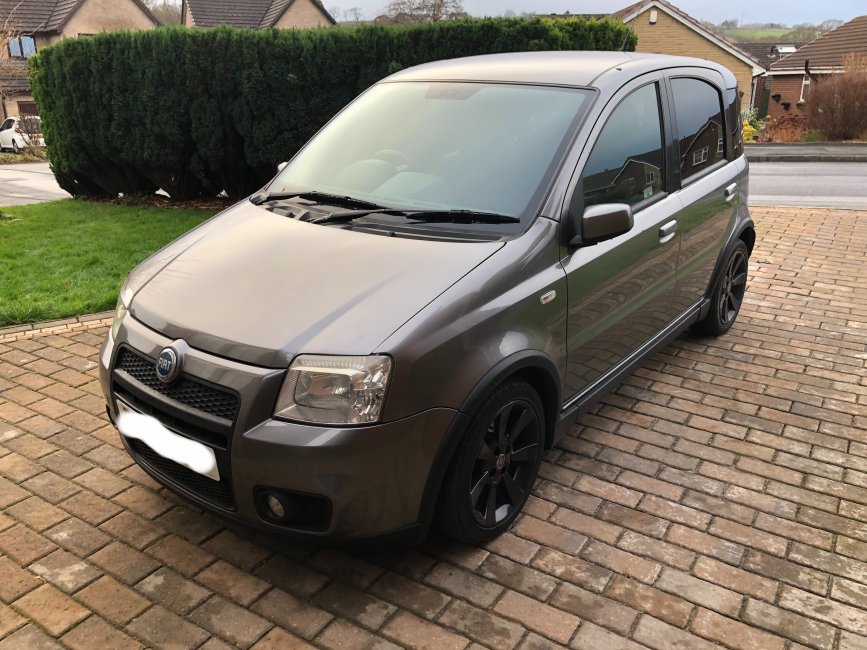
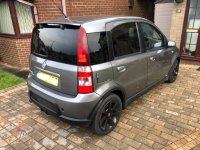
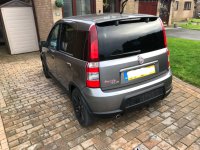
Here is my Fiat Panda 100HP, this thread will document my maintenance / ownership experiences. I have owned a few Fiats in the past (Bravo HGT, HLX, JTD, Coupe, Uno) but never a Panda.

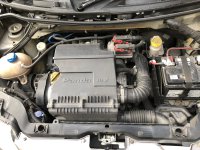
Lots more updates to come (servicing and cambelt)
Large update incoming, full service and cambelt kit with waterpump. This will be split into 3 parts

part 1 - oil & filter
part 2 - cambelt
part 3 - spark plugs, air filter, pollen filter,wiper blades

#1 - oil & filter
jacked up and engine run up to temperature
51806749075_32315e1a12_w.jpgUntitled by Montana BI, on Flickr

genuine filter and 5w40 fully synthetic
51805066632_0ec191ff16_w.jpgUntitled by Montana BI, on Flickr

ready for the drain
51806162953_4312c4727d_w.jpgUntitled by Montana BI, on Flickr

honda civic oil filter tool coming in handy in the tight space
51805089647_727e595a93_w.jpgUntitled by Montana BI, on Flickr

old vs new
51806405764_52d3156e2b_w.jpgUntitled by Montana BI, on Flickr

torquing up
51806162943_16f5623374_w.jpgUntitled by Montana BI, on Flickr

cleaned up an oil weep on the left hand side of the sump - something to keep an eye on
51806405654_7938e48cac_w.jpgUntitled by Montana BI, on Flickr

2.5L of oil measured out and going in
51812776444_2ebe2ddce7_w.jpgUntitled by Montana BI, on Flickr
 
part 2 - cambelt

jacked up, drivers side roadwheel removed
51812629741_a4afdb3af3_w.jpgUntitled by Montana BI, on Flickr

plastic cover to be removed
51806405749_7205dfe00c_w.jpgUntitled by Montana BI, on Flickr
51813162925_9a2a98612c_w.jpgUntitled by Montana BI, on Flickr

which exposes the crank pulley / aux belt setup
51806772665_8f32403240_w.jpgUntitled by Montana BI, on Flickr

taking the tension off the aux belt tensioner to allow the belt to be removed
51806405634_49acb09366_w.jpg by Montana BI, on Flickr

aux belt off
51813162970_69952b497e_w.jpgUntitled by Montana BI, on Flickr

cheap ebay impact wrench did the trick on the crank pulley bolts
51812434061_06723bb213_w.jpgUntitled by Montana BI, on Flickr

pulley removed
51812539268_ef918c130e_w.jpgUntitled by Montana BI, on Flickr

unbolt lower cambelt cover
51812779414_8fe015362a_w.jpgUntitled by Montana BI, on Flickr

carefully jack up the sump which will help with the next part - engine mount removal
51813162965_148ca59ecc_w.jpgUntitled by Montana BI, on Flickr

in the engine bay, remove the 3 bolts holding the air filter box on
51812434121_22c360f434_w.jpgUntitled by Montana BI, on Flickr
51812434111_61f186b025_w.jpgUntitled by Montana BI, on Flickr

unclip a pipe running across the top of the air box and it will be free!
51813357770_715b770984_w.jpgUntitled by Montana BI, on Flickr

which exposed some bodgery on one of the coilpacks (will come back to that later)
51811669682_dc8bed2b09_w.jpgUntitled by Montana BI, on Flickr

remove coolant bottle bolt
51812735483_50e85cfed7_w.jpgUntitled by Montana BI, on Flickr

at this point i opted to remove the lower hose as i would be draining/flushing the coolant anyway
51812735543_d123710e9d_w.jpgUntitled by Montana BI, on Flickr
51813357720_6e7256c37d_w.jpgUntitled by Montana BI, on Flickr

coolant collected in a very useful house box
51811669677_e8b575ff47_w.jpgUntitled by Montana BI, on Flickr

coolant bottle moved out of the way
51812629816_a1e020f945_w.jpgUntitled by Montana BI, on Flickr

the engine mount is now exposed
51812735548_31dd5cfaaa_w.jpgUntitled by Montana BI, on Flickr
 
remove these 3 bolts to the engine block
51812629806_2c40531617_w.jpgUntitled by Montana BI, on Flickr

then these on the chassis
51812735573_63d86f0cc5_w.jpgUntitled by Montana BI, on Flickr
51812974929_0e38044e9f_w.jpgUntitled by Montana BI, on Flickr

with the bolts removed, lift it off
51812629826_6aa8c84647_w.jpgUntitled by Montana BI, on Flickr
51812974924_954bb3e80a_w.jpgUntitled by Montana BI, on Flickr

now you need to remove the bolts holding the mount to the engine in order to get to the cambelt, there are 6 in total - you can see a few of them here
51812974859_46e4721d74_w.jpgUntitled by Montana BI, on Flickr

lift the engine to give easier access
51812629776_2f5e10e144_w.jpgUntitled by Montana BI, on Flickr

space is tight but perfectly manageable
51812987119_f0b7fe795e_w.jpgUntitled by Montana BI, on Flickr
51812986984_5191b753d2_w.jpgUntitled by Montana BI, on Flickr
51812641346_44b344571e_w.jpgUntitled by Montana BI, on Flickr

breaking a lower one free
51812987154_f1a83ed989_w.jpgUntitled by Montana BI, on Flickr

for the bottom one nearest the bulkhead i opted to go from the bottom
51813369695_7aac17857c_w.jpgUntitled by Montana BI, on Flickr

all 6 bolts out but still struggling to remove, so took the upper cambelt cover off
51811681787_5ec150279b_w.jpgUntitled by Montana BI, on Flickr

exposing the belt
51812747588_576851041b_w.jpgUntitled by Montana BI, on Flickr

the task - i was glad to see tippex here, backing up what i saw in the service history
51813369780_a45a3db6ee_w.jpgUntitled by Montana BI, on Flickr

i rotated the crank to get the crank locking tool in place (it was a £30 amazon jobbie)
51812649531_4283577766_w.jpgUntitled by Montana BI, on Flickr

however could only get 2/3 bolts in place which was enough to stop things moving but not ideal
51812756043_1e46100cf6_w.jpgUntitled by Montana BI, on Flickr

view from the top with the crank locking tool in place
51813378120_cfef435069_w.jpgUntitled by Montana BI, on Flickr

i removed the previous tippex markings...
51812756038_fb7db02e7f_w.jpgUntitled by Montana BI, on Flickr
 
...and made new ones to keep the cam pulley orientated
51813378085_3b0891e3ef_w.jpgUntitled by Montana BI, on Flickr

removing the tensioner
51812649491_99b5f6859b_w.jpgUntitled by Montana BI, on Flickr

belt coming off, no turning back now!
51811690167_6033c72afc_w.jpgUntitled by Montana BI, on Flickr

old dayco belt, no sign of cracking on the inside face (this was last changed in 2016)
51811690117_4e033947e3_w.jpgUntitled by Montana BI, on Flickr

new SKF one
51812755933_4070ee97a4_w.jpgUntitled by Montana BI, on Flickr

quick check it 'looks' right
51813378145_1ac41cb653_w.jpgUntitled by Montana BI, on Flickr

waterpump removal
51812649486_881514997a_w.jpgUntitled by Montana BI, on Flickr
51812756033_3e385a2fa9_w.jpgUntitled by Montana BI, on Flickr

pump removed
51812756063_0df93490fd_w.jpgUntitled by Montana BI, on Flickr

lots of sealent left behind, face all cleaned up ready for the new one
51812756003_f25c3c4d79_w.jpgUntitled by Montana BI, on Flickr

old versus new
51812756068_cfa2d2ea1f_w.jpgUntitled by Montana BI, on Flickr

new waterpump and tensioner back in
51813003984_59e850a216_w.jpgUntitled by Montana BI, on Flickr

along with the new cambelt
51812658036_1c63192019_w.jpgUntitled by Montana BI, on Flickr

setting the tensioner
51811698627_a3d3bf2478_w.jpgUntitled by Montana BI, on Flickr
51813003869_635466d36c_w.jpgUntitled by Montana BI, on Flickr

crank locking tool removed and engine rotated 2 full revolutions
51813003949_c04e2d1be4_w.jpgUntitled by Montana BI, on Flickr

lower cambelt cover back on
51812764923_0d235a110a_w.jpgUntitled by Montana BI, on Flickr

I also planned to change the aux belt and tensioner whilst here. old vs new belt
51812764918_4b8dbc4cf6_w.jpgUntitled by Montana BI, on Flickr

new belt on and running true
51813386425_5c4de3060b_w.jpgUntitled by Montana BI, on Flickr
 
I had an issue with the aux belt tensioner, having previously replaced one on a Mito using my standard allen keys, there is less room in the Panda so a set of stubby allen keys will be ordered to tackle the tensioner at a later date.

At this stage, i needed to leave the coolant to set before i could refill and check all was ok with the cambelt change, so left it for the afternoon and came back later (in the dark)

struggled to remove the quick release hose from the bottom of the radiator, so focused on the clip
51812662426_fffa25026b_w.jpgUntitled by Montana BI, on Flickr
51811703047_cc62b26e1c_w.jpgUntitled by Montana BI, on Flickr

hose removed and the residual coolant from the radiator drained, at this point 7 hours had elapsed, so refilled with water (not coolant)
51813390970_64702fcdfe_w.jpgUntitled by Montana BI, on Flickr

filled to the max ready for the first start
51813008554_aa46b18530_w.jpgUntitled by Montana BI, on Flickr

all good
51813008309_1aa119e1dd_w.jpgUntitled by Montana BI, on Flickr

the engine was then run up to temp and then coolant drained (twice) to flush any old coolant out - it was later refilled with the Prestone all in one once i was happy there were no leaks from either the waterpump or bottom hose

All in all it was a success, the main bottlenecks were on the removal of the engine mount & cleaning the face of the block which were a time sap - all in all took me 5 hours.
 
part 3 - spark plugs, air filter, pollen filter,wiper blades

air filter change
51812657991_6294c06d6b_w.jpgUntitled by Montana BI, on Flickr

unfortunately i had been supplied with an incorrect replacement, however the one in there looked like new, so that went back in!
51812764893_c6f4b907e9_w.jpgUntitled by Montana BI, on Flickr

spark plug change next
51813004019_8f7b51bf8f_w.jpgUntitled by Montana BI, on Flickr

all clips removed (including the cable tie bodgery)
51813386495_67bc86f6b8_w.jpgUntitled by Montana BI, on Flickr

plugs removed
51812769603_00806565f2_w.jpgUntitled by Montana BI, on Flickr

my plug didnt have the rubber insert to allow easy removal so made my own out of blue tack (take out when tightening)
51812769453_dab7ac87a8_w.jpgUntitled by Montana BI, on Flickr

old vs new - old plugs had this 'burn' ring around the ceramic - replaced with like for like (NGK DPR7E-N-10)
51813391185_73754b5402_w.jpgUntitled by Montana BI, on Flickr

torqued up
51813008599_9822c71e16_w.jpgUntitled by Montana BI, on Flickr

at this point took the oppourtunity to protect the exposed wiring (not pretty but effective)
51813391180_5043414256_w.jpgUntitled by Montana BI, on Flickr
51812769593_2ed4c764ee_w.jpgUntitled by Montana BI, on Flickr

time to reproduce the cable tie bodgery seen earlier
51811703112_12db396c23_w.jpgUntitled by Montana BI, on Flickr

factory fresh!
51813391155_e1e145a432_w.jpgUntitled by Montana BI, on Flickr

also took the oppourtunity to protect some exposed wire at the cam cover side
51813391135_2b5f773ba9_w.jpgUntitled by Montana BI, on Flickr
51813008524_eddd700629_w.jpgUntitled by Montana BI, on Flickr

new bosch wipers on the front
51812769438_dba7eb7ee9_w.jpgUntitled by Montana BI, on Flickr
51811702862_ce4e6e04ae_w.jpgUntitled by Montana BI, on Flickr

and a insert on the rear
51811702857_f1d7f8a288_w.jpgUntitled by Montana BI, on Flickr
 
I had a rear knock, examining the rear shock top mounts it was clear why with the perished bush
51813641930_5d87dbec52_w.jpgUntitled by Montana BI, on Flickr

with the Panda jacked up (wheels still on) i set about replacing the rear shocks

a bit of plus gas to help things along
51813641950_1bf2c0454a_w.jpgUntitled by Montana BI, on Flickr

end of life!
51811955537_d5891b1dee_w.jpgUntitled by Montana BI, on Flickr

i needed some replacements sharpish, so went to GSF (i know, a Panda is italian) and got some Amtec ones for £37 a pair which with a 12 month guarantee suited me
51813641960_9f9451b921_w.jpgUntitled by Montana BI, on Flickr

both rear dampers replaced and torqued up
51813022818_7fd1731c06_w.jpgUntitled by Montana BI, on Flickr
 
The cam lock tool screws into the front of the cam carrier. To fit you set the tool with the flats vertical and screw the knurled ring into place. Turn the engine until the lock clicks into place. If the cam belt is removed you just turned the cam. ;) Lock the crank as shown above.

Loosen the cam wheel using a back-holding tool to prevent torque going into the cam. Now the belt can be fitted and tensioned. I used the kit supplied pin wrench and a mirror to set the belt tension. Now torque up the cam wheel - again using the holding tool.

Remove the locks and CAREFULLY turn the engine TWO full turns. If all goes smoothly you can box it up. Yay!
 
My cam belt cover was broken where someone had butchered the front M6 bolt. I faffed about making new brackets from aluminium and all is fine. I later discovered that Shop 4 Parts have new covers for under £14. D'Oh.

I also had a sheared off M10 stud on the engine mount. Probably the same ape who smashed the cam belt cover. I fitted the top part and drilled out the broken bolt with a 10mm drill. This type cuts well and is long enough to go deep.
I then opened it to M12 tapping size and tapped to M12. The car now has two studs and one bolt on the engine mount.
 
This post contains affiliate links which may earn a commission at no additional cost to you.
The ignition coils will have brittle connectors and the wiring loom tray will also be brittle. You have some options -
(a) Hold it all neat and tidy with zip ties and be happy.
(b) Replace the male connectors with new and make a new ignition loom using high temperature (silicone insulated) wires. Use woven sleeves to avoid chafing.
(c) Replace the entire loom and support tray with new from Fiat.

(a) Risks a wiring fault but it's unlikely to stop the engine, though will be annoying.
(b) Requires some work, but will be the most reliable as Fiat wires are always crusty due to engine heat.
(c) Get your mortgage advisor on speed dial.

The support tray could be remade from aluminium sheet but it's not really needed with sleeves over the wires.
Wiring sleeves - eBay item 231407619751
Heat resistant wire - eBay item 124849723611
 
A few jobs completed on the Panda today.

When i did the cambelt, i failed on the aux belt tensioner as i didnt have a stubby 6mm allen.

The swap was straighforward
old vs new
51887670826_40b68ae437_c.jpgUntitled by Montana BI, on Flickr

fitted
51888001909_25dda77705_c.jpgUntitled by Montana BI, on Flickr

Next job, i had a slight blow around the downpipe to centre pipe gasket, the plan was to replace the gasket and re-seal (i had previously slapped some high temp on as a temporary fix)
51888001914_75e46e602f_c.jpgUntitled by Montana BI, on Flickr

I thought i would have a struggle with the old looking nuts, however refreshingly, no issues encountered - so the area was cleaned up and high temp silicone applied
51887670836_a0fda5d2c0_c.jpgUntitled by Montana BI, on Flickr
51888328535_c472beac6f_c.jpgUntitled by Montana BI, on Flickr

I took the oppourtunity to also clean up and re-seal the flexi join
51888001889_87a6f60d41_c.jpgUntitled by Montana BI, on Flickr

all done
51887755708_f0c3eb6c22_c.jpgUntitled by Montana BI, on Flickr

Last job as front discs, pads have recently been replaced all round but with the MOT on the horizon i took the oppourtunity to replace the lipped front discs
51887670856_645f11811d_c.jpgUntitled by Montana BI, on Flickr

the mammoth G-clamp made the piston push back childs play - this was very welcome as i didnt this during a hailstorm
51886708627_609826546b_c.jpgUntitled by Montana BI, on Flickr

all done
51888001969_fee1ca9197_c.jpgUntitled by Montana BI, on Flickr
 
Back
Top