Technical fabricating a curved flange for Panda Colour

Currently reading:
Technical fabricating a curved flange for Panda Colour

Joined
Jun 30, 2008
Messages
3,438
Points
776
Location
Stockport
I am not very good at visualising how to make shapes with sheet steel.
Mrs Codger says it is something about spatial awareness so it must be true!
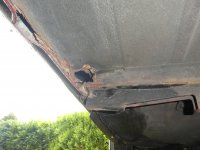
I am slowly renovating my Panda Colour and have found that the last 2cm of the cross-member (the one that the jacking point sits on) has rotted away.
The rest of the cross member is solid, so I want to basically fix the end of it and re-connect it in to the outer sill/inner sill/floor joint.
I came across a picture from "Kolza" (Jakob?) really great thread some time back,but for some reason I can't upload it tonight.
The end of the cross-member has a flange so that it can be welded to the floor above, and that flange then curves downwards in to the sill/ floor joint.

My question is, how can you make a flange which also curves downwards? Is there a technique?
Sorry in advance for the dim question if the answer is obvious!
 
Codge

Firstly be brutal cut back the top hat until the metal is consistent in thickness . It’s actually much easeir to fit longer or larger sections fold up the profile of the top hat in a 10cm long section it should just be tight fit if placed over the cross member to create the stretched curved end is a little more difficult at the root of the curve position cut a slit in each side off the top hat so it fold up then weld in place top hat fully with the flap still up then it’s a matter of panel beating down into place as itouches the sill tack weld and go again stretching the flange cutting tacking welding ect clamping welding ect until complete. Or the other option is create tooling to do this in a press. Ok if you need 100 +. Any help there ??? Ps overlap the top hat joint to cross member by 1 cm
 
Last edited:
IMG_1507529671.246732.jpg
Repair of central cross member
Not too pretty but functional
If a perfect spot welded repair is required it would require tooling made up ,then pressed if done cold .
 
Last edited:
By "top hat" do you mean the 90 degree "flaps" that are welded through in to the floor above?
When you say cut a 10cm long section that should be a tight fit over the cross member - so you mean I should not try to butt weld a section on to the end of the cross member, but chop the rotten end off and then fit a 10cm long section over the top of the original?
 
Yes that’s the section cut through looks like a top hat
yes don’t but weld it
Yes over the original by about 1cm
Use a longer length than the removed piece
So it can be worked after welding in the main strut fully
 
IMG_1507612556.323135.jpguse a cornflakes packet to prefabricate IMG_1507612571.204369.jpgcut and all flanges to cruve IMG_1507612581.956536.jpgIMG_1507612594.771786.jpg
Make sue this fits the copy to the steel. N B use slightly thicker new steel This will then soak up the heat from weld preventing thin or rusting steel burning through get the work position as high as poss !!! So you are comfortable when welding
 
Last edited:
Yes that’s the section cut through looks like a top hat
yes don’t but weld it
Yes over the original by about 1cm
Use a longer length than the removed piece
So it can be worked after welding in the main strut fully

Sorry mate, but I have just read again what you wrote and I am now unsure.
You say don't weld it?
So I make the piece as per your model, slightly larger than the original cross-member so that it fits tightly over it and overlaps by 1cm. But the new part has to be welded to the original surely? So should that be plug welded or lap welded where the overlap is? Or something else?
Sorry to be so dumb.
 
It was a typo not to butt weld the end but over lap. What are you welding with T I G or MIG MMA is a little fierce unless on timed off mode tack all the corners first then hammer home the flange until flush
 
Photos please Or why not do a how to :- repair cross member
 
I am a humble beginner, learning as I go along so I would not dare to be telling other people how to do it. But thanks to your help I will take photos as I go and hope it turns out alright - and also hope that people don't criticise my work!
 
Ok. Here it’s best to complete the sill repair 1st as the floor inner and outer are disconnects. Mot. Fail. Once that is sorted tackle the cross member
 
Use a rotary wire brush remove the debris from the sill then hit it square on its edge with a heavy hammer this will loosen a the rust go over again keep repeating until all is removed. Then look assess put the kettle on and review .s
 
Last edited:
What is the state of the previous repair to the rear of the C member it looks like it’s disconnected
 
Yes thanks for that. You are right of course.
If you can see on the photo forward of the jacking point there is some new steel hanging down. That is the inner sill that I have repaired. I will be connecting the floor, inner sill and outer sill.
Then the section behind the jacking point, then removing the jacking point and fixing the cross member. That's the plan in theory anyway.
 
What is the state of the previous repair to the rear of the C member it looks like it’s disconnected

Actually it is the passenger side of the car so the area you are looking at is the passenger side inner sill. Yes it is all disconnected . As I mentioned above it needs the outer sill bottom edge repairing, then all 3 layers re-joining up.
 
Have had a couple of hours (at most) to spend on the Panda since the last post.
Would like to post some pics of what I found after doing a bit of angle grinder cutting but I can't upload. Is there a problem?
 
Back
Top