Absolutely test first before thinking about removing them. When it comes to removing it's very much a lottery, although the younger the car the greater the chance of getting away without problems. If all you've got is a socket then try tightening just enough that you feel a very slight "give" first then try slackening. If it moves but is tight on the threads spray liberally with release oil, something like Plus Gas, not WD40, and work back and forwards gently to loosen. The problem is that the threaded portion tends to corrode into the head (steel threads on the plug and alloy head on most engines these days) and carbon builds up on the "business end" inside the cylinder. If it loosens then working back and forwards lets the releasing oil get down the threads and tends to crack off some of the carbon deposits.
All this only helps if the thing does show some signs of initial movement. If it's solid the releasing oil will not penetrate so there's little help there. Although it may be worth getting the engine nice and hot a couple of days before giving it a go and soaking it in something like Plus Gas morning and night for those couple of days. If the engine has an ally head then I think it would probably help to try doing it with the engine fully up to heat as the ally should expand more than the steel of the plug. All I can advise is to not get too violent with them as they are not the strongest of components. Over the years I've had more come out cleanly than have snapped off but it was one of those jobs that if I noticed it on the job card I'd find a reason to go and "hide" in the loo 'till some other unfortunate was issued with the job!
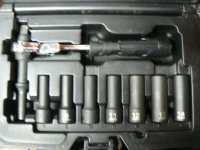
Now I'm retired I try to keep well away from modern diesels, indeed there's only one diesel now in the "family fleet" but if I ever have to do a glow plug in it I'll be reaching for my Vibro Shock tool. This is a tool I bought quite recently, within the last 5 years I think, mainly for doing bleed nipples as I work mainly on older vehicles and machines and seized nipples is a big problem on older vehicles. I can say with confidence it's a tool which works extremely well, in fact I haven't snapped a bleed nipple since I've owned it. I'll link to a couple of you tube videos which show how it works but the biggest thing to get your head round is how it works. The sockets have a very shallow hex. This is fundamental to how it works as it allows the force of the air hammer to be transferred into the fixing and so directly vibrate the threads. The undoing is accomplished by turning the side lever - which is not a ratchet so you can work the fixing back and forwards easily to loosen it and let releasing oil penetrate. DO NOT LEAN HARD ON THE LEVER. Moderate force should be applied until you feel the fixing start to move. It's the vibration which is loosening the fixing not the side lever:
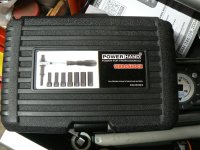
It's a wonderful tool if you have an air compressor and air hammer and it's what I would be using to do this job. By the way, this is an American tool (CTA Tools) which I first saw in a large tool store in Maryland. It seems to be sold by Snap On trucks over here but I turned mine up branded as a "Powerhand" on my local MAC Tools van at a considerably cheaper price than they appear on ebay imported from America - I've never inquired as to what the Snap On branded price is!
Here's a few pics of my tool:


The range of sockets that come with the tool is quite small and this disappointed me at first. There are more available as add ons in the States but I've not seen any over here. I was thinking of getting my sister to make Christmas presents of them to me - she lives over there - but then it dawned on me that I can adapt existing tools. For instance my old style impact tool - the type you hit the end of with a big hammer - has a good selection of bits:
The Vibroshock tool has a standard 3/8 square drive so stick a suitably sized 3/8 impact socket on it (8mm in this case) and you can use the bits from the old hand tool. That's it set up on the left with a cross head driver for doing brake drum retaining screws:
Look just to the right of it and you'll see a 10mm with a Torx bit in it and below it a splined and hex bit. Only your imagination becomes the limiting factor. As to sockets the big problem here is that normal sockets are too deep, the nut, or bolt head, goes right inside the hex of the socket so the vibrations are not transferred to the nut/bolt directly. However look at the two sockets on the right, here's a close up:
Look at the smaller socket - which is the biggest one that comes with the kit - and you can clearly see how shallow the hex is - this is to allow the vibrations to be transmitted into the nut or bolt and not just "wasted" on the surrounding casing (or whatever). However, stick a suitable nut into a standard socket so that it prevents the nut or bolt you are trying to slacken from fully entering the hex section and now the vibration will be transferred to the fixing just as the genuine socket supplied with the tool does it..
If you have a reasonably sized compressor which can drive an air hammer and you're seriously into working on mechanical "stuff" you really have to buy one of these. Maybe get together with a few friends and share the cost and the tool? I absolutely love mine and I'm finding more and more things I can tackle with it. Just remember, it's the vibrations that get the job done. Let it vibrate for as long as needed until the fixing comes undone with only moderate force being needed on the side handle. If you think you're applying enough force to maybe snap the fixing then back off and let it vibrate for a while longer. DON'T get impatient and force it, you can still snap it if you get impatient.


