General Blue Bambino 1969 500F

Currently reading:
General Blue Bambino 1969 500F

Starky

New member
Joined
Jul 23, 2013
Messages
24
Points
7
Hi Everyone

Progress so far on the "Blue Bambino at clearance auction"...
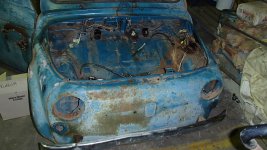
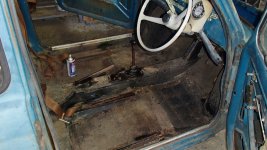
Going well; bagging, tagging & photographing everything.

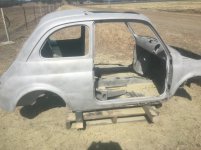
Everything nearly out of the front end. Door cards off, seats out, bonnet off.

Any tips for removing the switches on the dash? Waiting on a key to be cut to get the ignition barrel out, but not sure how to safely remove the switches without damaging them.

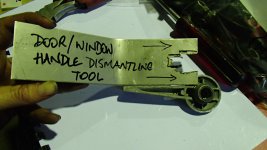
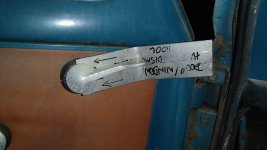
Thought I would also include a shot of the little tool I cut out of a piece of scrap - it's not pretty, but did the trick and got those door handles off very quickly. Might be helpful for future reference.

Cheers
Starky
 

Attachments

  • P3010584.JPG
    P3010584.JPG
    536 KB · Views: 90
  • P3010582.JPG
    P3010582.JPG
    414.3 KB · Views: 80
  • P3010583.JPG
    P3010583.JPG
    417.2 KB · Views: 75
  • P3020591.JPG
    P3020591.JPG
    517.5 KB · Views: 76
PS - Anyone have any suggestions on how to clean a fuel tank? Old fuel inside was still liquid, but smells of varnish (very brown - a bit sticky) and there are white, lumpy deposits on the inside of the tank just under the lid. I have added some new fuel to sit in it for a while to see if that cleans it up a bit.
 
Starky,

There are three parts to this. Dash switches have a chromed knurled ring that you can see from the inside. This is threaded. Behind that is a small aluminium spacer that you can also see. Finally there is the switch itself.

Undo the knurled chrome ring and take it and the ally trim off. The switch can be pulled out from the other side of the dash.

The knurled ring is difficult to grip because of its size, and because time will have fused to the switch body.

I think I used a pair of grips to gently undo the ring. I can take a photo tomorrow if you need.

Regards
 
Thanks guys

Chris, I have done one swish around and 'empty out' with some fresh fuel & now am letting the second lot sit in there to see if it breaks down the old stuff for a couple of weeks.

Joe, I'll give it a go next time I'm with the little car & if I get stuck I'll hit you up for a photo. Everything else with a thread is seized, I suspect the switches will be no different! ;) Sadly work is calling, so they toys have been put away until I get a bit more spare time again. Will keep you posted.

Kind regards
Starky
 
Hi Starky,
Compliments for taking on the challenge of saving another 500 in the land of Oz.
If you can't shift the deposits in the tank you could take it to an engine reconditioner and see if they could put it in their 'hot tank' to clean it out. They use these to clear out internal deposits in oil and water passages prior to rebuilding- it should fit as the whole fuel tank isn't much bigger than some engine blocks!
You might find that the fuel pump will need replacing too due to hardening of the diaphragm but they are quite inexpensive to replace.
I look forward to hearing of your progress!
 
Photos for switches.

First shows the three parts, the smaller ring is the knurled one that holds it all together. You can also see the corrosion on the thread of the switch body that causes the grief. Second photo shows how it goes together. Sorry about the focus and flare, but that's what the camera can do. If you damage either ring, I have spares.

SANY2237.JPG SANY2241.JPG

I'm thinking that for the fuel tank you may be OK. As long as it had something in it and was sealed, the fumes should have kept the rust at bay. Slosing fresh fuel around and draining a couple of times may do the trick. Perhaps if you filter what comes out you may be able to tell how much crap you are dealing with.

Bit of a bugger when you have one of the most economical cars around that you are going to get 0 KM per litre in the first instance.....

Regards

Joe R
 
Thanks Joe, much appreciated.
As for mileage, the little car has averaged 2.5L/0km thus far - an outstanding investment for anyone wanting to save money in challenging economic times. ;)

My 125 tyres have cleared customs, Bill at North Terrace Tyres, South Australia is the man you need to chat to for these - he might be able to sort you for that skinny spare you're chasing.
 
My tank had 5 year old gas in it. Swishing around fresh gas inside did not remove the thick varnish. I put lacquer thinner (same to use to thin automotive paints) inside and that did the job. Completely stripped all the nastiness out.
If you have some small rust inside you can put a short length of steel chain inside the tank and shake that around to remove the loose rust.
John
 
hi starky.
I have had my 500 for just a few weeks now and I need to remove the window winders & door cards. Is there any chance you could elaborate on your clevert tool for removing the winders? (dimensions etc).
Also, is it possible to remove the door cards withour ripping the material?
regards
geoff
 
Hi Geoff

I initially got two pieces of thin gauge scrap and slid them up inside, either side of the handle & the black plastic ring to get the clip out enough to pry it out with a screwdriver. I then used this to draw a template & cut it out. I bent it in the middle to make a bit of a handle & it worked. I can measure next weekend if you like?
As for the door cards, I am not sure - my cards were in such disrepair they fell off! I think I have seen in a manual if you pull out from the middle, bending slightly, slide the top down & out first, and then the bottom, you should hopefully be ok.

Kind regards
Starky
 
Hi Geoff;
Just be carefull when you take the door cards off; the proceedure is as Starky said--all the gubbins off first, gently bend in the middle and then pull out at the top--there are 2 clips holding the middle of the card in place--1 at each end, gently disengage them before, and as, (if that doesn't sound too Irish) you bend the card in the middle. hope this helps---did you see my message regarding an article I found about restoring an Giardy?(y)
 
Gents, I'm back. Not sure if any of you are still on this forum? Turns out I required rebuilding before the Bambino did, a couple of reconstructions and many hours of rehab over the last couple of years. Glad to be back in the garage and functioning again. The Fiat is coming along nicely. Will post some picks to update as soon as I can work out how to do it!
 
Sandblasted today. Let the panel work begin!
 

Attachments

  • IMG_1756.JPG
    IMG_1756.JPG
    568.9 KB · Views: 42
Hi all, jumping on the end of this as I need some tips on how to re-install the door lever and the winder handle (saw this mentioned earlier in the post). Mine is a '72 with the annoying C-shaped retaining clip. Got them off OK last year, but refitting is a pain especially with the plastic bezel in the way. So has anyone got a brilliant tips? :)
Rob
 
Hi Shepster,

from memory, you actually fit the clips onto the handles first and then push them onto the splined shaft. The shaft is slightly chamfered so it forces the clip apart a little, lets the handle slide back on and then locks in place.

Make sure you have the handles at the right inclination when you do this because once they are on they are a bugger to get off again. (as you probably know).

Joe R
 
Last edited:
Back
Top