Technical Bleeding Clutch on 1.9JTD

Currently reading:
Technical Bleeding Clutch on 1.9JTD

glowplug

Member
Joined
Nov 16, 2008
Messages
236
Points
117
Location
Surrey
Greetings all. I have gained much from this forum over the years so feel that its only right to give something back. Here is a tip I discovered (through much trial and error) whilst trying to resolve my clutch not disengaging issues. I read many of the threads on this forum and they all agreed that bleeding was a real PITA with some suggesting raising the front of the car and others saying "just stick at it"

SO in my case I had actually stripped the master cylinder to change the spring and plunger (which I did in situ by taking the bits from a new unit) and I replaced the slave cylinder with an aftermarket metal one with a proper bleed nipple. The above methods were not working well for me so I sat back and analysed the issue. The clutch piping is effectively an upside down U with a good few kinks along the way in which to trap air. The obvious route seemed to start moving the air from as close to the reservoir as possible and then push it through to the egress point at the slave. The problem lies in the fact that the master cylinder is 60 degrees inclined to the north in the car and the slave cylinder is ever slightly nose high on the gearbox.

Therefore to remedy these my recommendation is

1. Get yourself a Gunsons Quick Bleed kit or similar (as suggested on many previous threads)
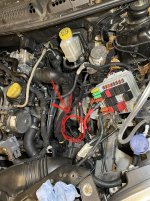
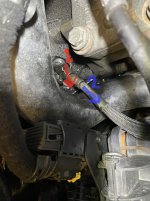
2. Before attaching the bleed kit, loosen the bleed nipple on the bulkhead bleed point which resides on the bulk head behind the battery/EGR valve
3. Raise the left side of the car (not the nose) to a significant height such that the bulkhead bleed point is the highest point AND the back of the slave cylinder is also higher than its front.
4. Armed with a spare BIG foot (e.g. from Wife), a Brick or other similar heavy object push the clutch pedal down and keep it down for the entire operation.
5. Close the bulk head bleed nipple
6. Install the bleed kit, pressurise (observing pressure recommendations - I used the left front wheel as the air source)
7. Once all pressured up, armed with an 8mm spanner and a torch open the bulkhead bleed nipple in 5 second bursts until the brake fluid leaks out smoothly with no evidence of bubbles.
8. Move to the slave cylinder and do the same.
9. Once you are satisfied that all the air is out ensure the bleed nipples are sound (do NOT overtighten) and remove the self bleed kit making sure to de pressurise first.
10. Remove heavy weight from clutch pedal. You will find it stays stuck to the floor. VERY slowly lift it by hand until it is all the way to the top. Then do NOT touch it for at least 2 minutes. At this point it will be drawing in a fresh AIR FREE charge of brake fluid from the reservoir.
11. Lower car and remove jack.

At this stage, assuming you have no other leaks your systems should be air free.

Happy driving
 
Last edited:
Thanks..
Do you have a step by step guide of how to change the innards of the master cylinder?
I have a spare that's been sitting in my garage for over a year...and an annoying clicking pedal
 
I could do one but it would be reinventing the wheel as a few already exist. They are what I digested before undertaking the job myself. Search this forum and here

https://sites.google.com/site/fiatmultipla/Home/repairs

The only additional tips I would give are to use a plastic hook to fish out the broken spring. The inside of the cylinder is metal lined and as such must NOT EVER be scratched. if you use a metal instrument you are bound to scratch it and then you will have to change the whole unit. I used the plastic hook from my sons loom bands kit. It was a bit short so I added a length of plastic rod from one of my RC aircraft to augment the length. A plastic crochet hook would be the ideal thing but alas my wife only has metal ones and additionally was strangely reluctant to let me use one anyway. She suggested I take a sexual excursion when I asked.

If like mine the spring is well and truly compressed at the bottom of the cylinder you may well think it is not there but it is so you need to fish from all angles until you feel a bite and then withdraw slowly, again to mitigate the risk of scratching the bore. My spring was in 3 pieces. To verify you have gotten it all out, assemble it side by side with the new one and ensure the lengths match. You CANNOT look down the bore, forget it, unless you have a head the size of a rat. There simply is not enough room. Push the drivers seat as far back as possible to make your working area tolerable.

To visualise the task at hand I recommend you disassemble your new one carefully first so you can see how it all goes together. MAKE careful note of how the plastic cir-clip comes out and it's orientation. Make sure it goes back in the same way. One side is flat and the other chamfered.

I still need to change my clutch and DMF, both of which I have, but will leave that till the summer now that my car is drivable again.

Best of luck.
 
Last edited:
I have also performed this "operation", and it worked for me, a neat trick avoiding lots of labour, swearing, and valuable time.
I dont remember how cramped it is to look into the bore, even if it would make any difference, but as I have managed before in other confined multipla spaces, I reckon you could use a small mirror and a handy light to see in it, ie if you havent got a "rat head" !!!!!
 
Just reading through this, as I'm doing my Clutch Bleed today.
Which Gunsons kit are we talking about here?

Mine pumps the Fluid through the Reservoir, in which case, this . . .
4. Armed with a spare BIG foot (e.g. from Wife), a Brick or other similar heavy object push the clutch pedal down and keep it down for the entire operation.
. . . wouldn't work.

Anyone used the Reservoir-based kit/method?
 
I only know of one type of Gunsons bleed kit, bottle full of brake fluid connected to a partially inflated tyre at one end and the reservoir at the other. This is exactly what I used. I think you may have missed the point of keeping the pedal down although I did cover the physics of it above. To reiterate the piston at full height within the MC equates to a high point which trap sair that CANNOT be expelled. By keeping the pedal FULLY depressed you have a clean travel of fluid from reservoir to the two bleed points.

1 = The point at the bulk head below the resevoir (the main high point) and the reason I suggested raising the left side of the car, making the high point higher means more air expelled.
2 = The slave cylinder

Once you have purged ALL air through the piping system the MC can now be released and will draw a fresh AND AIR FREE charge of fluid from the resevoir.

Job done.
 
I'll second the use of the Gunsons kit. I bought a cheaper £7 non-return tube and bottle job and tried to pump the air through using the pedal and master cylinder. Not worth the effort in my experience.

Back to the shop... bought the Gunsons kit (it's cheaper on fleabay but I needed it now!).
The pressure kit blew the air out of the system. I had to repeat the process twice so I would suggest balancing the battery in place and testing it all before bolting it back together.

It is working again now... new windscreen tomorrow!

Thanks to all at the Fiat Forum.
Cheers
Steve.
 
. . . think you may have missed the point of keeping the pedal down although I did cover the physics of it above. To reiterate the piston at full height within the MC equates to a high point which trap sair that CANNOT be expelled. By keeping the pedal FULLY depressed you have a clean travel of fluid from reservoir to the two bleed points . . .
That's the bit I disagree with.
If the Pedal is fully down (depressed), then the Piston Seal is beyond the fluid opening from the reservoir, and the bleed points are isolated from the reservoir.
Once the Piston Seal has passed the opening from the Reservoir, then the System is essentially a closed circuit.
If you had a 'clean travel of fluid' from the Reservoir to the bleed points with the Pedal fully down, then you'd have no Clutch movement.
 
Your choice, it worked for me and as you can see above others too.

Good luck
 
Fluid must be being forced past the seal then, what pressure did you use?

Correct,
The seals are cup type so act as one way valves, it only takes a few PSI to "open" them in the reservoir to outlet direction. Remember the OP opened the bulkhead bleed valve before depressing the pedal so there is no pressure on the outlet side of the seal. This is one of the advantages of the pressure bleeding kits, you can put fluid where it normally would not go.


HTH,
Robert G8RPI.
 
As per step 6 in my guide

6. Install the bleed kit, pressurise (observing pressure recommendations - I used the left front wheel as the air source)

So long as WITH the pedal down you get a decent flow of fluid from both the bulkhead and slave cylinder bleed nipples then you have sufficient. NOTE the factory slave cylinder does NOT have a bleed nipple, you need to raise the circlip holding the feed pipe up slightly. However this in itself leads to a similar challenge as with the master cylinder.

In the MC it is slightly raised at the rear. As physics dictates that air rises to the surface, any air contained at this pointed simply cannot be expelled. Hence why I found it necessary to depress and keep depressed the pedal. As g8rpi has stated the seals are cup type with the opening of the cup pointing downward to CUP the fluid and then force it down. In the fully depressed position and with NO pressure in the system (obtained by opening the bleed nipples) the walls of the cups do not have the benefit of hydraulic pressure to keep them rigid. As such any outside force against their walls (from the Gunsons kit) will force them to collapse allowing fluid to flow past.

Now the slave cylinder should ideally have a bleed nipple right at the front nearest the clutch fork not at the rear for the same reason. Any air at the front cannot be purged by a flow of fluid at the rear. It is for this reason that I recommend raising the passengers side of the car as much as possible to try an encourage any air trapped in the slave to rise to the bleed point.

Best of luck.
 
Last edited:
Bled mine last week, from both points, no change, still graunching into reverse.
Took the the Slave Rod out today, drilled both ends, and pushed in an appropriately-sized Mush-Head Rivet into each end, effectively lengthening it by approx 4mm.
No more graunching!

I'm pretty sure my Release Bearing face has worn down prematurely, probably due to my previous experimental mod to the Release Arm (lightly Sprung loaded to keep the bearing in contact with the Clutch Spring).
Will machine up a new Slave Rod now as a temporary fix.
 
Well, the modified Push-rod failed a couple of weeks ago, luckily my Wife was only about a mile from home when it went.
Drove it home sans-Clutch.
At first I was expecting the worst, that the Release Bearing had gone, but it was the Push-rod end that had failed, split open where I'd drilled the end to fit the Rivet.
I made another from a length of 6mm Alloy Tube, again with a mush-head Rivet pressed into each end.

Made it a couple of mm longer again, and it's working great!
Didn't even have to bleed it, I think the fact my Wife pumped the pedal a few times when it initially went may have flushed any remaining air out, that or it's just the longer length that's done it.

I guess I'll have to take a look at the Release Bearing soon though . . .
 
Greetings all. I have gained much from this forum over the years so feel that its only right to give something back…
Thanks for that guide. I had to do this today after my second clutch master cylinder failure. First one wore through the white clip, second one the armature just snapped, leaving me stranded for several hours in -5 weather. Junk parts, FIAT.

Anyway, thought I’d add some pics and tips to fill in some bits I didn’t get from the guide.

1. BUY JUBILEE CLIPS. Unless someone’s taken the coolant system apart before, You won’t be able to disconnect some soft pipes that are in the way without breaking the crappy single use clips that they use in the factory. Also buy tube to fit over the bleed nipple and a plastic bottle to bleed it into. You can’t fit anything under the bleed nipple so I had to just let it spill into a drain pan. Also, a syringe to get excess brake fluid out of the reservoir is handy.

2. When replacing the cylinder, first disconnect the fuel filter and move it aside carefully. I wired it to the frame to keep it upright. Then disconnect the top of the coolant reservoir, unbolt the reservoir and move it aside. You can use the little plastic male plug that comes on the new cylinder to stop the coolant pipe so it doesn’t dump coolant onto your aux belt, or clamp it off. Save the female plastic cap for later.

2a. skip the gym and meals for a couple of weeks prior to starting. Your arms need to shrink down so you can work behind the engine without getting shredded. Also having a small ratchet with a short extension is handy

3. Use the female plastic cap to cap off the brake fluid lines as you disconnect the clutch master cylinder. The first one of these I replaced I didn’t even have to bleed the system after. The second one I knocked one of the caps off without noticing, drained the reservoir completely.

4. If you also derped air into your system, follow instructions in the first post. the bleed valve is on the clutch slave cylinder. To get at it you have to remove the battery bay (see pics). Careful not to snap the thin wires on the fusebox while removing it. Push the wire clip down (careful not to bend it) and pull the fluid line out a little way. It’s captive so shouldn’t come all the way out, but fluid will start leaking from the nipple.

5. The kit tells you to use a tyre as a pressure source for the bleeder. if you’re stupid like me, you may forget the fuel filter is disconnected. If this is the case, turning the ignition to run a 12v pump may cause diesel to spray all over your headlights. This is not ideal. Electrical contact cleaner is recommended, as is paying bloody attention.

6. remember to reinflate your tyre before you let the car back down. Remember the pressure will be lower because it’s off the ground.
 

Attachments

  • 4320BD96-9E2A-45C5-AA06-198865194CF1.jpeg
    4320BD96-9E2A-45C5-AA06-198865194CF1.jpeg
    1.1 MB · Views: 24
  • A428583A-7799-4A31-83E0-F3CFC9E7FEE7.jpeg
    A428583A-7799-4A31-83E0-F3CFC9E7FEE7.jpeg
    789 KB · Views: 39
Back
Top