Wiltshire Chris
Accidental Barchetta owner
I've long known that I'm missing a trim clip on my B-pillar which slightly bugs me

I recently got hold of a few B parts and buried in there I found a spare clip

Sadly it's little legs were too weak to clip it back in, gluing them back did no good whatsoever. A sensible person would just stick it on with blu-tack or something else but with too much time on my hands and a 3D printer I turned to my favourite hobby of over complicating things.
Firstly I tried making a piece with new little legs that could either glue to the back of the trim piece or replace it entirely (I haven't got any black 3D printer filament at the moment so it had to be blue):


Rubbish, it's legs were too brittle as were a couple of variants I tested, basically falling down the path of it's thin enough to bend in it's thin enough to snap easily.
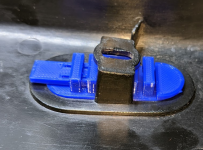
Next up was an idea inspired by seeing a pen on my desk. Basically making a little sprung loaded catch:

It ended up too deep and fouled the bracket so I sanded bits off. I think I could have made this work but came up with my final idea. A sliding bolt with it's own spring catch:

One end of the piece has a flange that hooks over one end of the trim while the bolt slides inside the back. You can move the bolt by putting something small and pointy through the slot in the trim to slide it along. The little blobs on the side of the bolt engage in the slots on the length of the bolt sleeve to keep it in place. It can be printed as either the whole piece or just something to glue to the back of a piece of FIAT trim. Here is me using a pointy thing to slide the bolt in:

I think with some light sanding and some spray paint it would look OK in the car but I'll be using the version that glues to the piece of broken trim.
And here's what the back looks like with the bolt engaged:

The OpenSCAD file I used to create the piece is here https://github.com/OldBoyCoder/Barchetta-B-pillar-trim in case anyone else is interesed in trying it out. For me it was a useful real project to stretch my brain learning the OpenSCAD design tool my son had put me on to. It had the beneficial side effect of making my car look a bit better.
If anyone has other ideas for fixing these clips I'd be keen to hear (or just tell me you can buy them for pennies from somewhere!). My next 3D printing project is to make a piece that clips into the roof rail instead of the interior light and holds a small GPS speedometer as my speedo is annoyingly inaccurate, more over-complicating things awaits!
Lastly, here's a pile of some of the failed prototypes to show how many times it didn't work:

If anyone wants me to print one off I'm sure I can oblige.
I recently got hold of a few B parts and buried in there I found a spare clip
Sadly it's little legs were too weak to clip it back in, gluing them back did no good whatsoever. A sensible person would just stick it on with blu-tack or something else but with too much time on my hands and a 3D printer I turned to my favourite hobby of over complicating things.
Firstly I tried making a piece with new little legs that could either glue to the back of the trim piece or replace it entirely (I haven't got any black 3D printer filament at the moment so it had to be blue):
Rubbish, it's legs were too brittle as were a couple of variants I tested, basically falling down the path of it's thin enough to bend in it's thin enough to snap easily.
Next up was an idea inspired by seeing a pen on my desk. Basically making a little sprung loaded catch:
It ended up too deep and fouled the bracket so I sanded bits off. I think I could have made this work but came up with my final idea. A sliding bolt with it's own spring catch:
One end of the piece has a flange that hooks over one end of the trim while the bolt slides inside the back. You can move the bolt by putting something small and pointy through the slot in the trim to slide it along. The little blobs on the side of the bolt engage in the slots on the length of the bolt sleeve to keep it in place. It can be printed as either the whole piece or just something to glue to the back of a piece of FIAT trim. Here is me using a pointy thing to slide the bolt in:
I think with some light sanding and some spray paint it would look OK in the car but I'll be using the version that glues to the piece of broken trim.
And here's what the back looks like with the bolt engaged:
The OpenSCAD file I used to create the piece is here https://github.com/OldBoyCoder/Barchetta-B-pillar-trim in case anyone else is interesed in trying it out. For me it was a useful real project to stretch my brain learning the OpenSCAD design tool my son had put me on to. It had the beneficial side effect of making my car look a bit better.
If anyone has other ideas for fixing these clips I'd be keen to hear (or just tell me you can buy them for pennies from somewhere!). My next 3D printing project is to make a piece that clips into the roof rail instead of the interior light and holds a small GPS speedometer as my speedo is annoyingly inaccurate, more over-complicating things awaits!
Lastly, here's a pile of some of the failed prototypes to show how many times it didn't work:
If anyone wants me to print one off I'm sure I can oblige.