Technical Alternato & A.C. Blower Fan of Linea T-Jet

Currently reading:
Technical Alternato & A.C. Blower Fan of Linea T-Jet

Navin Talati

Member
Joined
Oct 23, 2006
Messages
106
Points
97
Friends,
My car is Linea T-Jet 1.4 L Emotion model (F.L.India 2014).
Unfortunately my linea T-Jet submerged into the flood water up to the dashboard's lower level. I am trying to revive it. after complete drying it started and mostly gives all equipment and instruments working response. I found mainly TWO faults:

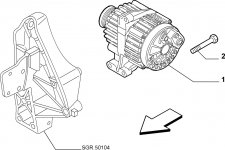
1. The battery is not getting charged. While engine ON, the terminals at battery must show about 14.5 V. But it shows just that of the battery (12.3 V or whatever it has remain) So I am unable to drive it. After starting the engine it must remain ON if I detach a negative terminal of the battery. But the engine gets OFF. Continuity of the connection from alternator to battery is ok. So I suspect the ALTERNATOR and I must repair or replace the same.

2. The A.C. blower fan is also jammed and hence must repair or replace.

So what I need as guidance are:

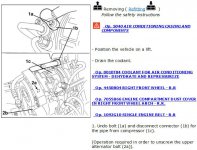
(A). How to replace the ALTERNATOR. For that how should I proceed in the procedure. for this should I have to remove the drive-shaft / axle?
(B). How to check and repair the Alternator.
(C). I could remove the A.C. blower fan but how to repair it?
(D). What other precautions and checks I need take while repairing.
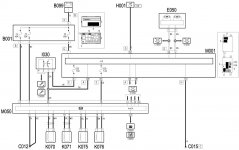
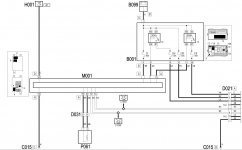
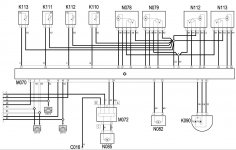
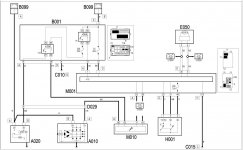
(F). Electrical Circuits for ABS and AIR-BAG for the Linea T-Jet 1.4 L Emotion is also requested as it shows the error.

Regards to all in anticipation.

Navin Talati / 01-08-2018
 
Hi Navin,

first I guess you posted this on the Grande section since the Linea is very similar to it, right ?

If so and have A/C, be aware that you'll have to empty it (disconnect pipe) in order to access one of the alternator bolts… and maybe the driver's side shaft if you need to catch the alternator from below (not sure tho).

It seems pretty obvious that water is the main cause of those malfunctions ! Automatic A/C doesn't use the typical resistor plug configuration as fan speed selector but an electronic module (M072 on the drawing) instead so it might haven't been enough just to let it dry …

As a general rule, you should open every electrical connection and check for moisture/corrosion and cure it if found any.

Here are some Drawings, they're from GPs so don't blame me if they Don't match your car's …

BRs, Bernie

If someone here helped You fix -or better, understand- your issue, hit the thanks icon @ bottom right corner, it's free and makes us feel helpy ;-)
 

Attachments

  • Start-charge punto wiring.JPG
    Start-charge punto wiring.JPG
    104.8 KB · Views: 354
  • ABS Wiring.JPG
    ABS Wiring.JPG
    99 KB · Views: 274
  • AC auto part1.JPG
    AC auto part1.JPG
    86 KB · Views: 121
  • AC auto part2.JPG
    AC auto part2.JPG
    111.6 KB · Views: 452
Last edited:
Dear Bernie
The technician was telling that the removing the driver side shaft will be sufficient to remove the alternator. A.C. detachment will not be required.
Will it do ?
Navin
 
Not sure, have a look at the drawing if your engine looks like this I'm afraid you'll have to drain the A/C …

BRs, Bernie

If someone here helped You fix -or better, understand- your issue, hit the thanks icon @ bottom right corner, it's free and makes us feel helpy ;-)
 

Attachments

  • TJet alt rem.JPG
    TJet alt rem.JPG
    83.7 KB · Views: 117
Let me add some images/pictures for further visual ideas to the viewing people:
 

Attachments

  • Alternetor & Mounting.jpg
    Alternetor & Mounting.jpg
    160.8 KB · Views: 272
  • A. C. COMPRESSOR.jpg
    A. C. COMPRESSOR.jpg
    120 KB · Views: 127
  • 20180721_172419.jpg
    20180721_172419.jpg
    1.7 MB · Views: 77
  • 20180721_172411.jpg
    20180721_172411.jpg
    1.7 MB · Views: 96
Finally i could Replace the Alternator and A.C.Blower fan in the linea. But unfortunately a NEW ISSUE arised. Let me first update the replacements for every body's interest and then show you the issue.

(1).
Blower fan replacement is very simple. just remove the glow box and it could be replaced. It work fine. If front seat is removed, it will be much more convenient to work.

(2).
To replace the Alternator some obstacles are required to be cleared from the working area and path. These are as under:

a).
Remove the driver side wheel , hub-nut,(36mm) and make the axle end free from the nuckel. take care of the ABS sensor and Brake fluid tubes. Drain the Gearbox oil from the gear casing.
b)
.On the drive shaft mount, there are THREE 10mm bolts. Remove them and pull the shaft outward carefully. Soft hammering may require to push the shaft outward. The bearing part fixed on the shaft will come out from the mount and the inner-end of shaft will come out from the differential. remoce the rubber protection and pull the shaft out of the mount.


c)
.Remove the Mount which is mounted/fitted on the engine body with FOUR bolts 13 mm. Upper Two are longer then the lower Two. There are Two dowel pins in cross to fix the mount properly.
d).
Belt tensioner is to be pulled clockwise and it could be locked by a star élan-key of T15 number through a hole in the upper pulley-shaped part above the tensioner pulley. Remove the belt from the alternator.
e).
Alternator is mounted through TRHEE 13 mm bolts in which TWO dowel pins are fitted. TWO bolts re at the lower side (base of the alternator) and could easily be removed by 13 mm small ratchet or ring spanner. The third ONE bolt can not be seen easily and normally but it is at the top and physically using figure, you have to assess and set a 13 mm tube-spanner or appropriate ratchet (this is a little pains taking job). Then carefully remove it. Keep some support to prevent the drop-down of the article. Also you have to disconnect the TWO wire connections. Remove the Plastic cover on connection side.
f).
Clear the path as well as working area and carefully remove the alternator out by appropriately adjusting it through the space and gaps available.
g).
Mounted the NEW ALTERNATOR in the reverse way. Keeping i9n the Neutral gear, its working is checked and found the it shows about 14 Volts when the engine is running. So it is ok.

Now a NEW ISSUE arised as under which is quite a new and very surprising to me. I direly need the solution of it in EMERGENCY basis.

PROBLEM:
When I re-install the shaft, hub, hub-nut and wheel etc., I found that the front wheels are rotating in OPPOSIT direction. i.e. After engaging the car in gear, if I rotate the driver side front wheel in Clock-wise direction, the opposite passenger side front wheel rotates in Anti-clock wise direction. Both wheels are UP (car mounted on TWO stand-jacks, and engine is off.)

How this has happened and what is the solution for this?

Navin Talati
04-09-2018
 
This is absolutely NORMAL behavior with both wheels lifterd and due to the differential action …
NO new issue there !!

BRs, Bernie

If someone here helped You fix -or better, understand- your issue, hit the thanks icon @ bottom right corner, it's free and makes us feel helpy ;-)
 
Hi Navin,

the starter "puller" is activated by a relay in the connection box (engine bay) and is fuse protected; I'd have a look at those before further investigation …


BRs, Bernie

If someone here helped You fix -or better, understand- your issue, hit the thanks icon @ bottom right corner, it's free and makes us feel helpy ;-)
 

Attachments

  • Start-charge punto wiring.JPG
    Start-charge punto wiring.JPG
    104.8 KB · Views: 281
Sir,

The circuit in #9 is different and the Fuses and Relays are not matching with that of mine. Here I am attaching a circuit which is matching with that of my Linea.

I have checked all fuses and relays on the engine bay - every thing is ok.
I have also checked continuity of the battery wires to earth on gearbox, connected to alternator and starter motor. etc.
key on MAR gives power to all other devices to function.

Could this starting problem may happen due to the tilted position of the car? (as it is front side is still supported on stand-jacks keeping both the front wheels up)

May there be any sensor which may cause this problem?
 

Attachments

  • Fiat Linea Electronics - Start-up Circuit..pdf
    42.4 KB · Views: 39
  • Starter Problems 2006 to 2011 Fiat Doblo Diesel.pdf
    202.8 KB · Views: 67
Back
Top