

Right heres my best attempt of a guide to fitting a bluetooth handsfree kit to a blaupunkt OEM head unit.
The first thing to do is you have to wire the car kit up to the battery, pop the bonnet and locate the black plastic mesh in the top right corner under the windscreen.

Now you have to remove the rubber strip from the edge of the panel and remove the foam insert that qoes under the wing. now you can undo the 2 screws that hold it down, and pull the panel upwards (but not fully off).
Once you have sorted the plastic panel out, its time to run the wire through the rubber grommet in the bulkhead, you will need a peice of wire to do this (wire coat hanger is perfect).

Feed the wire through the grommet, open the glovebox and locate the wire. Now all you need to do is tape the power leads to the wire and slowley pull it back through the grommet.
Once you have pulled the wire through you can feed the power lead around to the battery, connect the round spade connectors to the end of each wire and attach to the "-" and "+" terminal on the battery.


Now on to positioning the mic, place the mic unit just above the plastic strip next to the front drivers door pillar, and run the mic wire down the door tucking it into the rubber seal as you go. Once at the footwell, remove the plastic panel just right of the steering rack. Feed the mic wire under the dash tucking the wire inside the groove inbetween the top and bottom part of the dash and cabel tie to the metal plate behind the diagnostic socket.

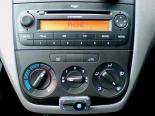
Now remove the head unit as it states in the manual, and unplug the connecters (THIS MIGHT APPLY TO YOU - MAKE SURE YOU HAVE THE CODE BEFORE UNPLUGGING THE RADIO)
Now with the same peice of wire you used with the grommet, feed this behind the dash so you can locate it via the hole in the dash where the panel was, Tape the mic wire and slowly pull it round the back of the steering coloum and out the hole where the radio should be.
Run the power wire through the hole where the radio should be. You will need to unscrew the radio cage and unscrew the the torx screws that hold the heater cluster, remove the radio cage and gently push the top of the heater cluster, and it should flex back (your own risk). Through the gap at the bottom feed the wire for the remote through and pull round the top of the heater controls.

Now your ready to screw the heater control back.
This next step I had to do as the proper connecter that you use had not come through the post at this point. Once the connecter is here I will try to update with the final step, or if you want to use the step below entirly up to yourself.
Take the speaker that came with the car kit and chop the wire about 1 inch from the speaker back, strip about 5mm of the plastic coating from the Speaker "-" and "+" wires, the Yellow mute wire and the Blue ignition sence wire, and attach four small female spade connectors by crimping them to the wire. Cover any bare wire with either electrical tape or heat shrink tubing.
Re atach the radio cage to the dash, and pull the wires through the cage.
Atach the yellow mute cable to the pin coulored yellow on the pic below, the blue ignation sence wire to the blue coloured pin, and the black/white speaker wire to the "AF+" pin, and the black speaker wire to the "AF-" pin.


Now plug all the connecters into the bluetooth control box, and push it back through the cage opening and let it rest below the radio, tidy all the wire's up with cable ties, put the radio back in, stick the remote to the heater console just below the dials. and turn the ignition on, and yr ready to go.

This takes about 2-3hrs depending on how well you cope with this guide")
The first thing to do is you have to wire the car kit up to the battery, pop the bonnet and locate the black plastic mesh in the top right corner under the windscreen.
Now you have to remove the rubber strip from the edge of the panel and remove the foam insert that qoes under the wing. now you can undo the 2 screws that hold it down, and pull the panel upwards (but not fully off).
Once you have sorted the plastic panel out, its time to run the wire through the rubber grommet in the bulkhead, you will need a peice of wire to do this (wire coat hanger is perfect).
Feed the wire through the grommet, open the glovebox and locate the wire. Now all you need to do is tape the power leads to the wire and slowley pull it back through the grommet.
Once you have pulled the wire through you can feed the power lead around to the battery, connect the round spade connectors to the end of each wire and attach to the "-" and "+" terminal on the battery.
Now on to positioning the mic, place the mic unit just above the plastic strip next to the front drivers door pillar, and run the mic wire down the door tucking it into the rubber seal as you go. Once at the footwell, remove the plastic panel just right of the steering rack. Feed the mic wire under the dash tucking the wire inside the groove inbetween the top and bottom part of the dash and cabel tie to the metal plate behind the diagnostic socket.
Now remove the head unit as it states in the manual, and unplug the connecters (THIS MIGHT APPLY TO YOU - MAKE SURE YOU HAVE THE CODE BEFORE UNPLUGGING THE RADIO)
Now with the same peice of wire you used with the grommet, feed this behind the dash so you can locate it via the hole in the dash where the panel was, Tape the mic wire and slowly pull it round the back of the steering coloum and out the hole where the radio should be.
Run the power wire through the hole where the radio should be. You will need to unscrew the radio cage and unscrew the the torx screws that hold the heater cluster, remove the radio cage and gently push the top of the heater cluster, and it should flex back (your own risk). Through the gap at the bottom feed the wire for the remote through and pull round the top of the heater controls.
Now your ready to screw the heater control back.
This next step I had to do as the proper connecter that you use had not come through the post at this point. Once the connecter is here I will try to update with the final step, or if you want to use the step below entirly up to yourself.
Take the speaker that came with the car kit and chop the wire about 1 inch from the speaker back, strip about 5mm of the plastic coating from the Speaker "-" and "+" wires, the Yellow mute wire and the Blue ignition sence wire, and attach four small female spade connectors by crimping them to the wire. Cover any bare wire with either electrical tape or heat shrink tubing.
Re atach the radio cage to the dash, and pull the wires through the cage.
Atach the yellow mute cable to the pin coulored yellow on the pic below, the blue ignation sence wire to the blue coloured pin, and the black/white speaker wire to the "AF+" pin, and the black speaker wire to the "AF-" pin.
Now plug all the connecters into the bluetooth control box, and push it back through the cage opening and let it rest below the radio, tidy all the wire's up with cable ties, put the radio back in, stick the remote to the heater console just below the dials. and turn the ignition on, and yr ready to go.
This takes about 2-3hrs depending on how well you cope with this guide